|
This post will guide you on how to use the Lonsdor K518PRO Programmer to modify and convert the LT-Series smart key Button Function.
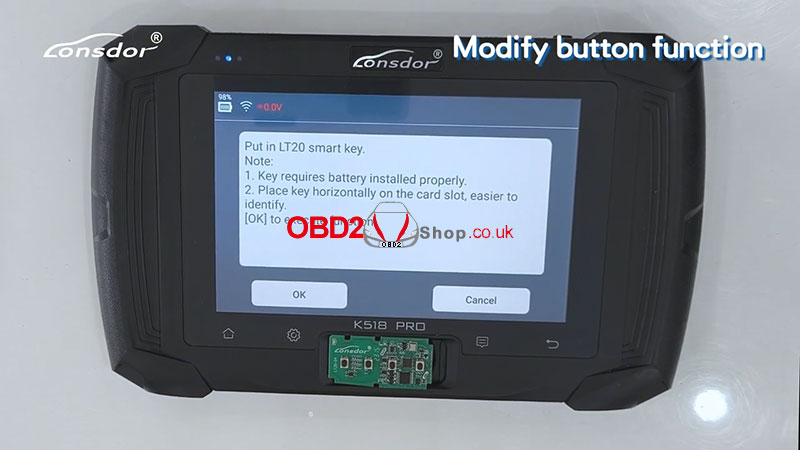
The tools we need: K518 PRO LT-Series Smart key Procedure: Part 1. Modify LT-Series Button Function Take LT20-04 as an example. Choose [Special functions]>>[Key settings]>>[Lt smart key]>>[Read/Modify button function] Put in LT20 smart key. Please Note: 1. The key requires the battery installed properly. 2. Place the key horizontally on the card slot, easier to identify. Click [OK] to continue. 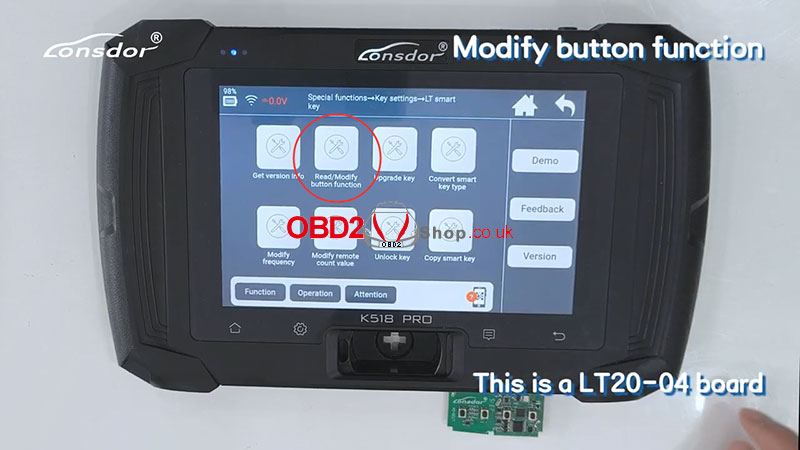
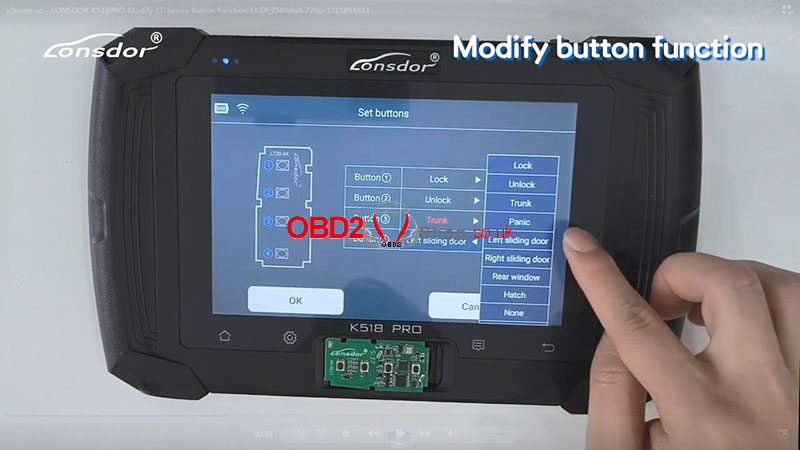
Then we set the buttons, as shown in the figure below, we set Button ③ from "Rear window" to "Trunk".
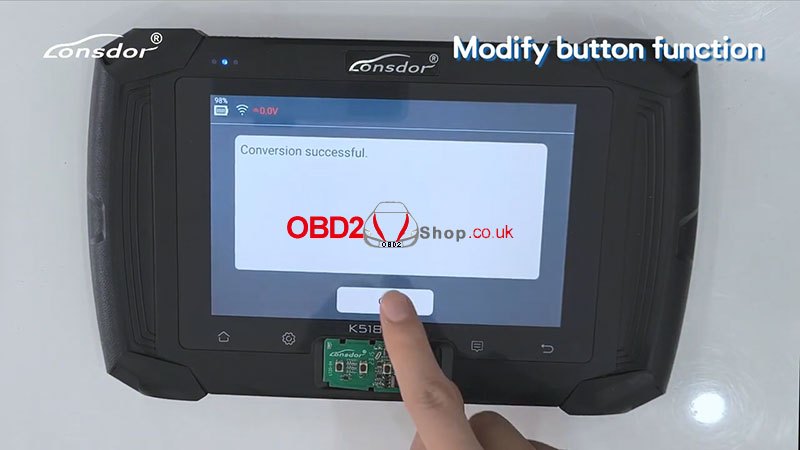
Set Button ④ from "Left sliding door" to "Panic". Click [OK] to continue. Conversion is successful. 
Then we return to the previous interface and select [Read/Modify button function] again to check.
As shown in the figure, the previously set information has been successfully saved. 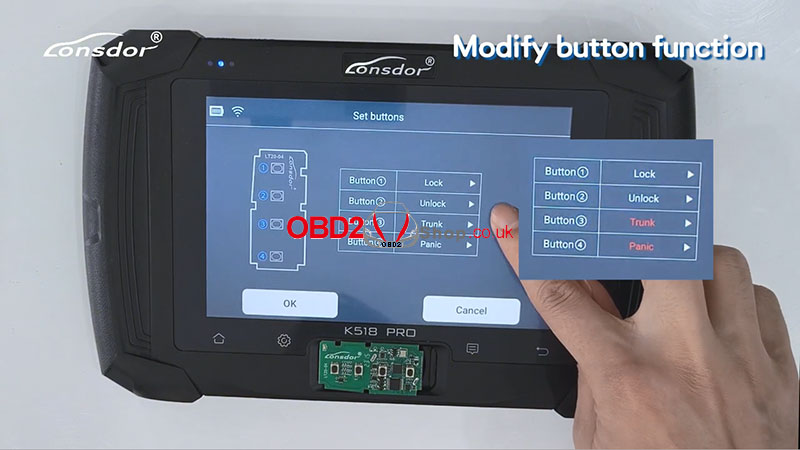
Part 2. Convert LT-Series Button Function
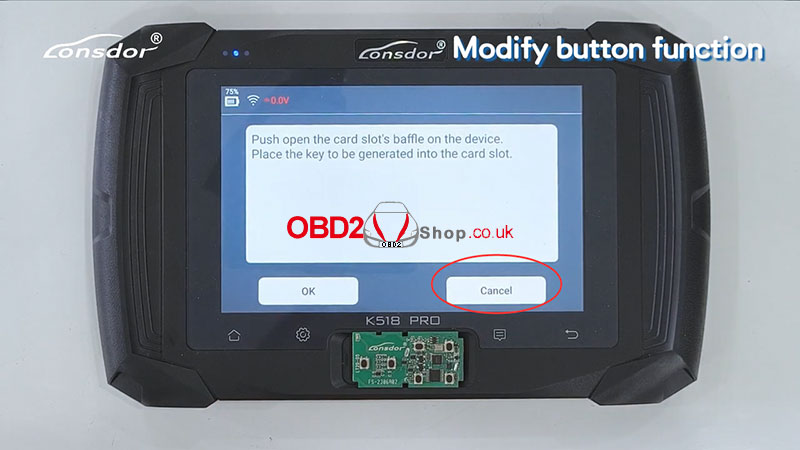
Take LT20-06 6 buttons as an example. Choose [Special functions]>>[Key settings]>>[Lt smart key]>>[Convert smart key type]. This function requires an internet connection. Push open the card slot's baffle on the device. Place the key to be generated into the card slot. 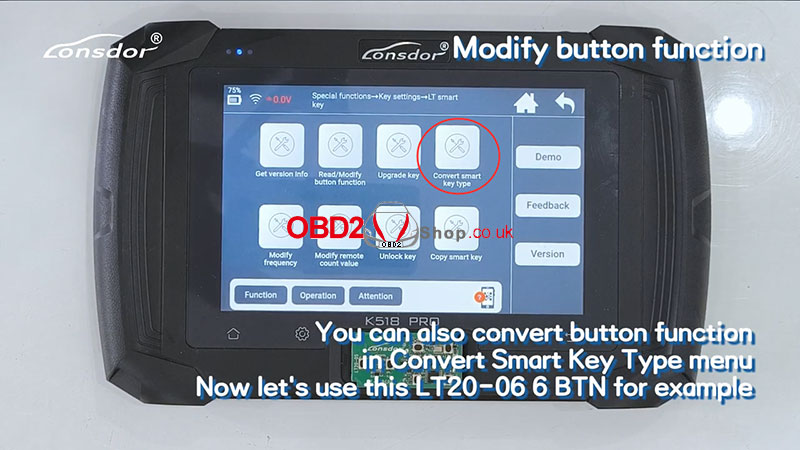
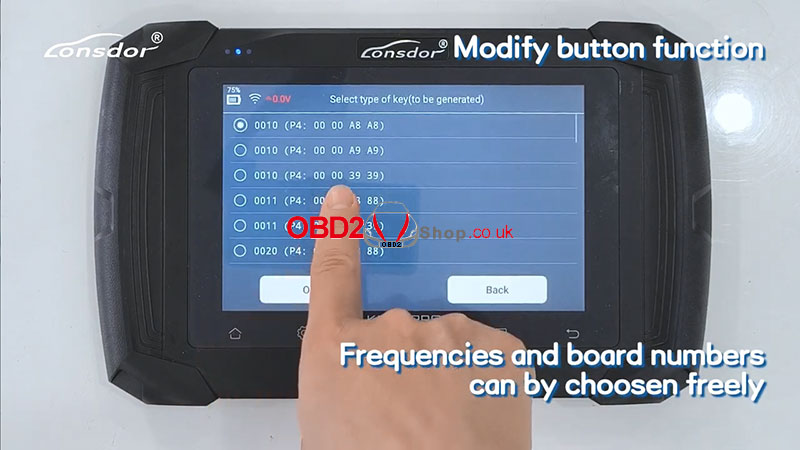
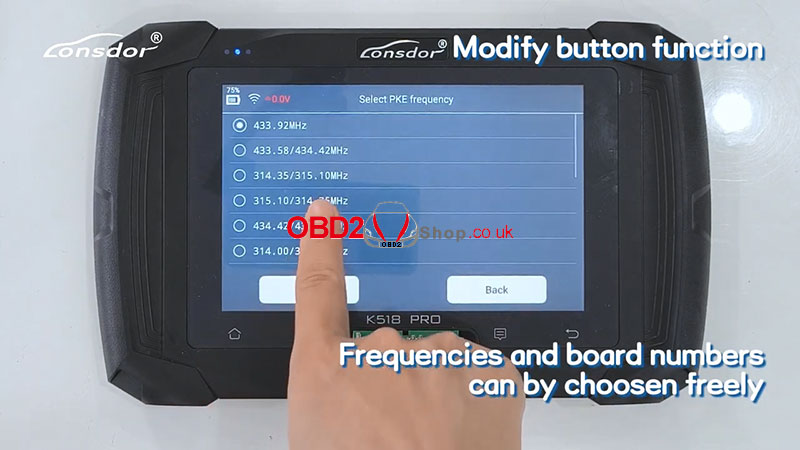
Choose [By selecting key type] >> [Generate 8A]
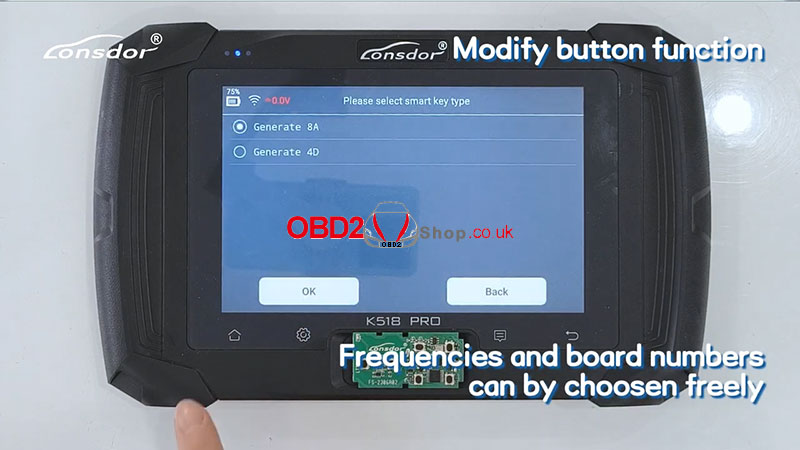
Frequencies and board numbers can be chosen freely. 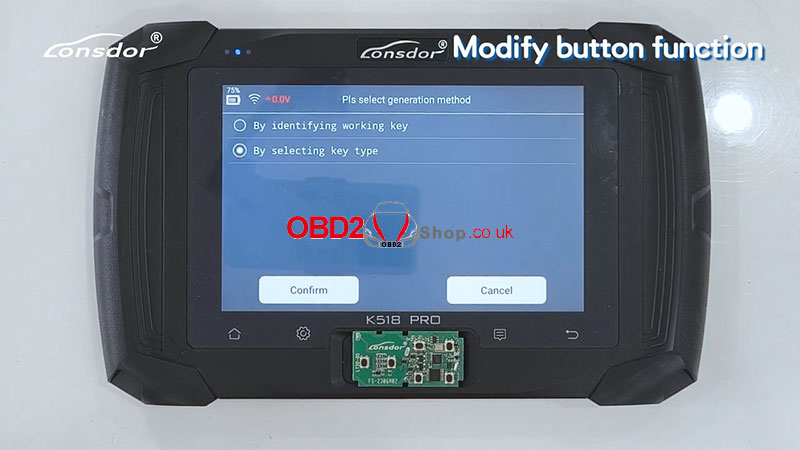
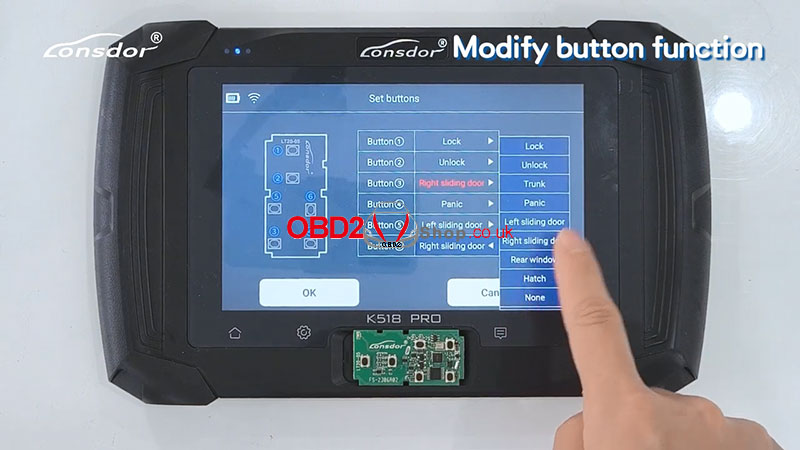
Then we set the buttons, as shown in the figure below, we set Button ③ from "Hatch" to "Right sliding door".
Set Button ⑥ from "Right sliding door" to "Hatch". Click [OK] to continue. Generation successful. 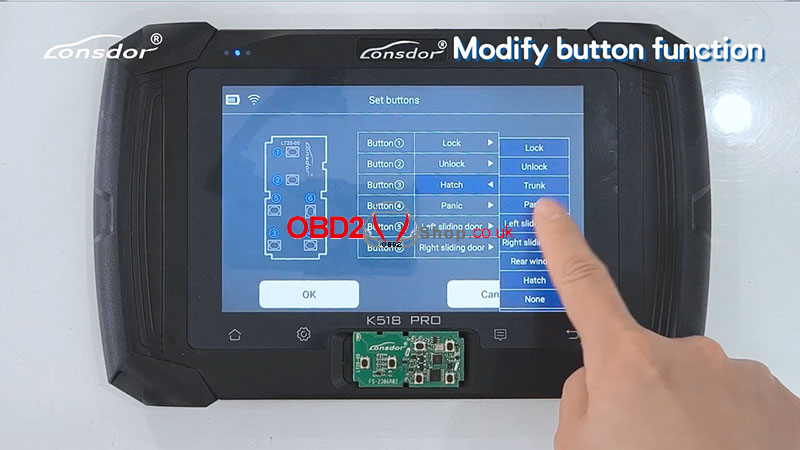
Then we return to the previous interface and select [Read/Modify button function] to check.
As shown in the figure, the functions of Button ③ and Button ⑥ were successfully converted. 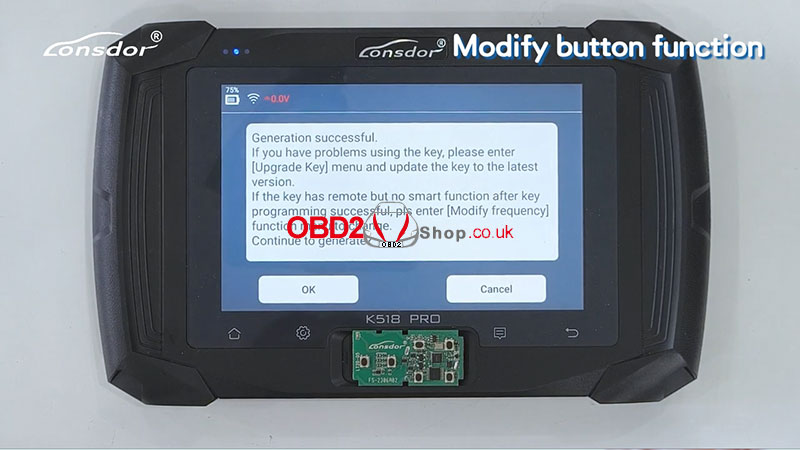
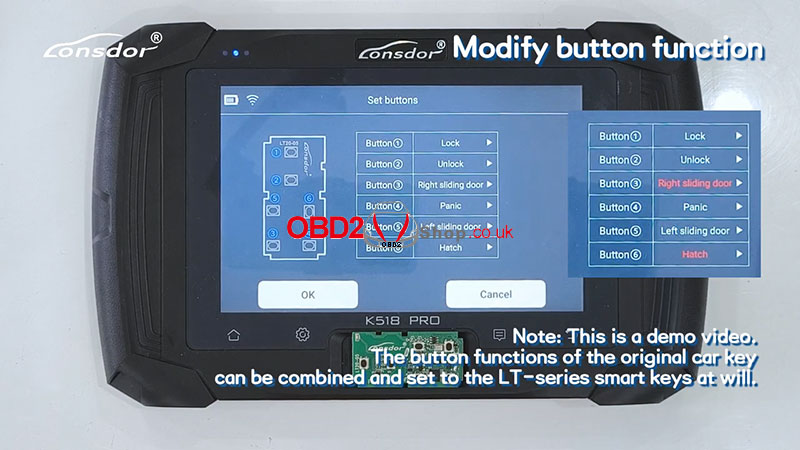
Note: The button functions of the original car key can be combined and set to the LT-series smart keys at will.
Video guides:
0 Comments
Now I'm working on a 2014 Toyota RAV4 with all keys lost. Next, I'm gonna use the Autel MaxiIM IM608 PRO II to program a new blade key for this car. IMMO >> Auto VIN >> Toyota >> OK >> OK >> Control unit >> Immobilizer(H 8A/8E) >> Immobilizer reset(all keys lost) This function is only supported for the Middle East and the USA now. 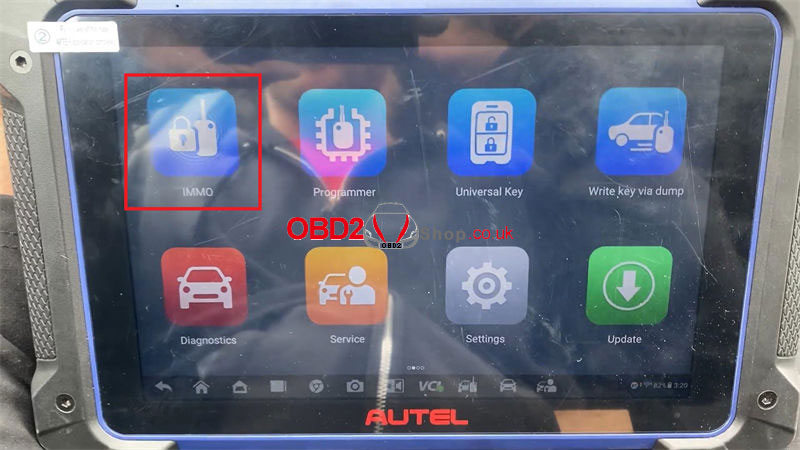 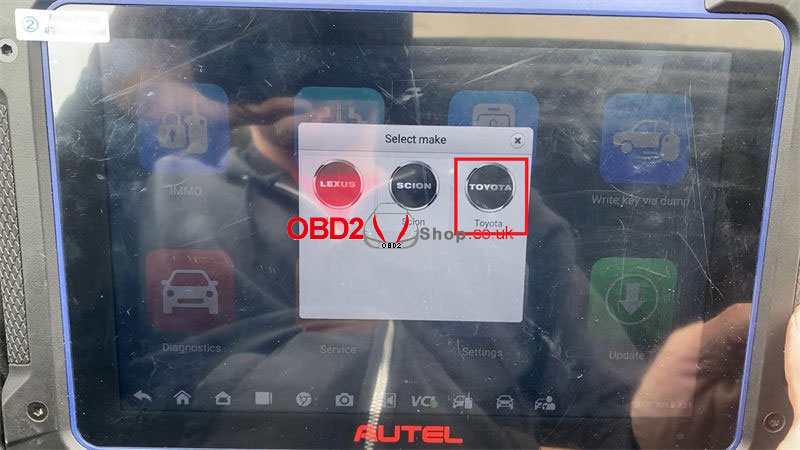 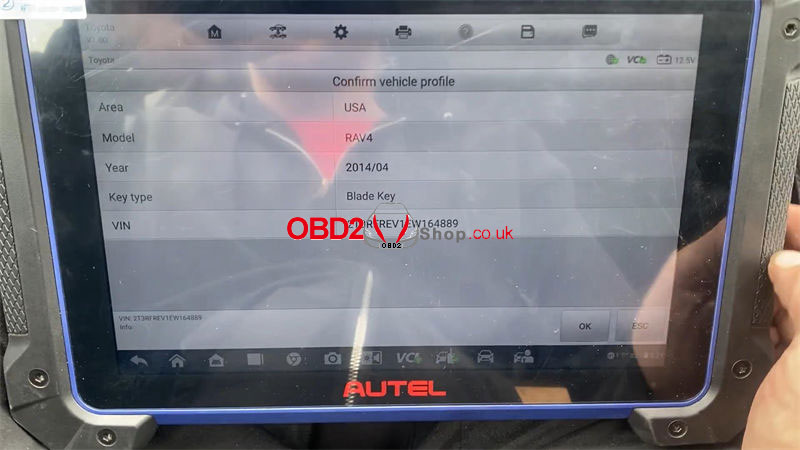 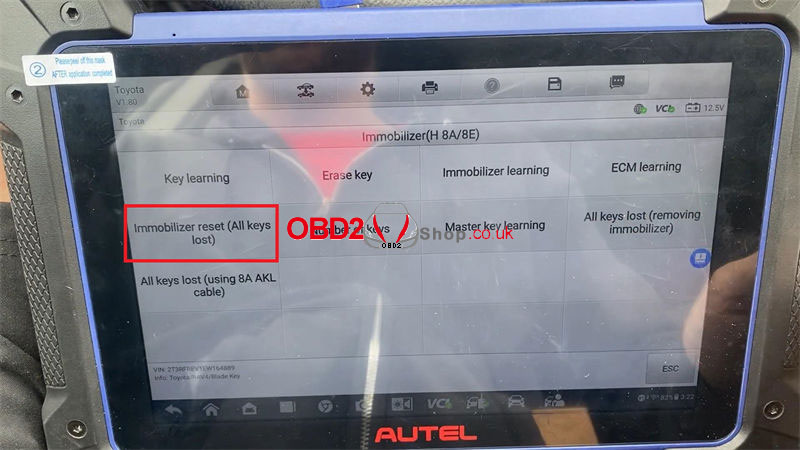 Ensure that the door remains open during the learning process. Enter the number of keys to be registered: 1 Turn the ignition off. Turn the ignition on. Turn the ignition off and remove the key. Turn the ignition on. Turn the ignition off and remove the key. Follow the following steps to learn 1 master key within 120s: 1)Insert the master key, turn the ignition on, and wait for 5s. Then quickly turn the ignition on and back off 5 times until the SECURITY lamp goes out, which indicates that learning is completed. Test the new key, it can start the engine normally. Done. This is using Autel IM608 Pro2 to program the 2014 Toyota RAV4 with all keys lost successfully. 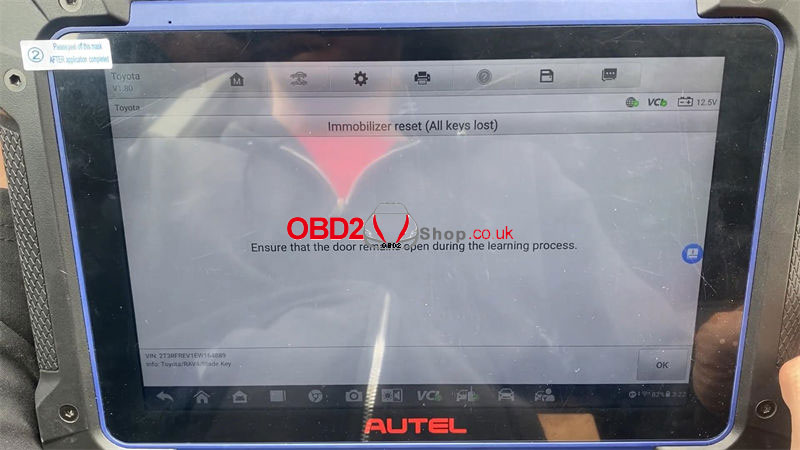 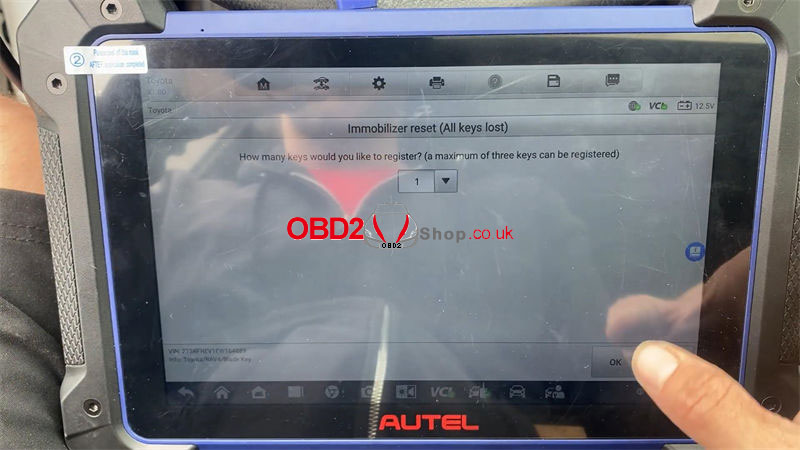 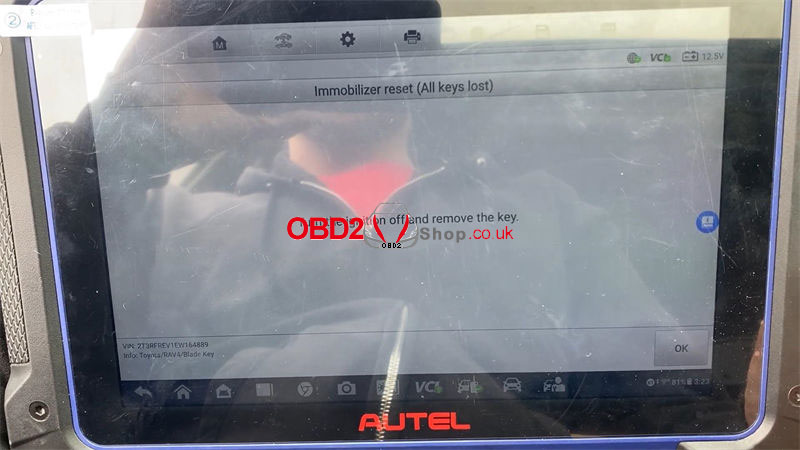 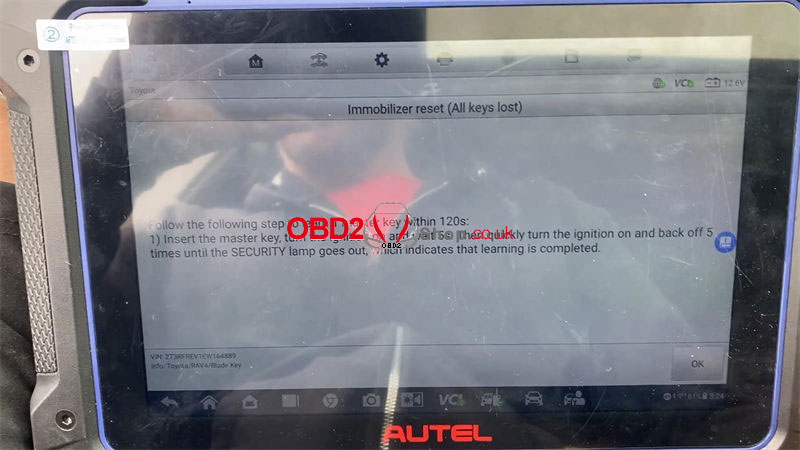 
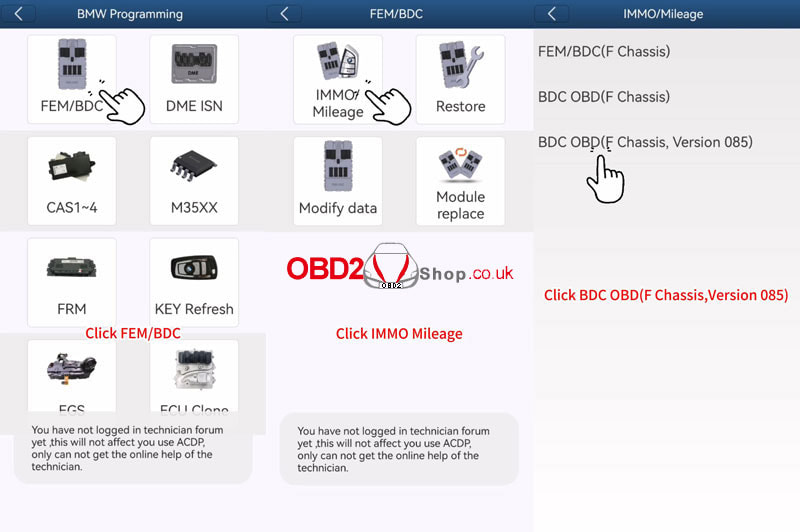
This is a tutorial on how to use Yanhua Mini ACDP 2 + Module 31 to add keys for the BMW F chassis BDC 085 version via OBD(DoIP method).
Check the video for full operation:
Procedure:
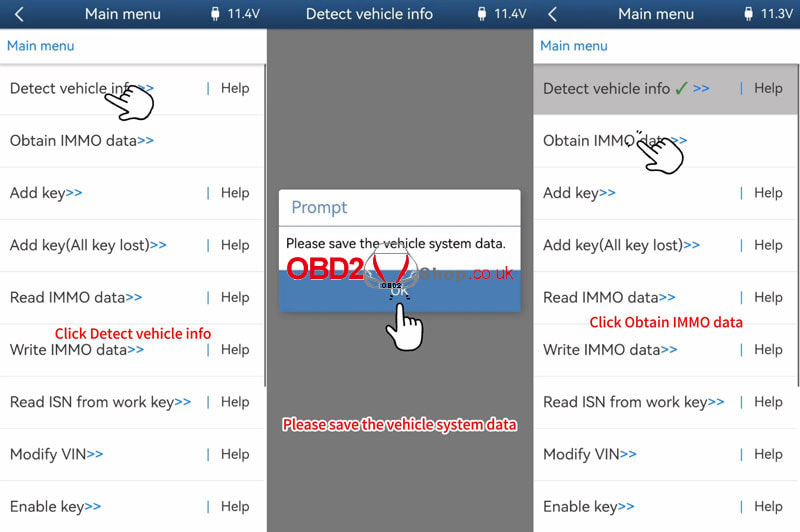
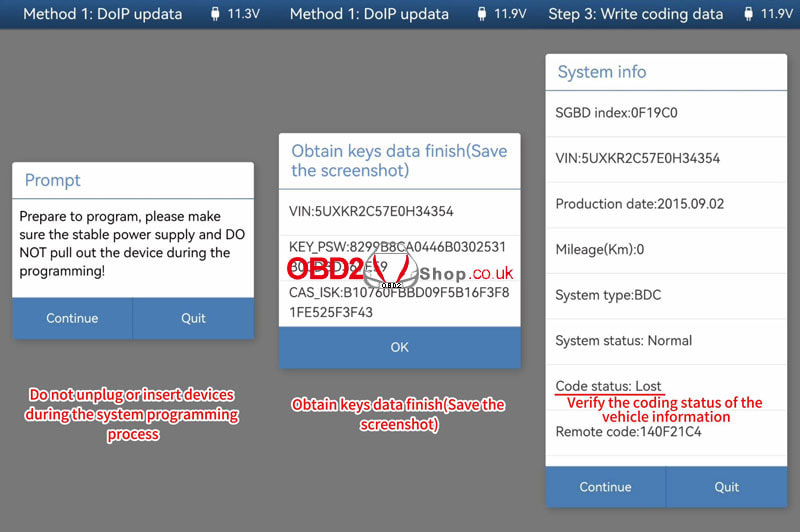
Connect Mini ACDP & OBDII interfaces with Module 31 DoIP adapter. Open the Mini ACDP app. The device number displayed in the top right corner indicates successfully connected. BMW >> FEM/BDC >> IMMO/Mileage >> BDC OBD(F chassis, Version 085) >> Detect vehicle info Please use the ACDP standard power adapter(voltage+12V, current >= 2.5A) Connect ACDP with vehicle OBDII port! Please save the vehicle system data. Check vehicle info is normal. Identify vehicle info finish. 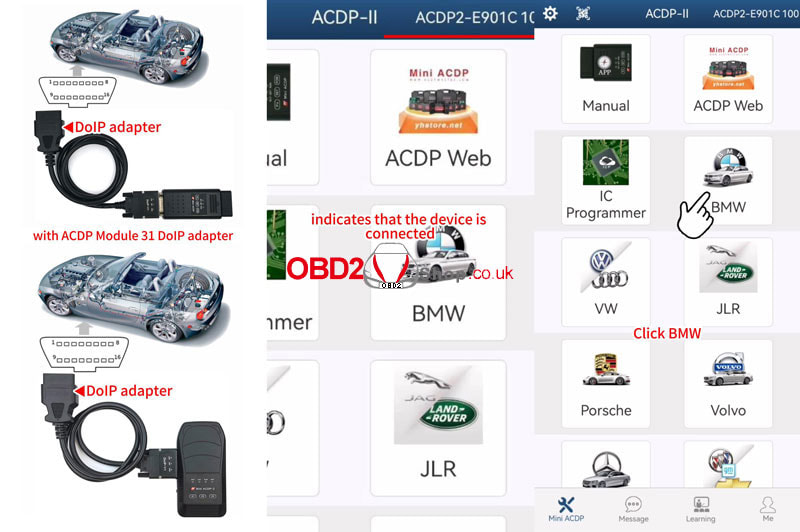
Obtain IMMO data >> Read coding data >> OK
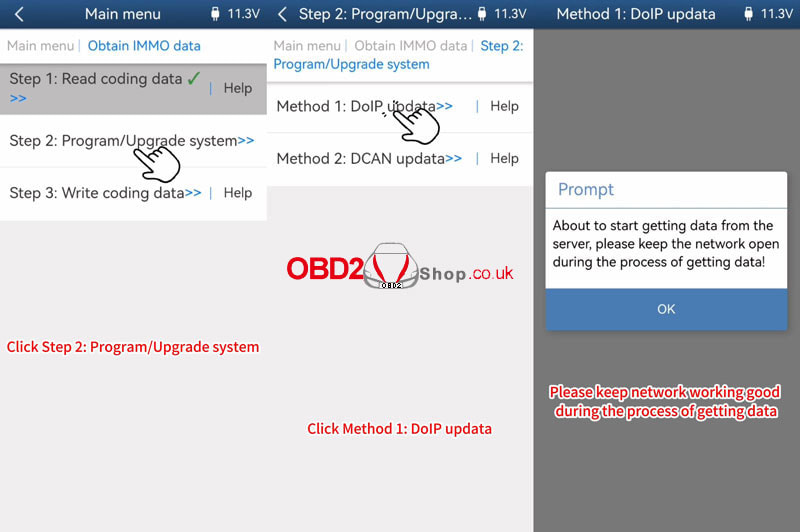
Connect ACDP with vehicle OBDII port! Check vehicle info is normal. Please save coding data. Read coding data finish. Program/Upgrade system >> DoIP update >> OK >> Continue Please save the vehicle system data. The backup file succeeded. Check vehicle info is normal. About to start getting data from the server, please keep the network open during the process of getting data! Prepare to program, please make sure the stable power supply and DO NOT pull out the device during the programming! Programming ECU, please wait... Please save key data. Obtain keys data finish. Write coding data >> OK >> Continue Verify the coding status of the vehicle info. If it's a lost state, click "Continue" to restore it. If it's a normal state, click "Quit". Please select coding data. Writing coding data, please wait... Write coding data finish. 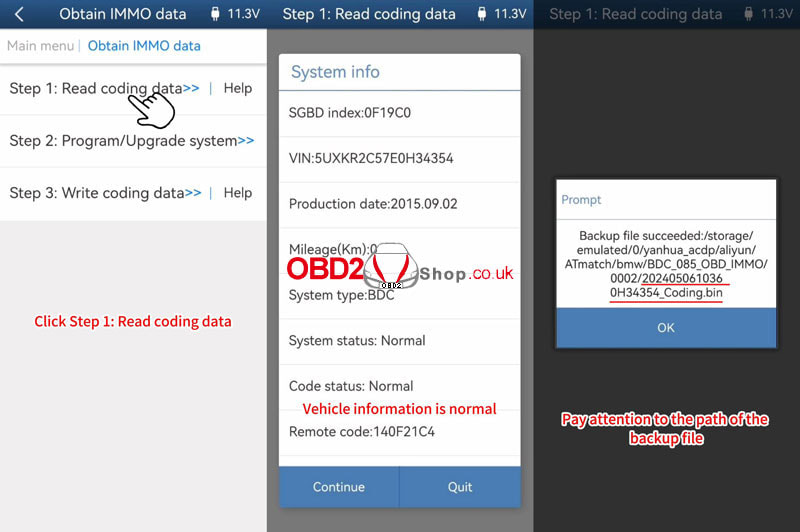
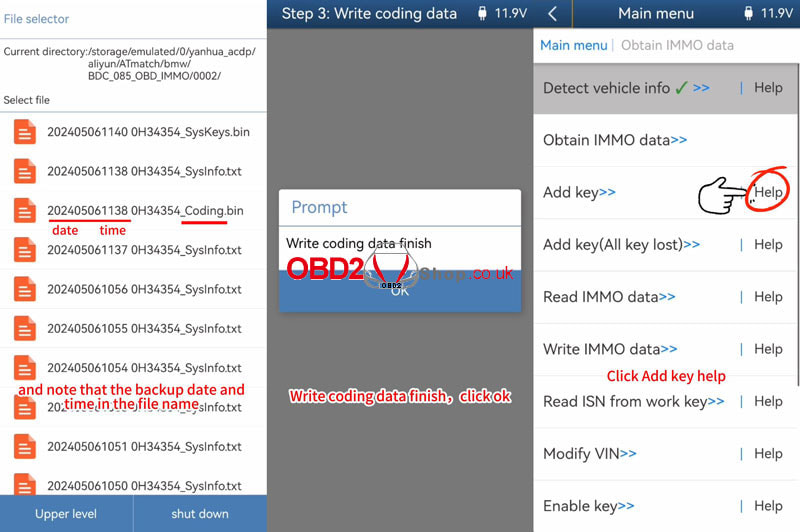
Click "Add key Help".
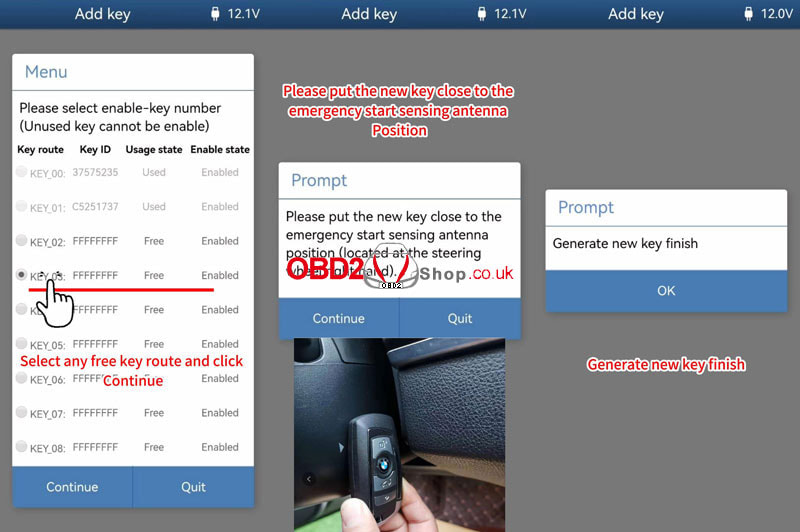
1. Connect ACDP to OBDII, when using Mini ACDP-2, it's necessary to change the Diop cable to the OBDII extension cable. 2. Connect the BAV-KEY adapter to the ACDP-2 device properly. 3. Place the working key into the BAV-KEY adapter properly. Add key >> OK >> Continue Vehicle info is normal. Please select key data. Confirm the working key has been correctly placed in the BAV-KEY adapter. Please save ISN data. The backup file succeeded. Take a screenshot or click "Export" to save IMMO info. Select any free key position, and click "Continue." Please put the new key close to the emergency start sensing antenna position(located at the steering wheel's right hand). Learning new key... Generate a new key finish. Remember to check whether the new key functions properly. Done. 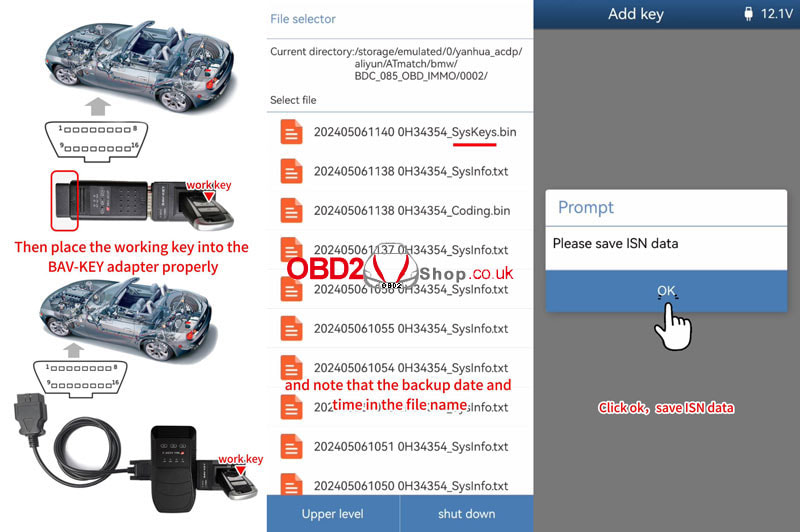
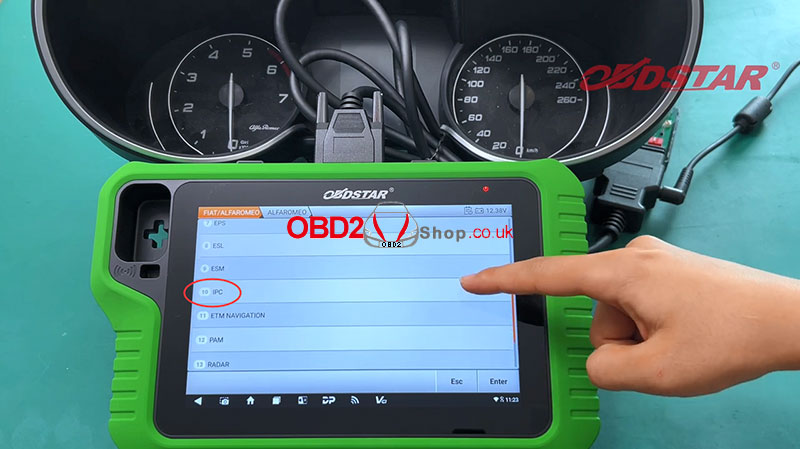
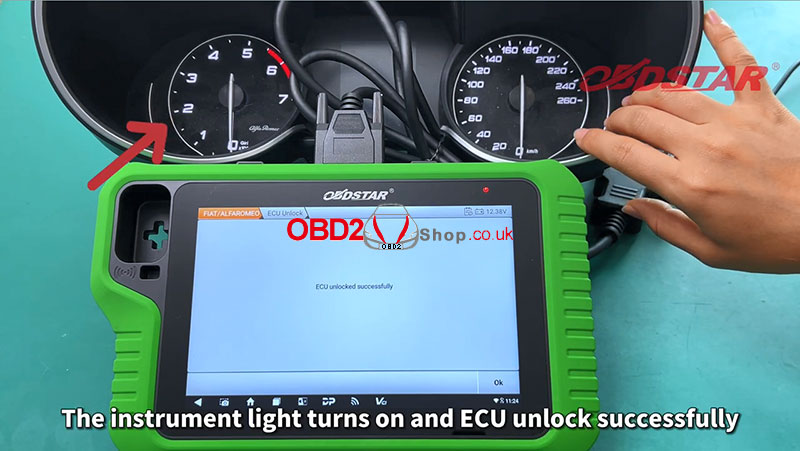
This post will guide you on unlocking the used instrument ECU for Alfa Romeo Stelvio using the OBDSTAR X300 Classic G3 key programmer.
The tools we need: Alfa Romeo Stelvio Instrument X300 Classic G3 P004 Adapter Main Cable P004 ECU Clone Jumper 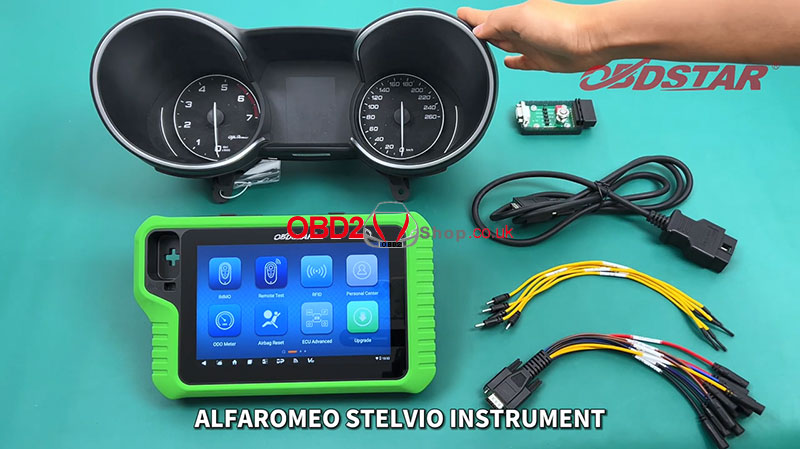
Procedure:
First, we select [ECU Advanced] >> [FIAT/ALFARMEO] >> [FIAT/ALFARMEO V30.04] >> [ALFARMEO] >> [IPC] 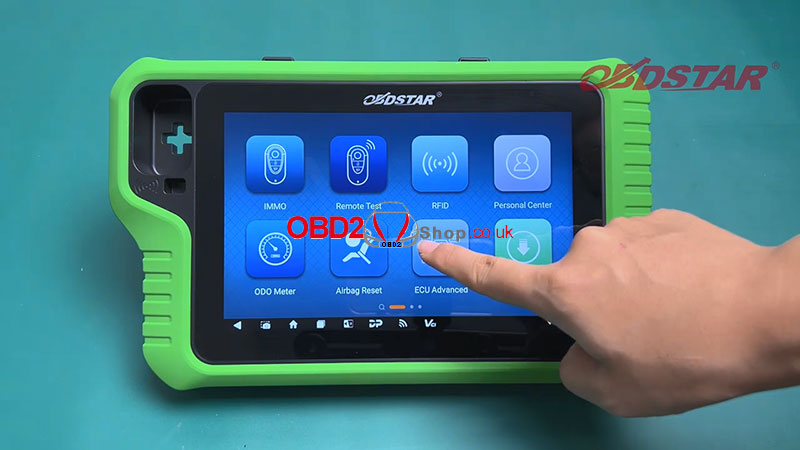
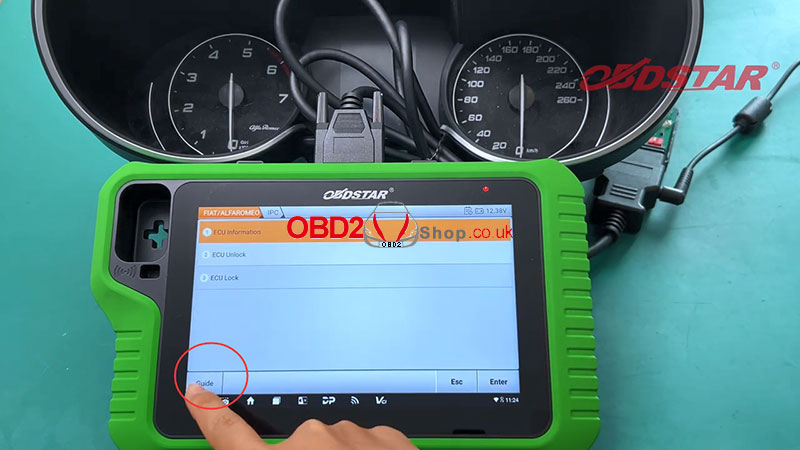
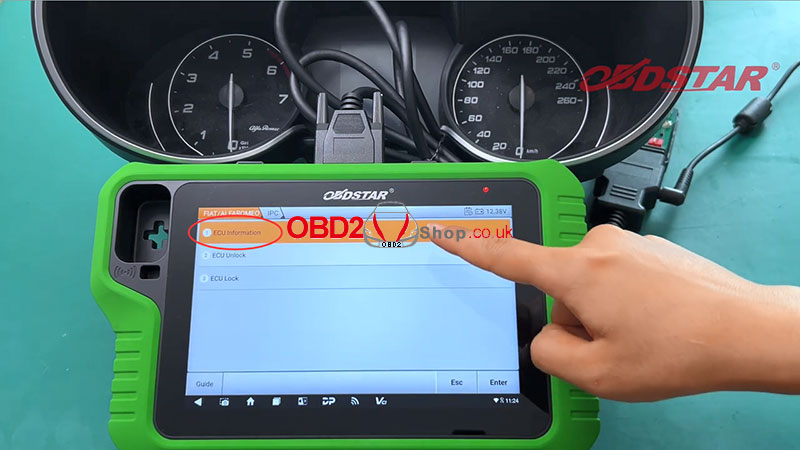
Click [Guide] in the lower left corner of the X300 Classic G3 tablet, and carefully read the development background and operation methods.
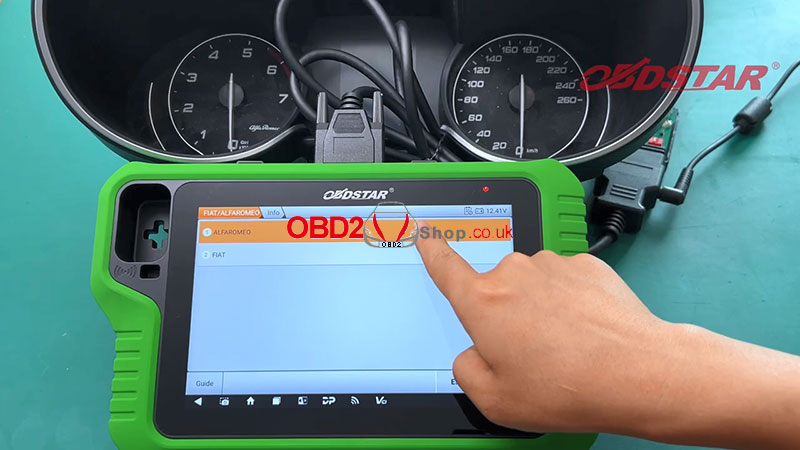
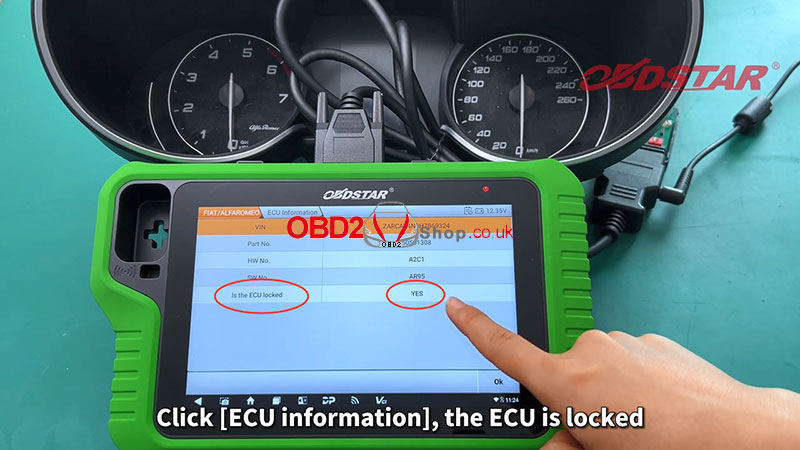
Then click [Back] to return to the previous interface, and select [ECU information] to view the information, we can see that ECU is locked here. Then we select [ECU Unlock] to unlock.
Information:
This function is available by connecting the server, please ensure the internet connection is normal. We click "OK" to continue. The instrument light turns on and the ECU unlocked successfully. 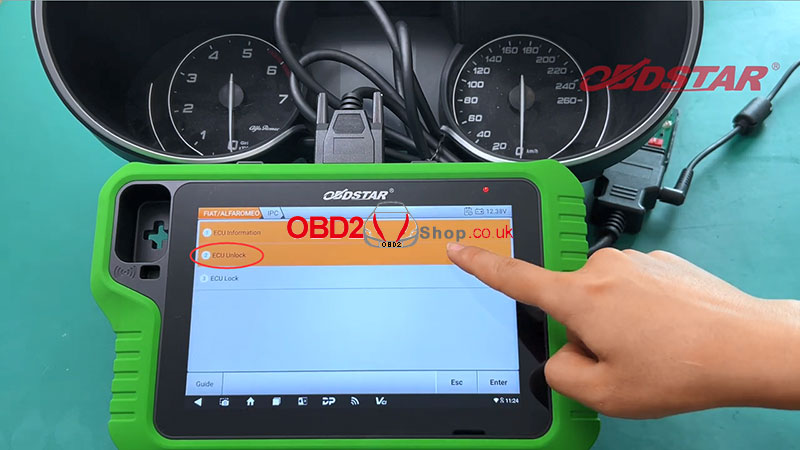
Video Guides:
Today I'm going to program a new remote for 2023 GMC Savana with Lonsdor K518 PRO. Since I've already had the original working key and a new key at hand, let's get started. Immo & remote >> GMC >> Savana >> Remote >> 2022-2023 >> Program remote Please switch the ignition ON. Within 1 minute hold down each remote lock and unlock buttons together, until the vehicle makes a sound, click "OK" to continue. Programming complete. Test the keys, both the original one and the new one are working. Done.  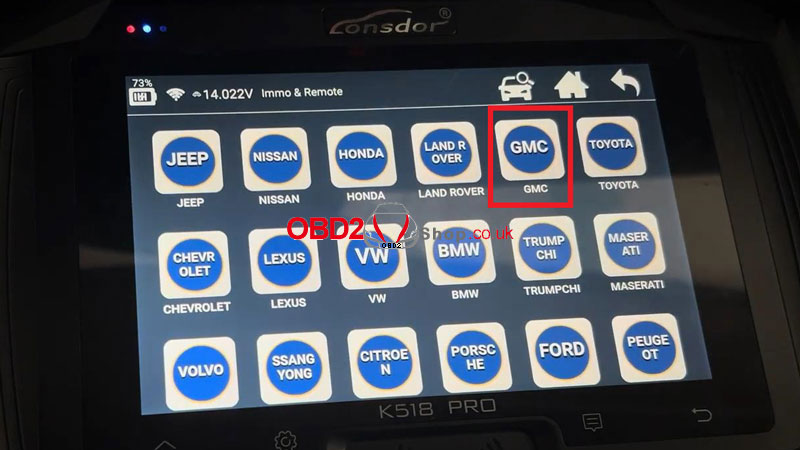 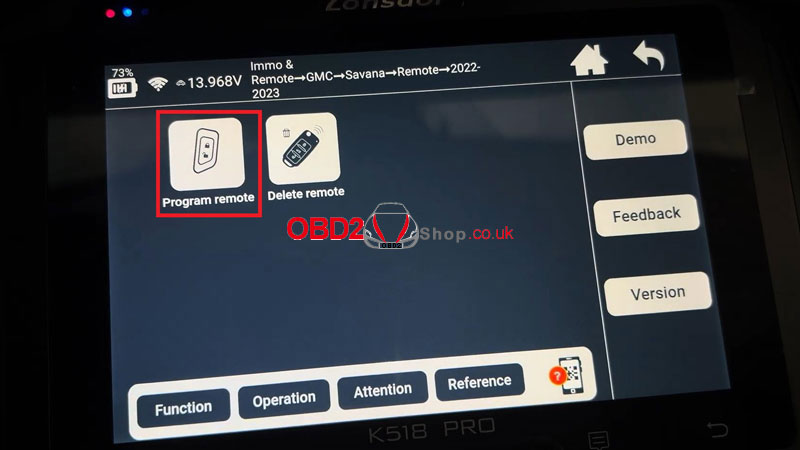 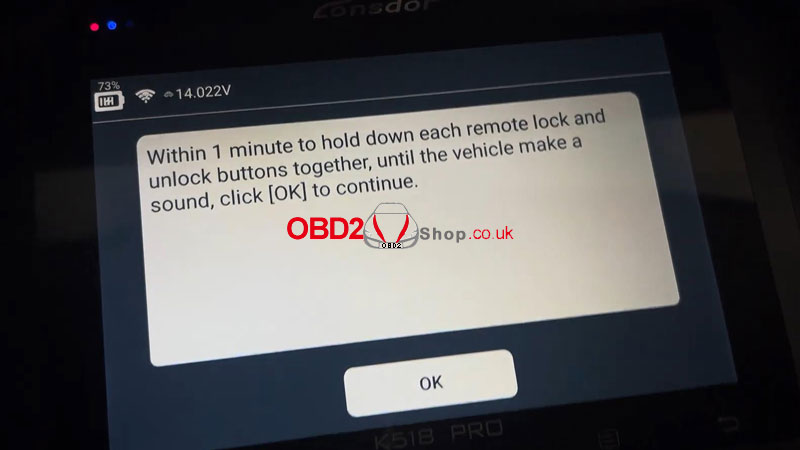 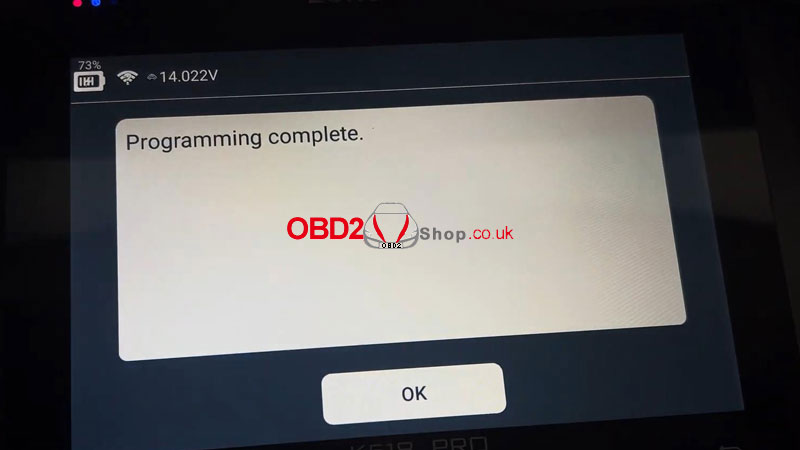 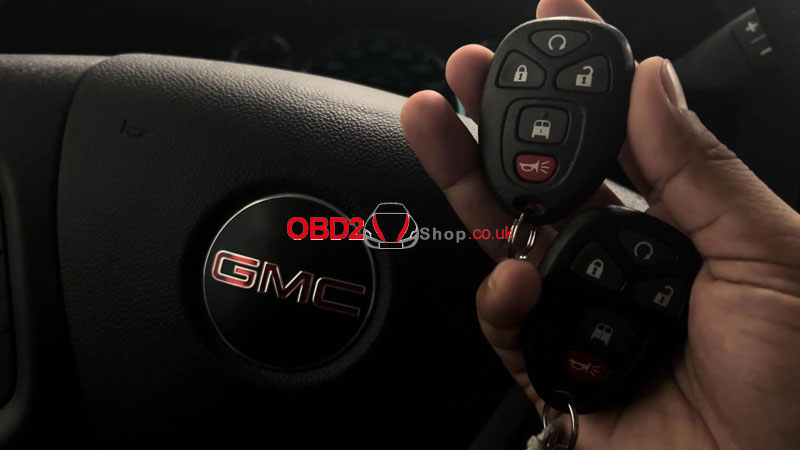
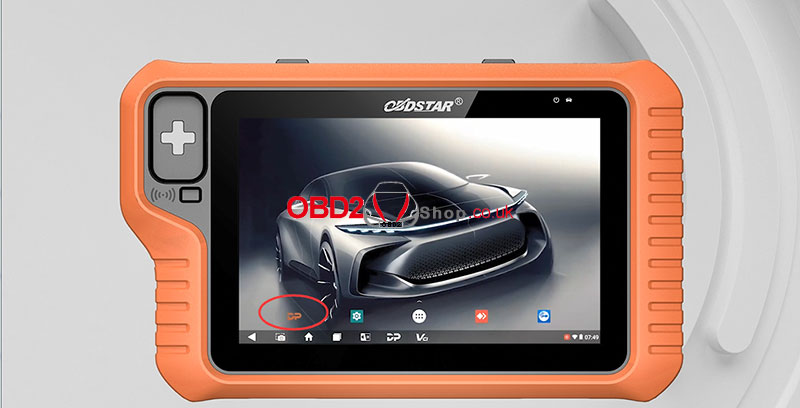
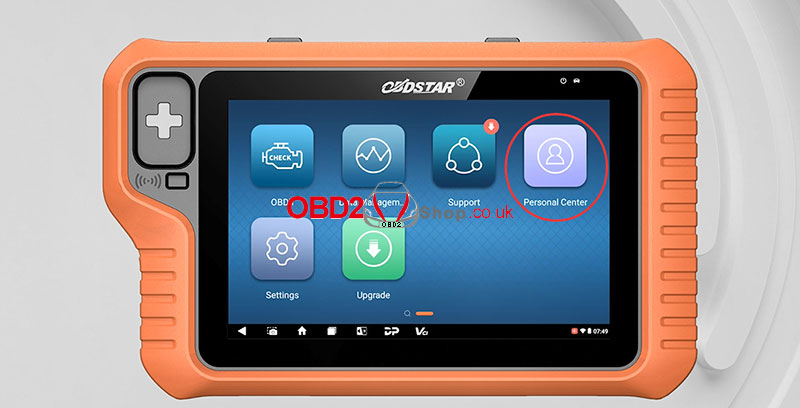
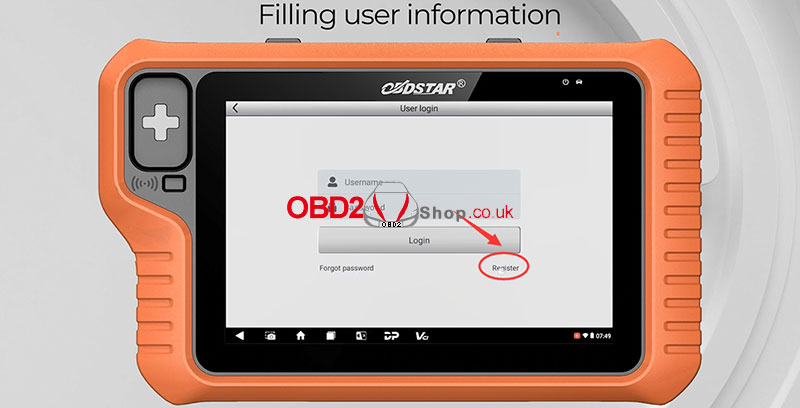
This post will guide you on how to register and update your OBDSTAR X300 Classic G3 Programmer.
Connect the power supply, connect to the network. 
Select [DP] in the lower left corner of the tablet, and select [Personal Center] to enter the user login page.
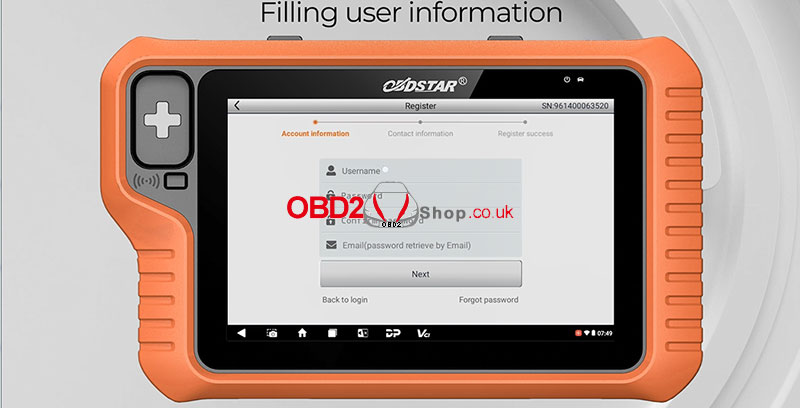
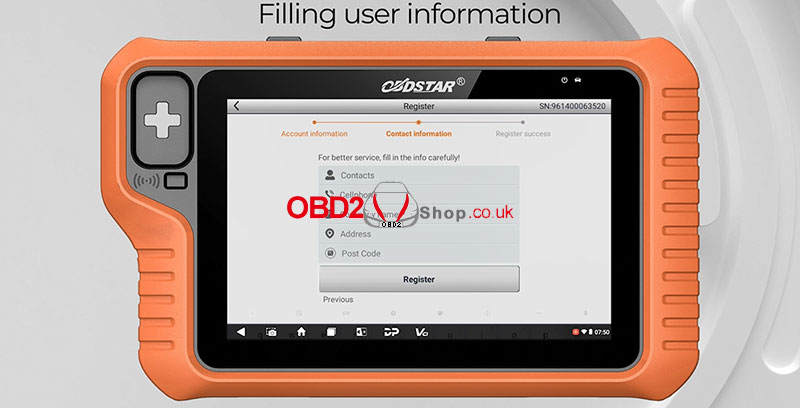
Select [Register] to fill in relevant information.
Registration is successful, select [Login now!].
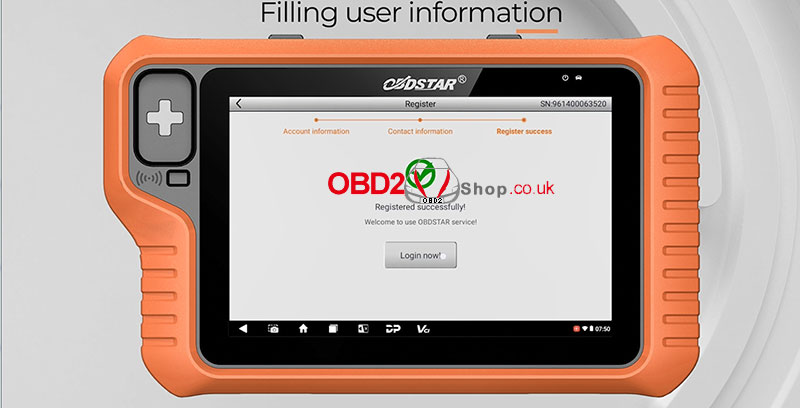
Enter your user name and password to login.
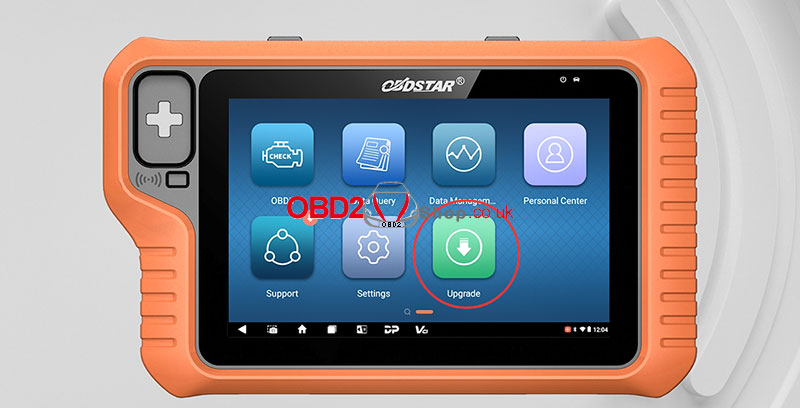
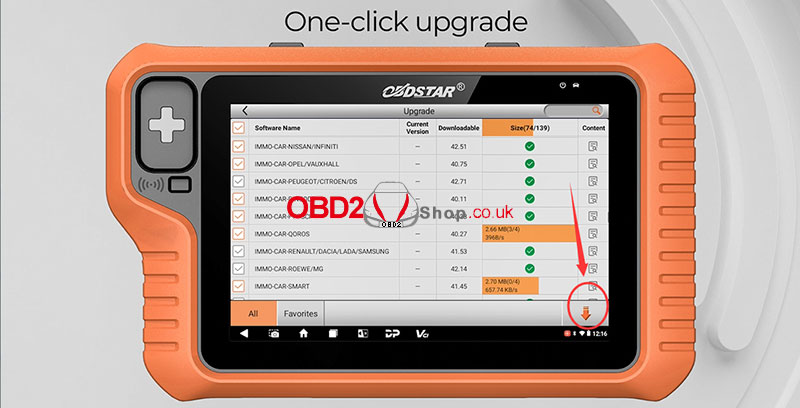
Then return to the previous interface and select [Upgrade] to update the software. 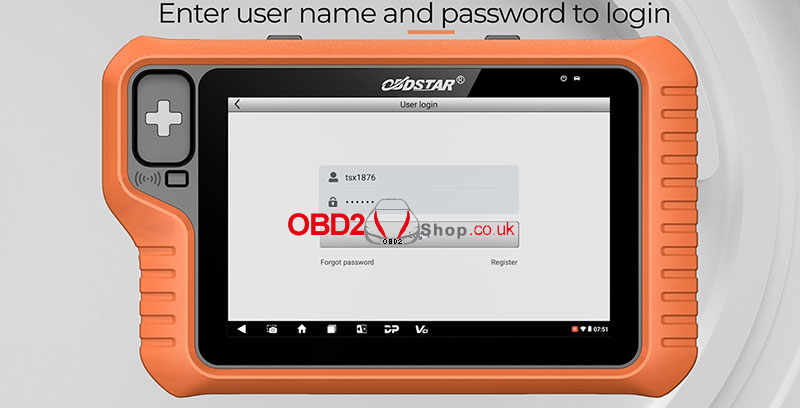
Done!
Video guides:
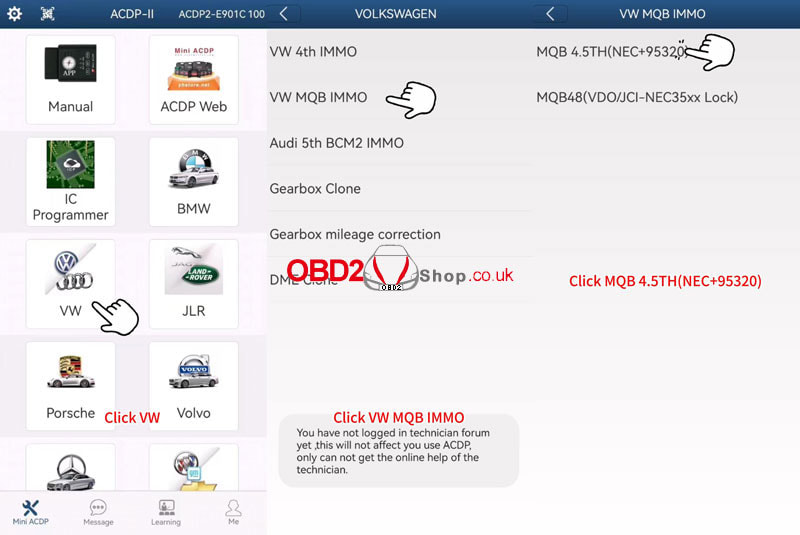
This is a tutorial on how to use Yanhua Mini ACDP-2 + Module 33 to add a smart key for the Volkswagen 4.5th generation MQB(3526+95320).
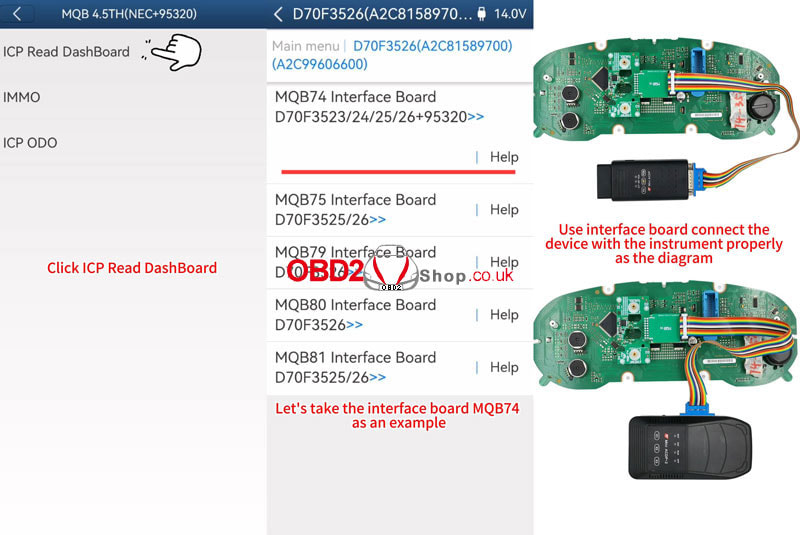
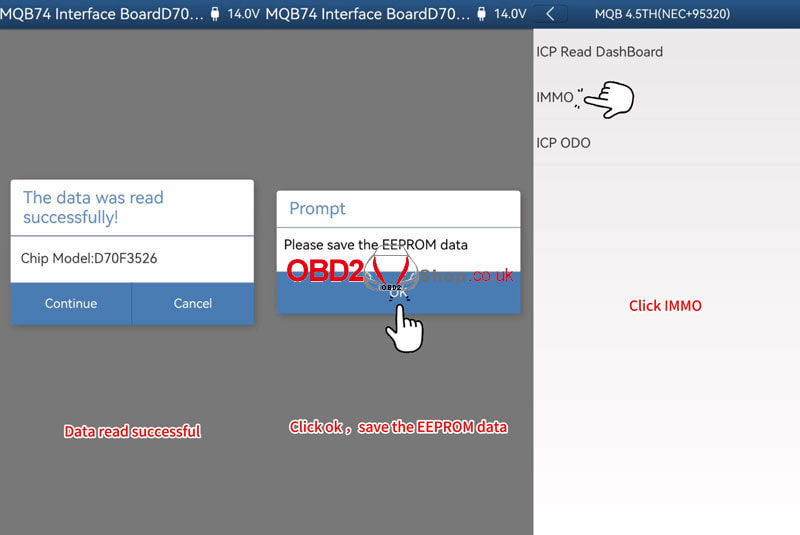
Remove the instrument cluster from the car and open the cluster shell to check the chip model. Power on Mini ACDP-2. Open the Mini ACDP app. Confirm the SN is showing in the upper right corner, which means the device is connected to your phone or PC. VW >> VW MQB IMMO >> MQB 4.5TH(NEC+95320) >> ICP Read Dashboard >> D70F3526(A2C81589700)(A2C99606600) >> MQB74 interface board D70F3523/ 24/ 25/ 26+95320 *Click "Help" to check the connection diagram. Please use the ACDP standard power adapter(voltage+12V, current >= 2.5A). Please connect the main unit and the meter. Continue >> Continue Data read successfully. Please save all backup data of the chip. OK >> OK Please save the EEPROM data. Reinstall the instrument panel into the vehicle and confirm that the vehicle is functioning properly. 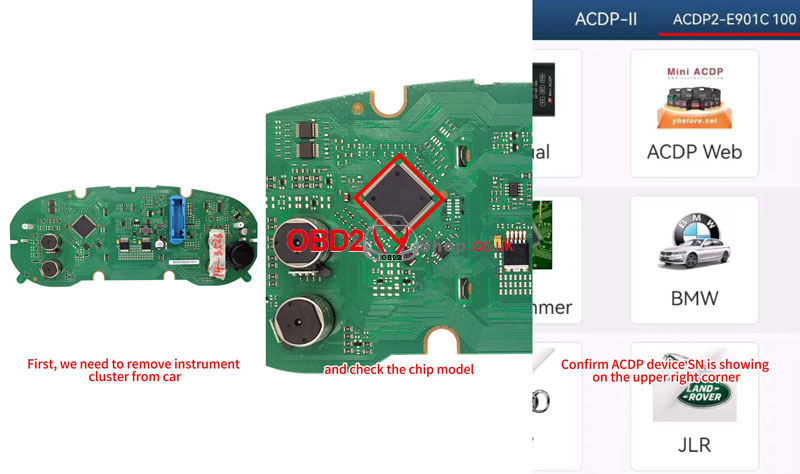
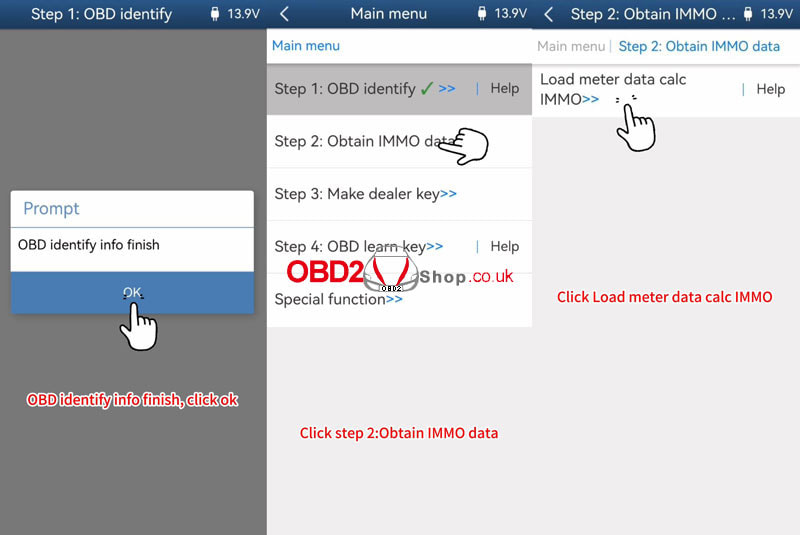
IMMO >> Step1: OBD identify Help
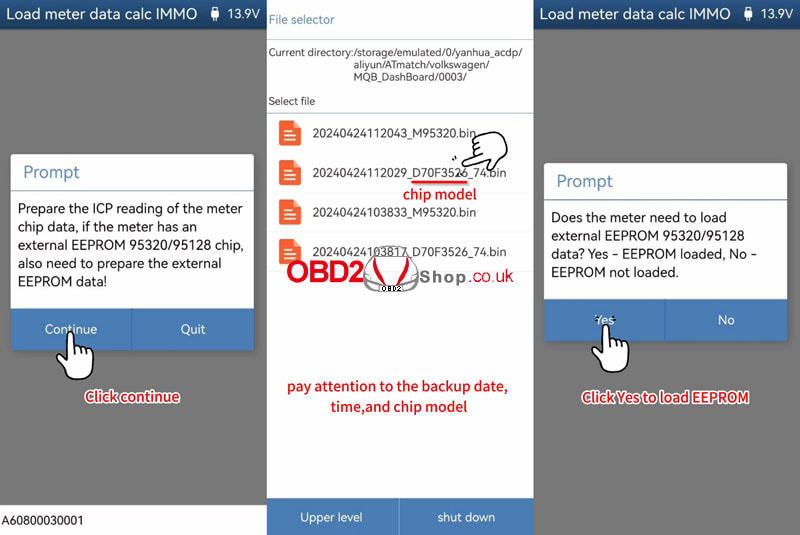
Connect the ACDP to the vehicle's OBDII port properly. Step1: OBD identify >> OK Connect ACDP to vehicle OBDII! If have a working key, please insert it to/near the ignition switch and light the meter! If all key lost, open the headlight and step on the brake! Continue >> OK OBD identifies info to finish. Obtain IMMO data >> Load meter data calc IMMO >> OK Prepare the ICP reading of the meter chip data, if the meter has an external EEPROM 95320/95128 chip, also need to prepare the external EEPROM data! Please select the NEC chip data for the instrument. Does the meter need to load external EEPROM 95320/95128 data? Yes - EEPROM loaded. Please select external EEPROM 95320/95128 data. The IMMO data will be calculated soon, please keep the network smooth during the data calculation! Please save IMMO data. OK >> OK >> OK Obtain IMMO data finish. 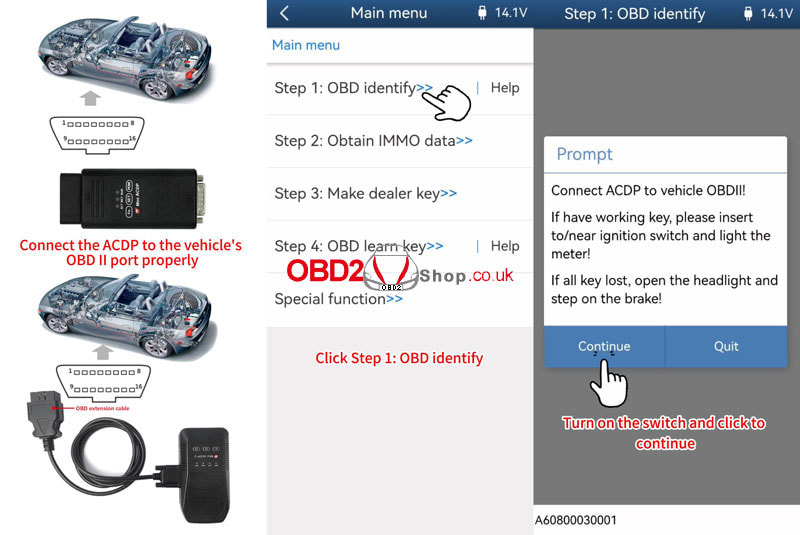
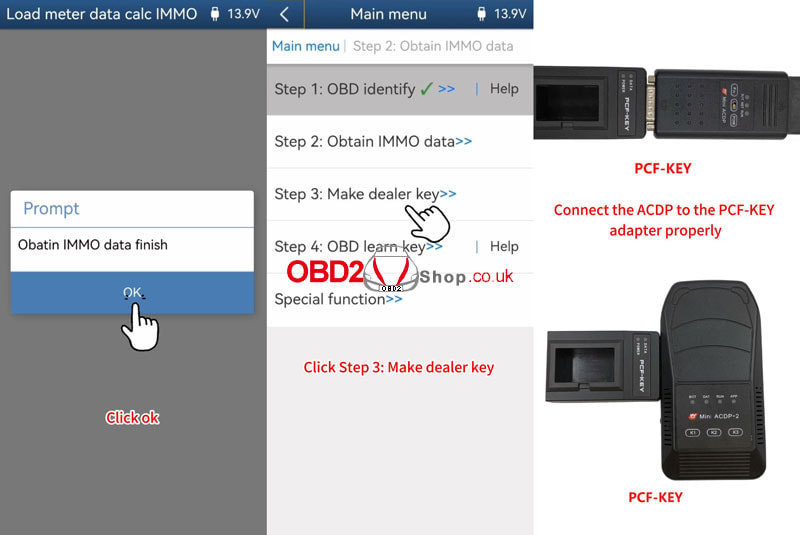
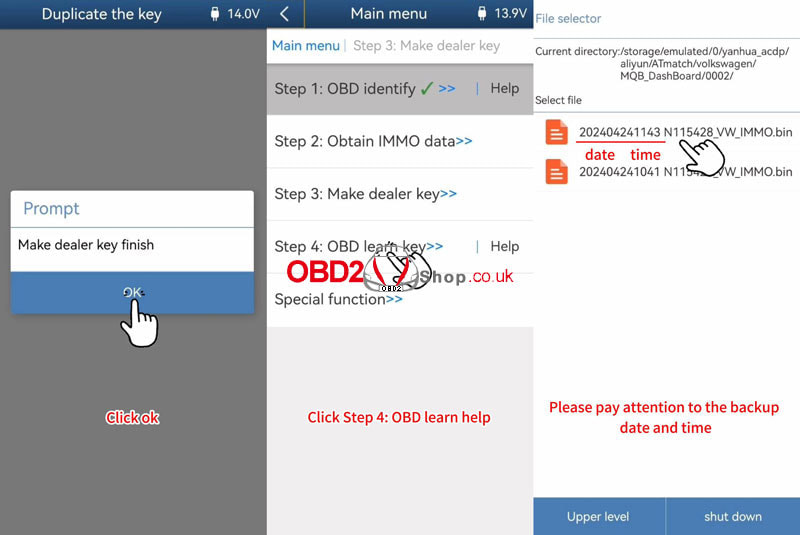
Make dealer key >> Duplicate the key >> OK
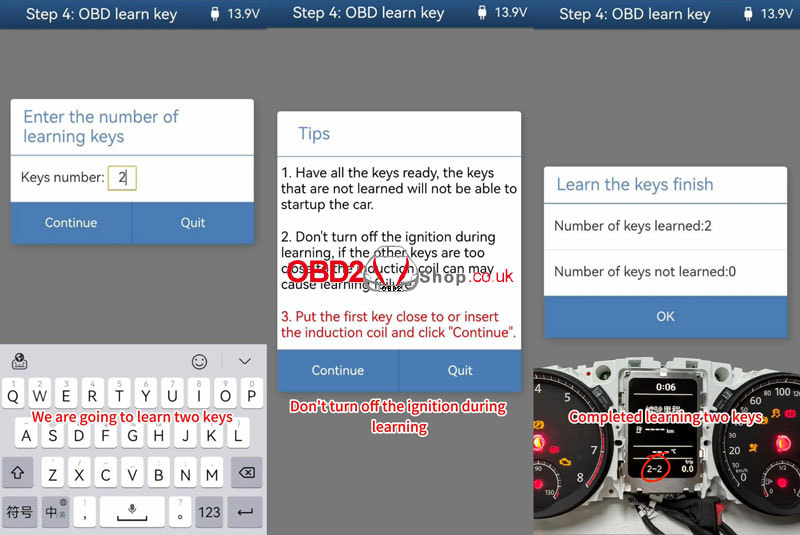
Connect the ACDP to the PCF-KEY adapter. Place the blank key that has been changed to the original car's lost key ID on the PCF-KEY adapter correctly! Note: the new key should be a blank key that ID can be changed and the blank key has been changed to the ID of the lost key. Place the blank key that has been changed to the original car's lost key ID on the PCF-KEY adapter correctly. Continue >> Continue Please select IMMO data >> Continue >> VW Programming key data is about to begin, and forbidden to power off or unplug the device during operation! Make dealer key finish. OBD learn key >> OK >> Continue >> Continue Please select IMMO data. Enter the number of learning keys: 2 Tips 1. Have all the keys ready, the keys that are not learned will not be able to start the car. 2. Don't turn off the ignition during learning, if the other keys are too close to the induction coil can may cause learning failure. 3. Put the first key close to or insert the induction coil and click "Continue". Put the 1st key close to or insert the induction coil, and click "Continue". Put the 2nd key close to or insert the induction coil, click "Continue". Number of keys learned: 2 Completed learning 2 keys. The smart key addition is complete. Please try on the car and verify if the added key functions are normal. 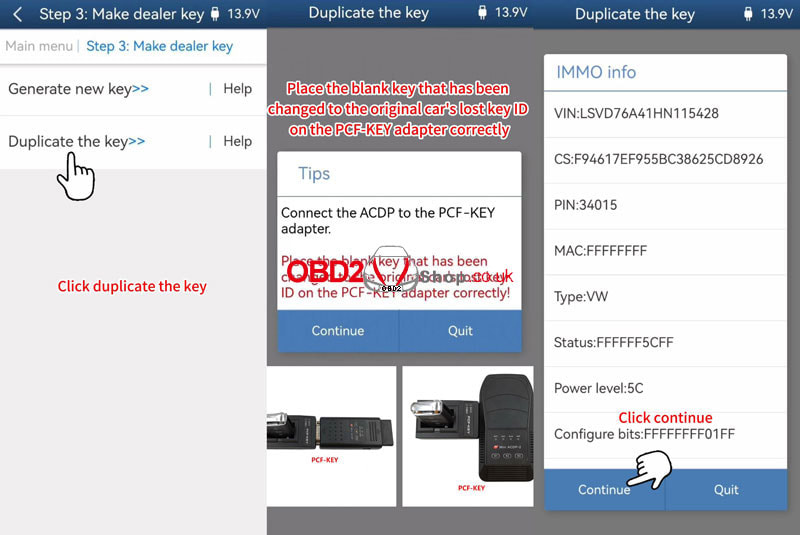
Video guides:
Lonsdor K518 PRO, K518 series have upgraded FIAT vehicle coverage for reading immo data & making dealer key on April 23, 2024. Read this article to learn how to update K518 Fiat immo software & program new keys. Supported FIAT Car List: Grand Punto (2005-2014) 500 (2006-2017) Nemo (2007-2017) Bipper (2007-2017) Cinquecento (2007-2021) Mini Cargo (2008-2021) Qubo (2008-2021) Fiorino (2008-2021) New Fiorino (2008-2021) Punto (2009-2021) Punto Evo (2009-2021) Pratico (2010-2021) Doblo (2010-2021) Viaggio (2011-2018) Panda (2011-2021) 500C (2011-2021) Avventura (2014-2018) Egea (2018-2021) Tipo (2018-2021) Linea (2018-2021) 500X (2018-2021) 500E (2018-2021) New 500 (2020-2022) New 500C (2020-2022) 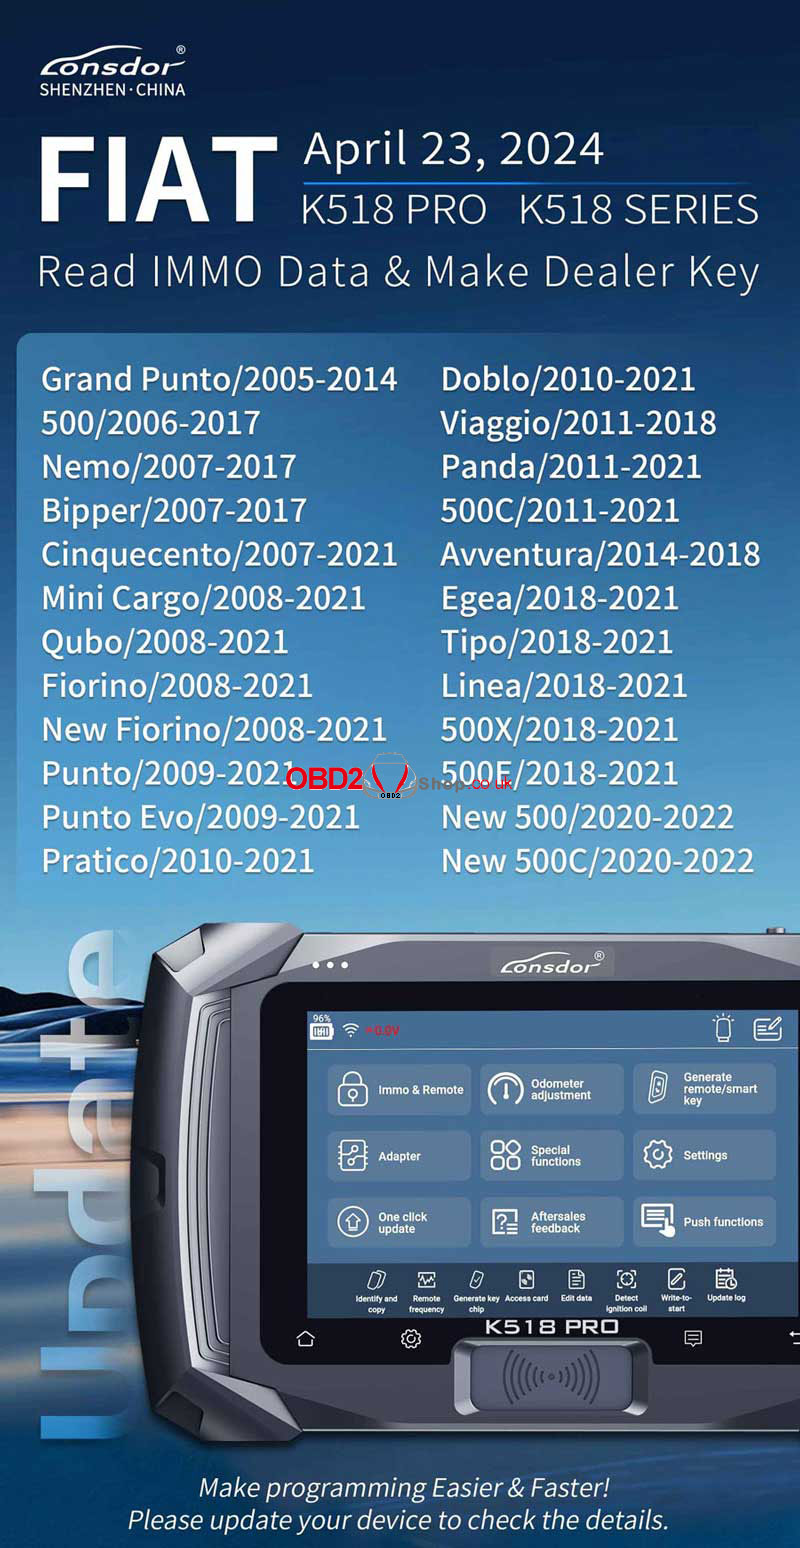 How to program Fiat's new key with K518 PRO? 1. Read Immo Data Immo & remote >> FIAT >> Select from vehicle >> Europe >> 500 >> Mechanical key >> 2006-2017 >> 70F3633_93C86_46 >> Read immo data Check the immo data, and press "OK". Save the immo data file. Reading successful. Can use this data to make the dealer key and then the program key. Note: if vehicle communication fails during subsequent function execution, please disconnect the vehicle battery for 1-2 mins and re-connect it, then retry the function. 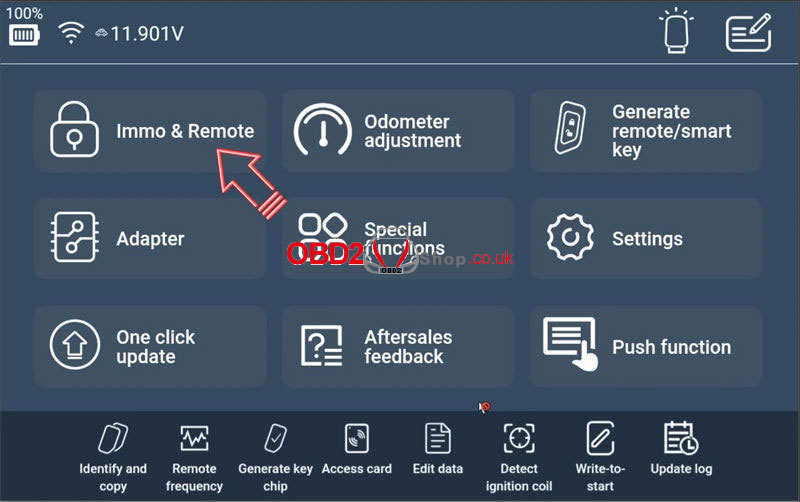 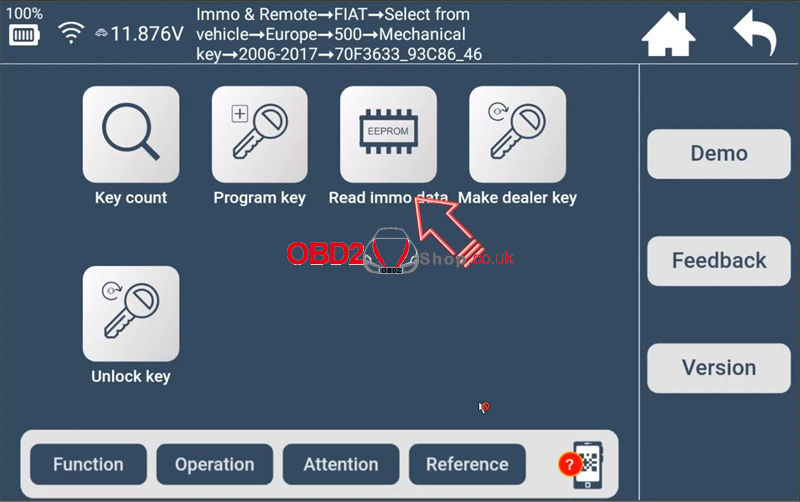 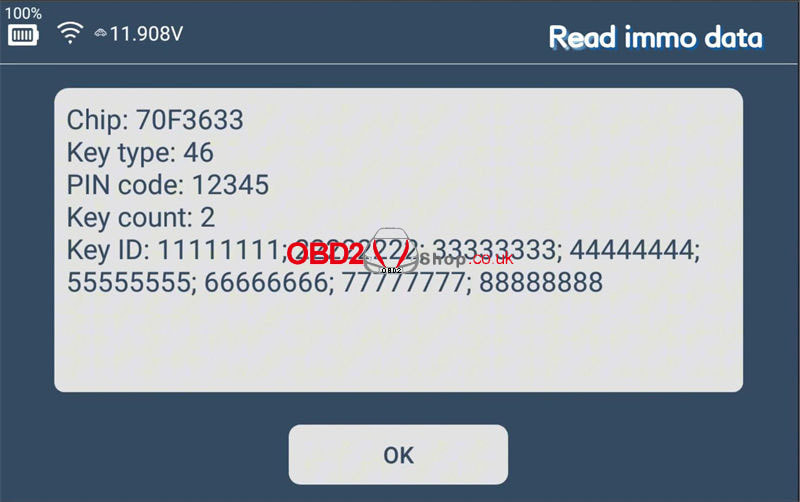 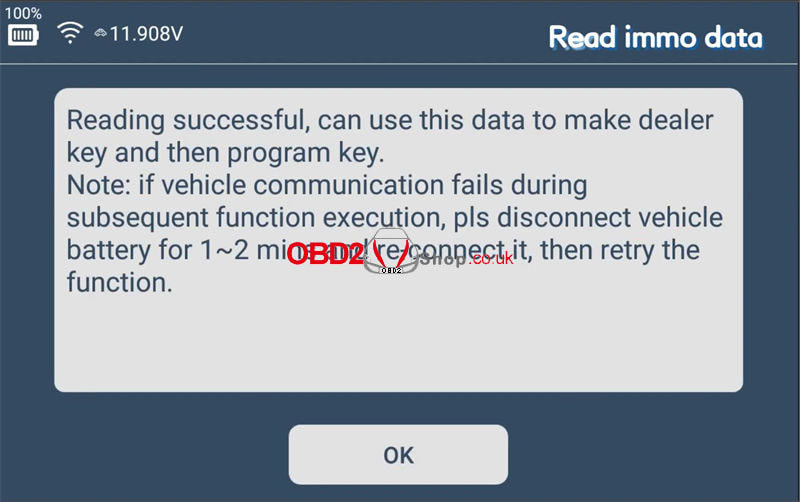 2. Make Dealer Key Make dealer key >> OK >> Selected immo data file >> OK Push open the card slot's baffle on the device. Place the key to be generated into the K518 PRO card slot. Operating to the key, please wait... The dealer key was generated and locked successfully. 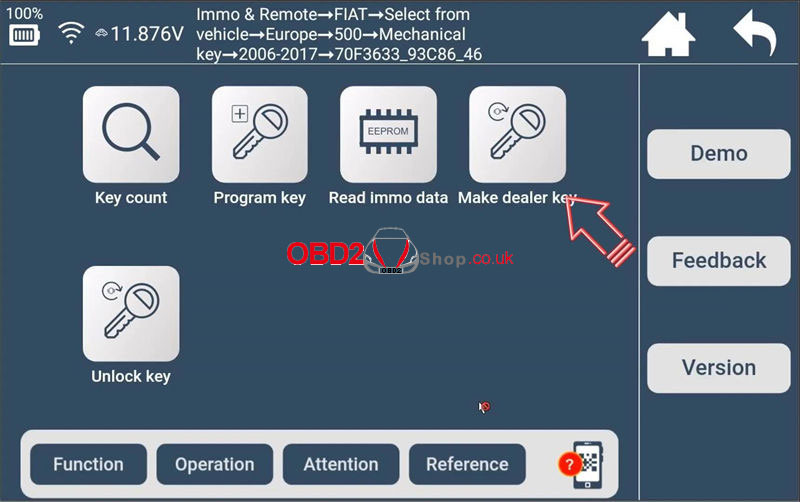 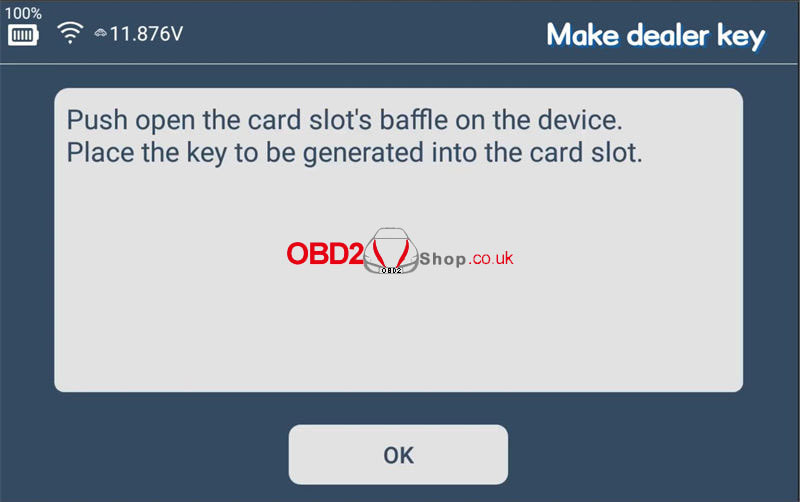 3. Add New Key Press the "Program key". This operation will delete all programmed keys, which need to be re-programmed before use, keys to be programmed need to be custom or dealer keys, press "OK" to continue. Please insert the key to be programmed, and switch the ignition ON. Enter PIN code. Programming succeed. Please switch the ignition off. Turn the ignition on. Current key count: 2 Programming complete. 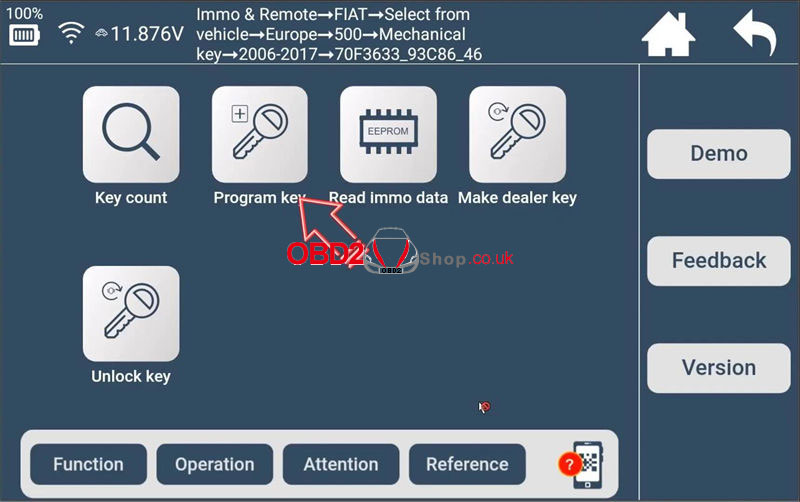 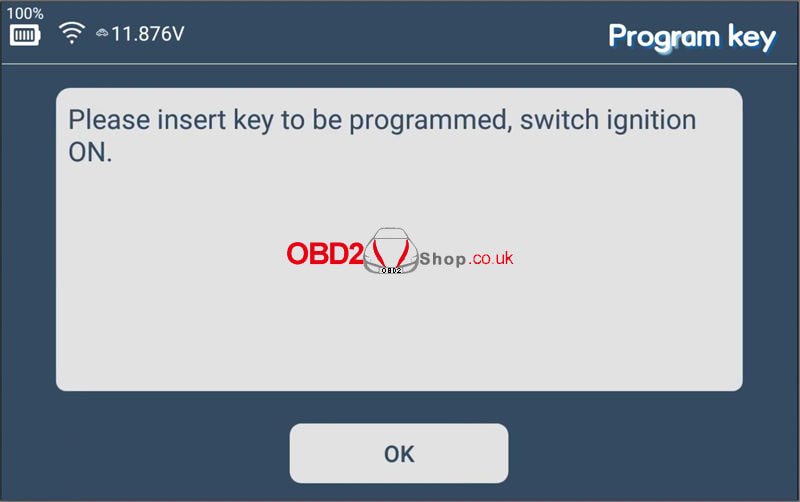 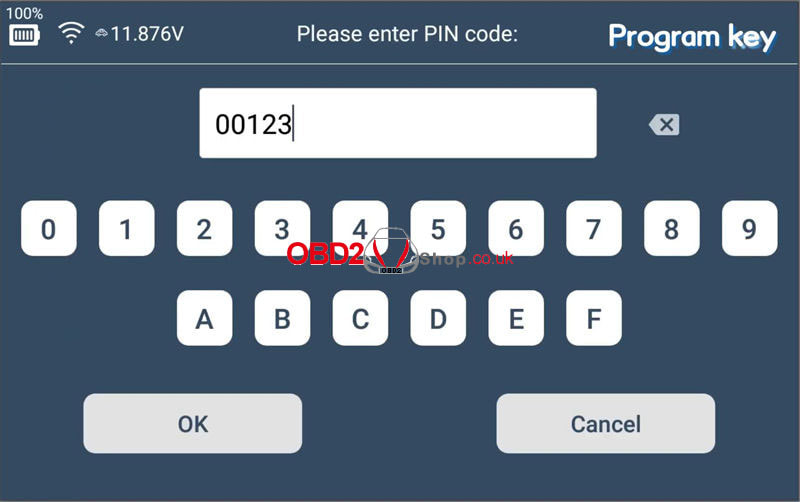 What's different between XTOOL A30M & D7 Diagnostic Tool? Today I'm gonna do a detailed but quick comparison review of these 2 devices side by side. Hope this can help you to make an informed decision. The first obvious difference is that the XTOOL D7 is a standalone tablet-style tool while the A30M needs you to pair it by Bluetooth on a phone. 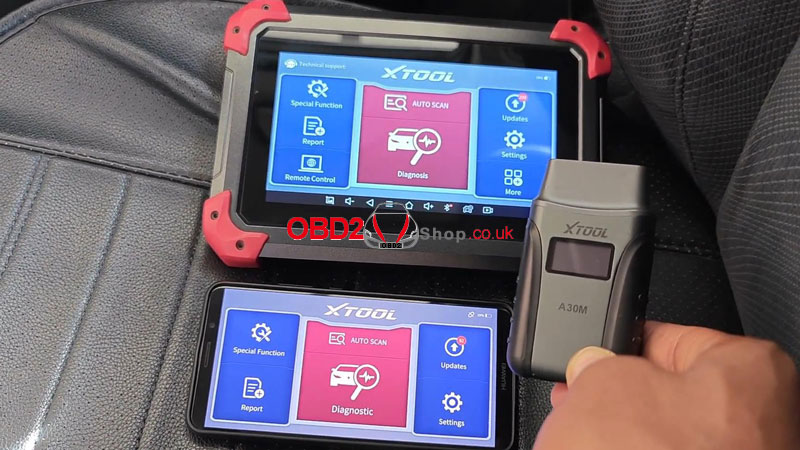 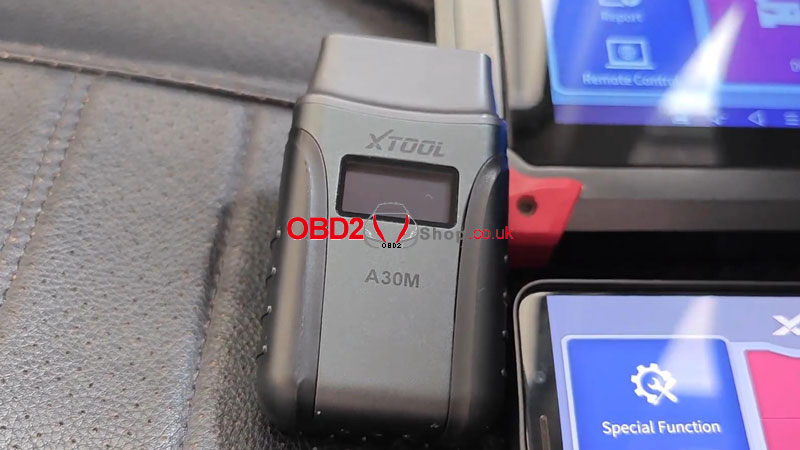 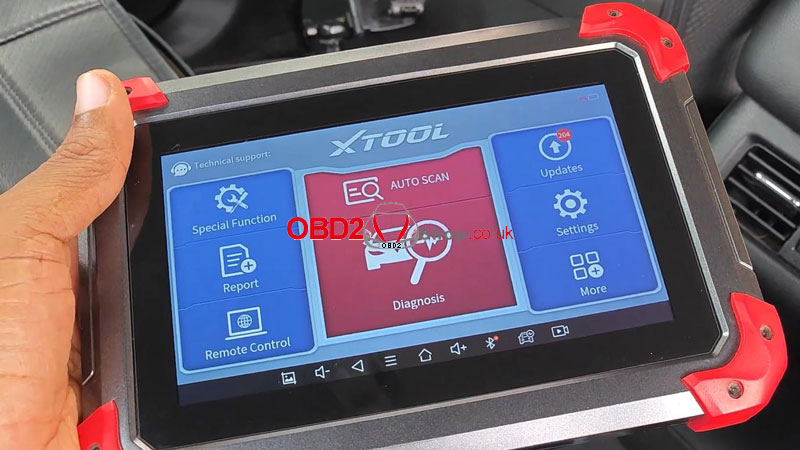 Despite this difference, these 2 scanners have a lot in common. They're both all system diagnostic scanners, meaning that you have access to every single ECU that's installed in the car. They're also fully bi-directional tools and the A30M has kept up with every single bi-directional or actuation test that I've been able to do with the D7 on my 2017 Honda Accord. So I haven't been able to put a knife between these two when it comes to directional tests in terms of OBD2 protocols. I haven't really seen any difference between the two as well. 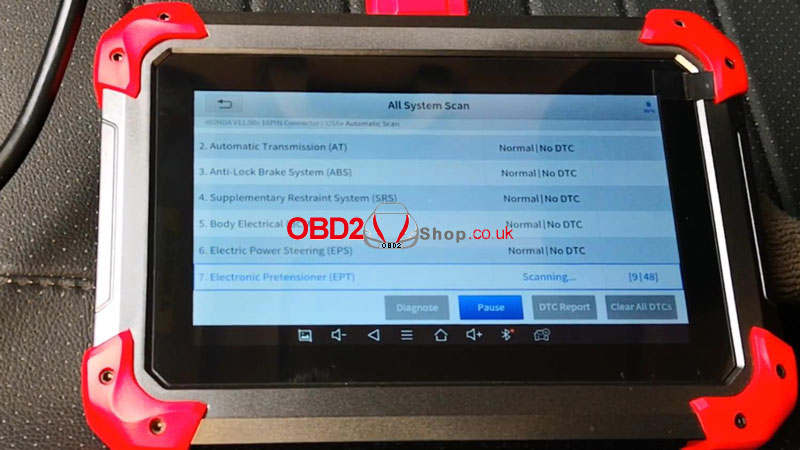 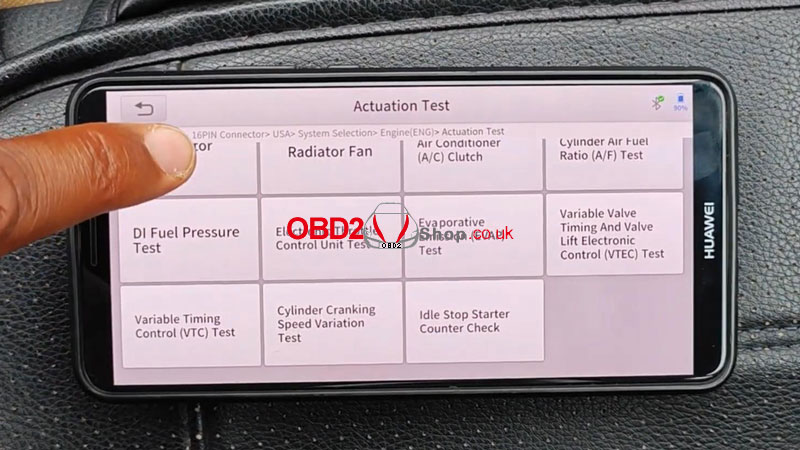 By the way, if you're wondering what the difference is between the 3 versions of XTOOL D7, D7S, and D7W. The D7S simply boosts improved hardware and supports the diagnosis over Internet protocol when compared to the traditional D7. The D7W does everything that the D7S does but in addition, it makes a wireless connection to the car via Wi-Fi. So if diagnosis over Internet protocol is a must for you, then you should be looking at either the D7S or the D7W. 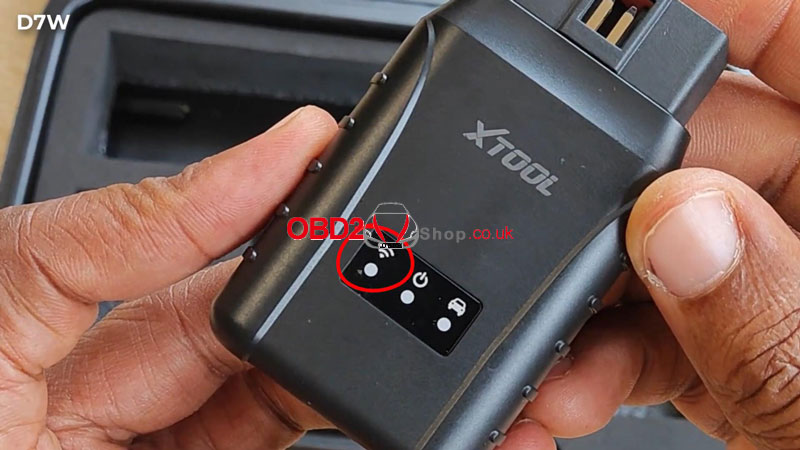 These tools really begin to differ when it comes to special functions. The A30M supports 21 kinds while the D7 supports 36 kinds for my Accord. For example, the A30M doesn't support key programming. So if key programming is an absolute requirement for you, the D7 should be more suitable. 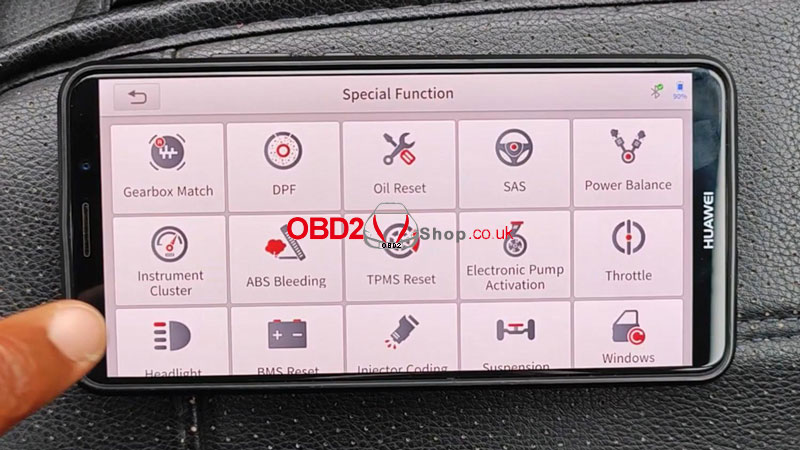 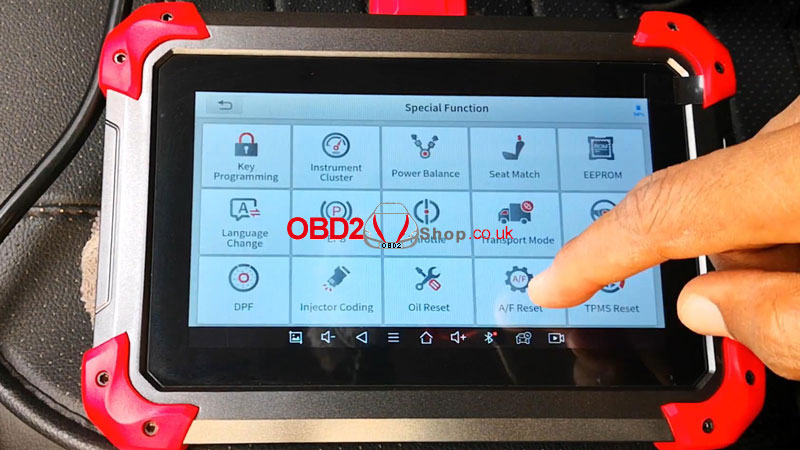   Another major difference between these tools is that the D7 supports ECU coding while the A30M doesn't. So if you're looking to customize those hidden functions or settings in your car, for example turning off those annoying beeps or doing other coding stuff again, the D7 will be the obvious choice here.  However, just to state that not all cars support ECU coding, you can't just simply buy a D7 or any other scanners that support ECU coding and say you want to code any cars. This is by no means exhaustive. But generally, Mercedes, VW, Audi, and Lexus are examples of cars that support ECU coding. For me, the real break difference between these scanners is with support for vehicle updates and the cost. The 30M comes with lifetime free updates and I've been amazed at how frequently these updates get pushed to it. Despite being a lifetime free update tool, you'll also get it usually retailing for £138 on our web. For the D7, it comes with 3 years of free updates, and after that, it costs $99 per year. For a new license retail cost is typically around £294. 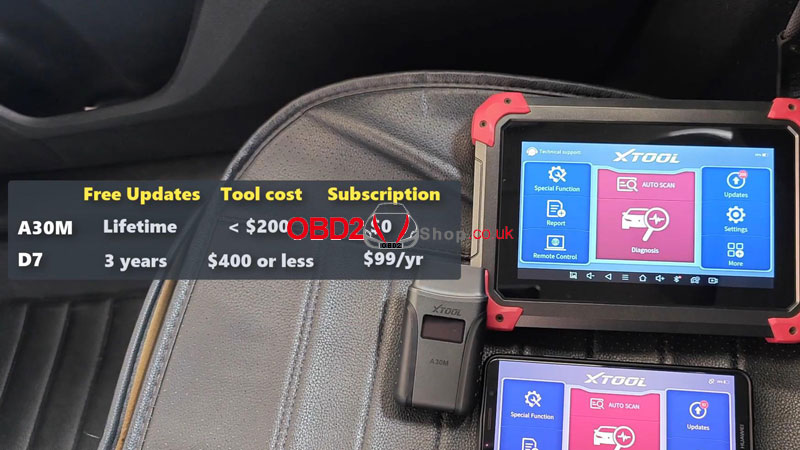 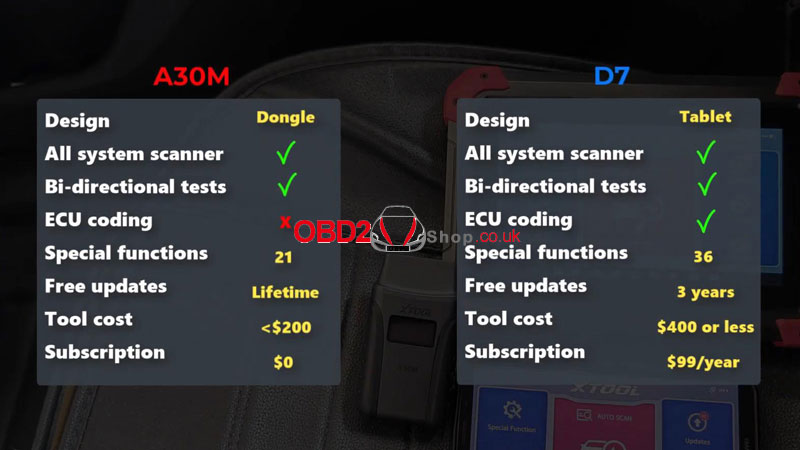 Customer's problem: I bought 10/2023 Cgpro v2.2.0.0 from you, I have issues with my device I cannot write mileage on 35160wt EEPROM, and it seems to not be able to initialize the device properly before writing new data to EEPROM. Is it possible to file a complaint about this to you? I even just tried increasing mileage by 2000km and trying to write backup Again, the same issue. Initialization error after 25 mins at 95%. Is new status, after messing around with it I can only read 16km dump out of my EEPROM. When it's soldered to the cluster it shows a mileage of 45019km. It looks like it cannot read the EEPROM any longer either..... 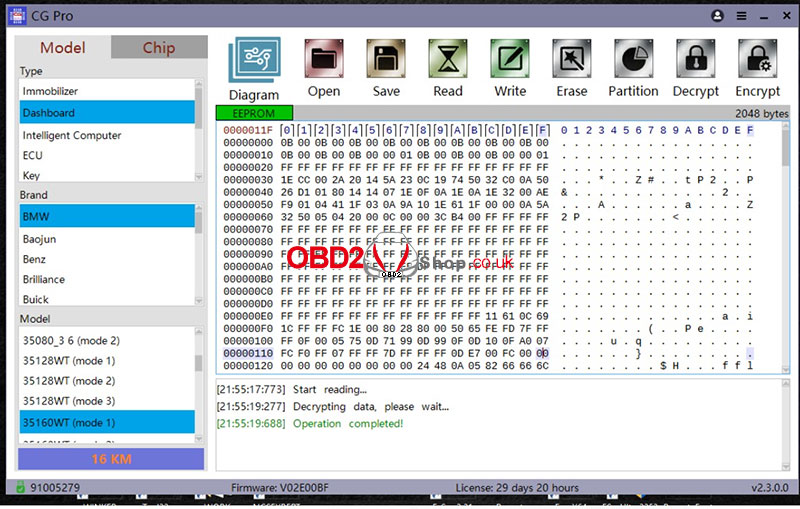  Solution: Chip heating or replacing the spare chip. 35160WT erasing heating method instructions (if the chip cannot be erased, you can try it): Before operation, adjust the air gun to 100°C and heat the chip for 20 to 30 seconds (the chip is soldered to the board). After that, stop heating and put it on immediately to try the operation. After waiting for the chip to cool down completely, if the chip has not entered the second stage for erasing, you can reheat it with an air gun for 20 to 30 seconds and then stop heating. The chip may be erased during the cooling process. Customer's feedback: I tried and tried and tried today and I found a method with a heat gun that finally worked! So now I have successfully written 16km to EEPROM. I will remember this method for next time and Hopefully, it'll last! I'm sorry for the inconvenience but please understand my anger when in the field and this didn't work. Have a great weekend! 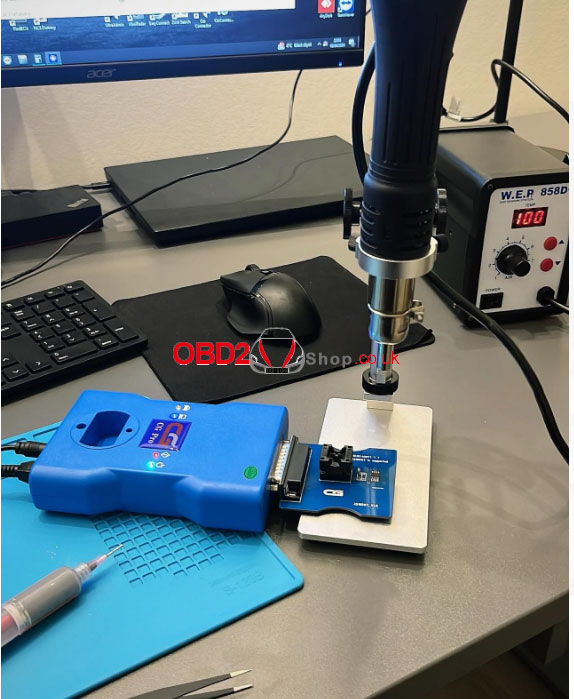 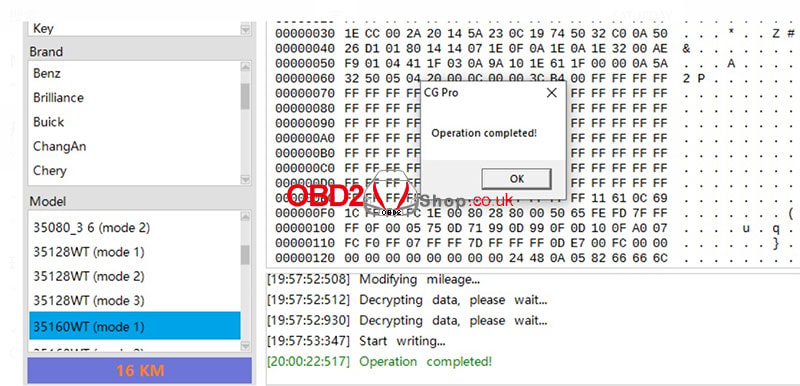 For more technical support, please follow www.obd2shop.co.uk
|
