|
This post will guide you on how to use the OBDSTAR P50 Airbag Reset Tool to do a Toyota steering angle sensor repair by bench.
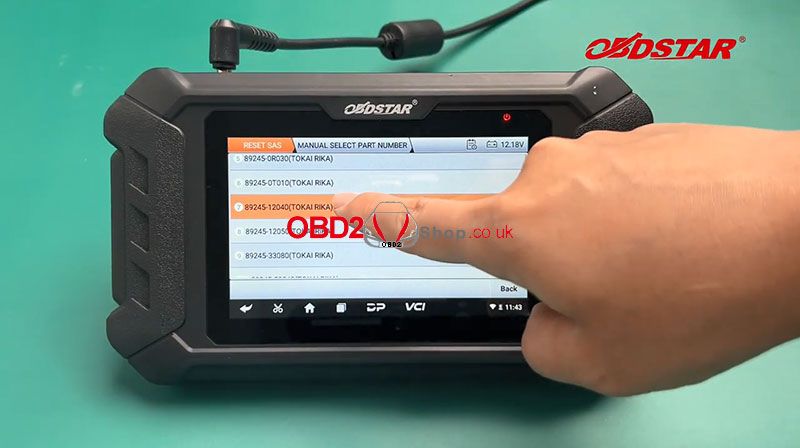
Tools we need: OBDSTAR P50 Main Cable P004 Jumper P004 Adapter Toyota Steering Angle 89245-12040 
Procedure:
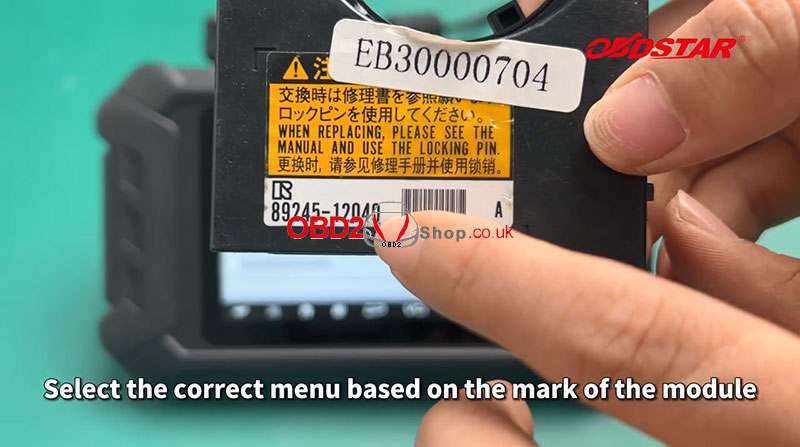
Tap [Airbag Reset] Select the correct menu based on the mark of the module. Click [Guide] at the bottom left to check the best connection method. 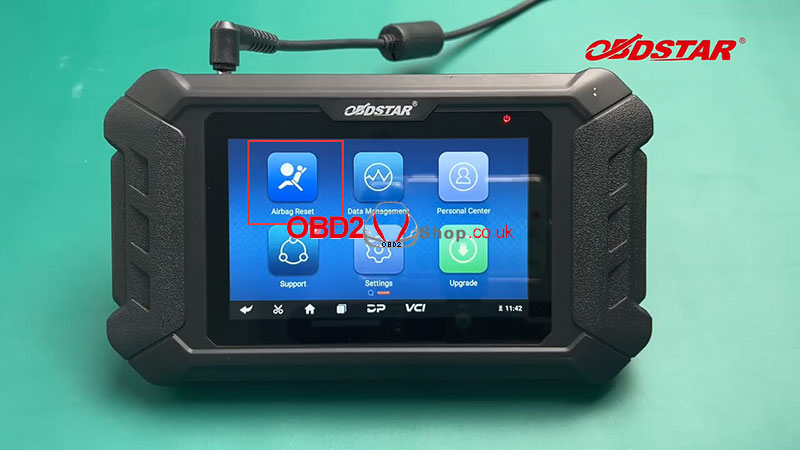
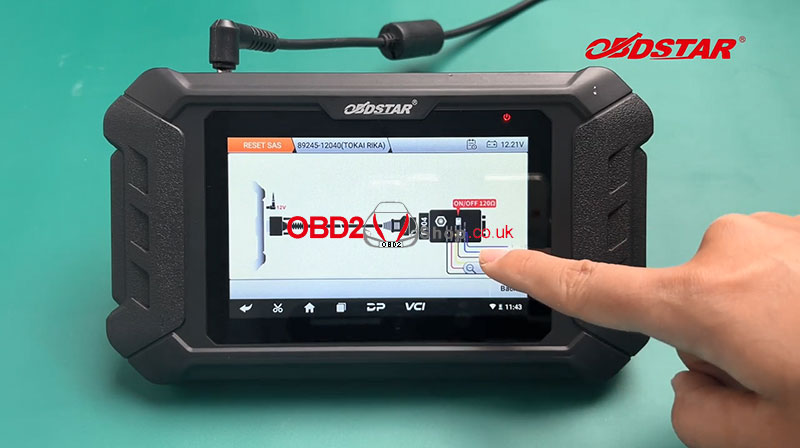
Click [Back] at the bottom right, then click [Pinout] at the bottom left to check the diagram.
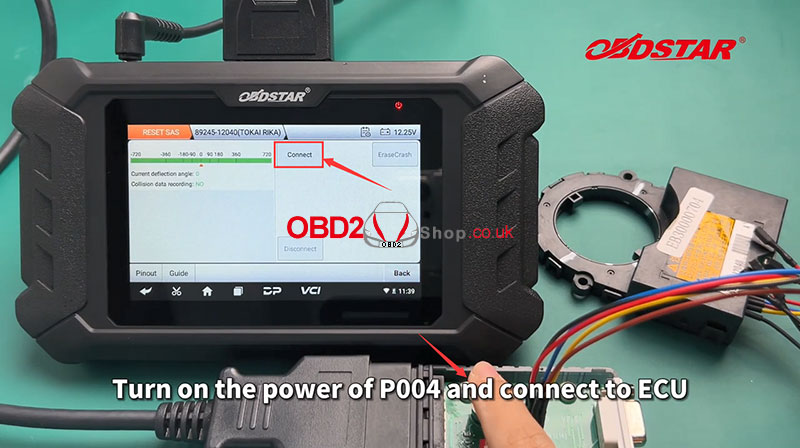
Then we connect the harness according to the wiring diagram. Turn on the power of P004 and connect to ECU. 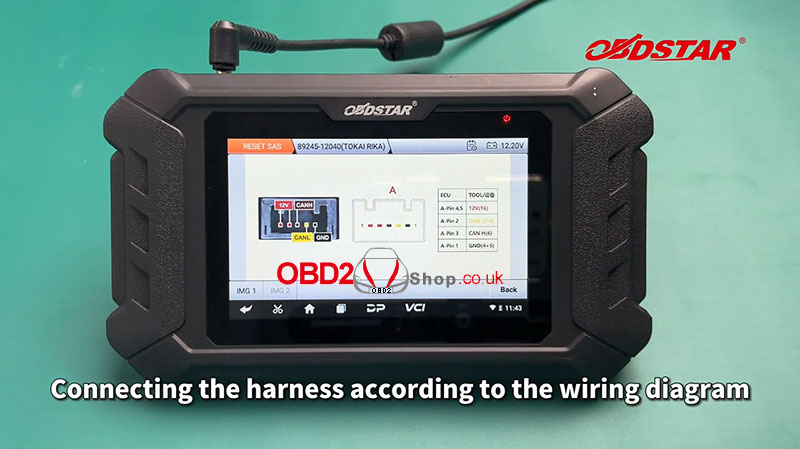
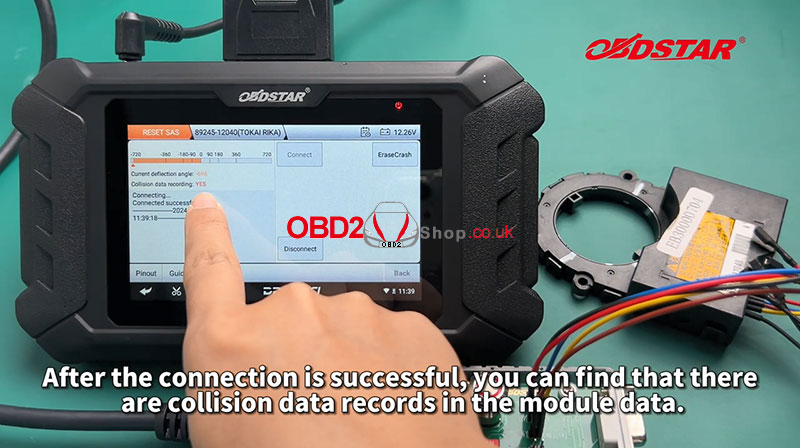
After the connection is successful, you can find that there are collision data records in the module data.
Click the [Erase Crash] button, now you need to calibrate the angle back to zero degrees.


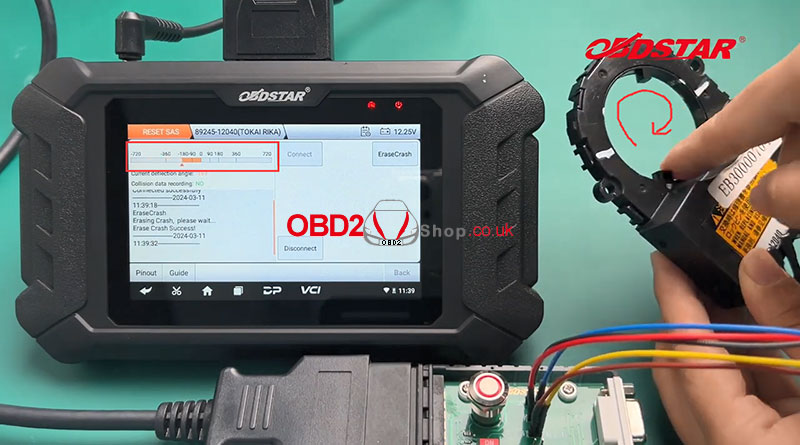
At zero degrees, it will show a green.

Once the calibration is complete, we can fix it with a tie to prevent deviation.
When loading, make sure that the steering wheel is centered and key off before installing the angle sensor. For more details, please refer to the video below:
0 Comments
GODIAG ECU GPT Boot AD Adapter can work with J2534 devices to read and write ECU data by OBD2/GTP bench or boot method. Since not all ECUs can read and write without dissembling through the OBD2 interface, that's why the GODIAG adapter is designed to support 3 modes. 1. OBD2 Bench mode 2. GPT Bench(no disassembling) mode 3. Boot CNF1 read ECU mode 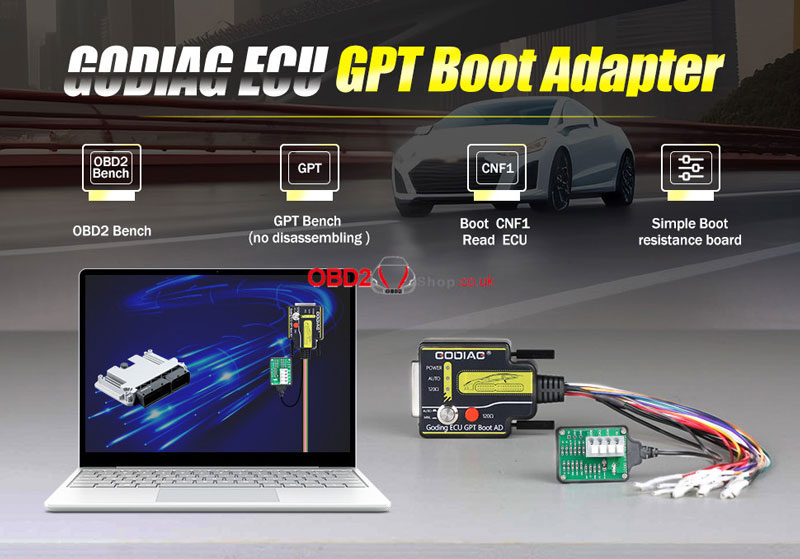 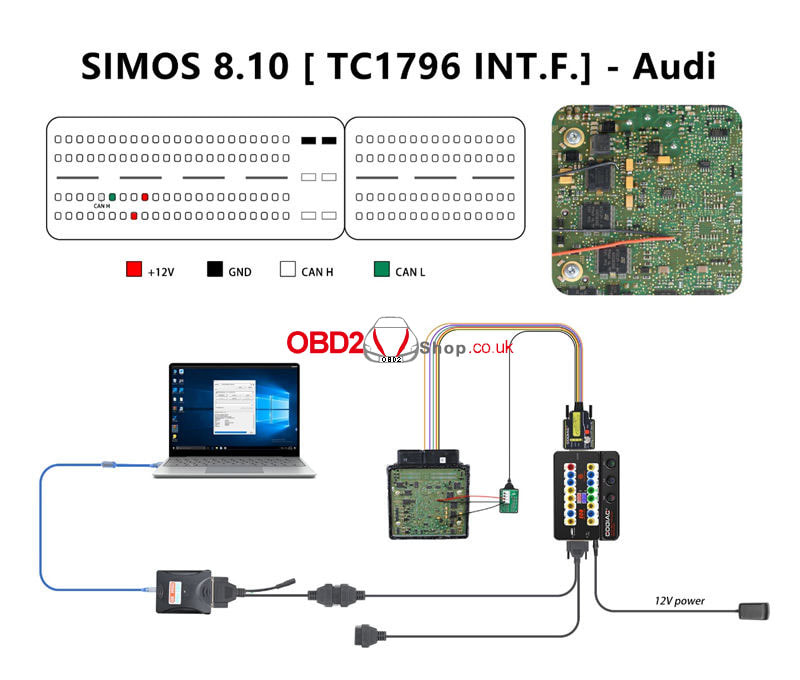 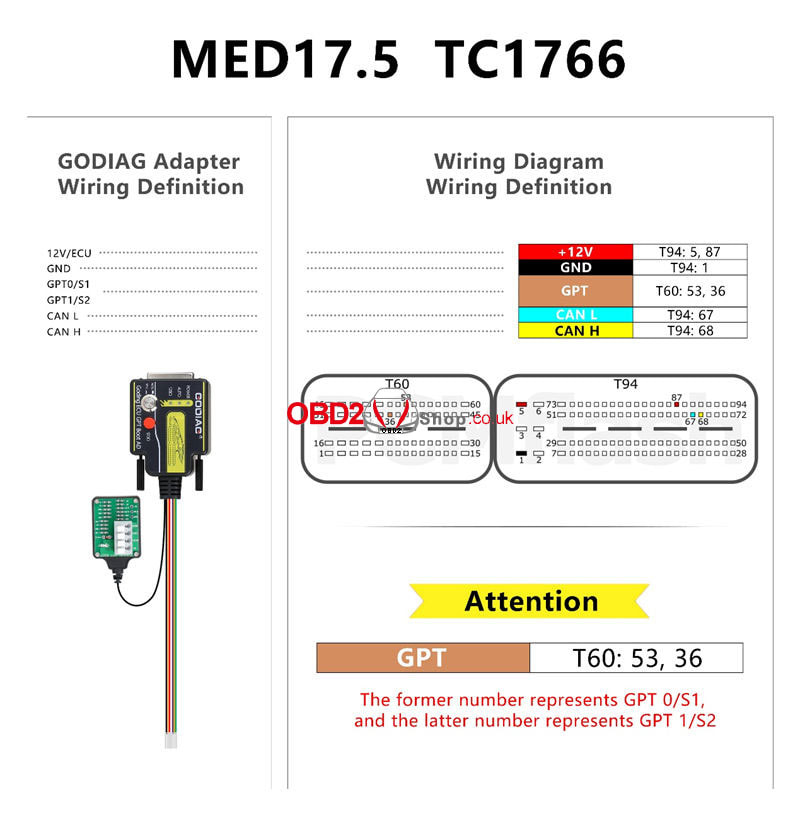 DIMsport KESS V2 KTAG connection diagram: 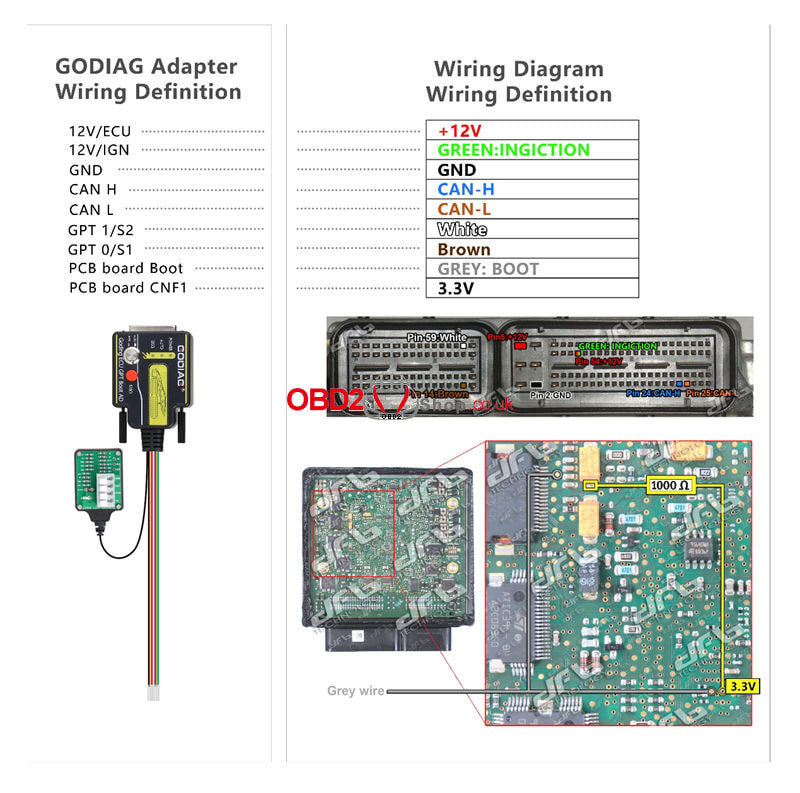 EVC ECU connection diagram: https://www.evc.de/en/product/bsl/ecu.asp Connect the L port to the boot port of the GODIAG ECU Adapter, and the H port to CNF1. 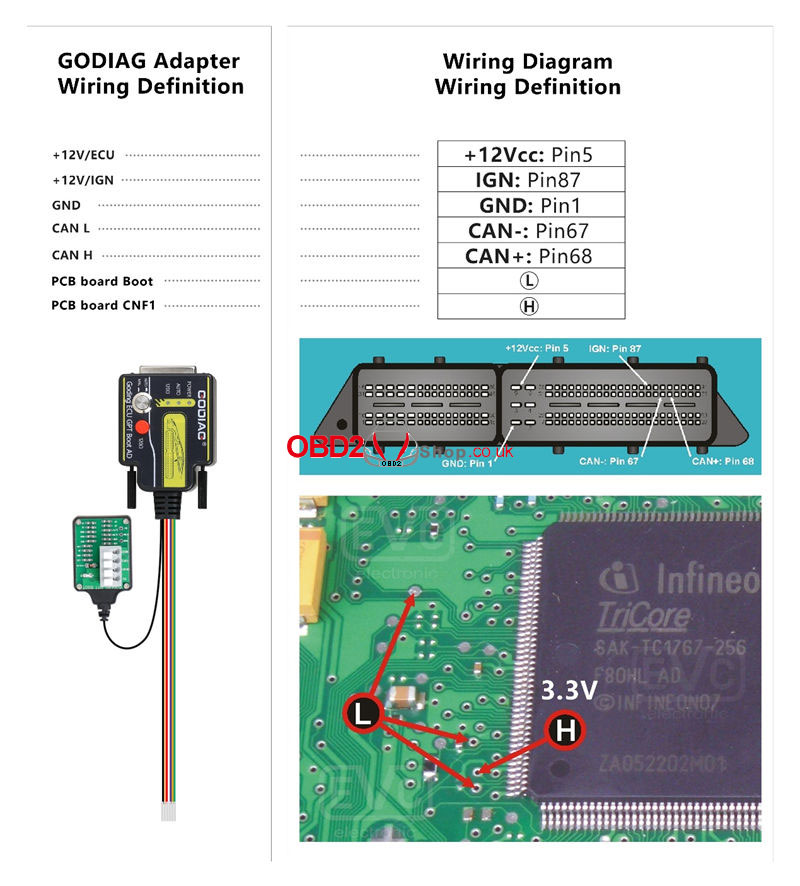 KT-PROG or FOX FGtech ECU connection diagram: https://www.kt-prog.com/download/ Connect the gray line to the Boot, CNF1, or 3.3V to 1KΩ resistance point, or follow the wiring diagram. Connect the brown line to GPT10, and write the line to GPT1.  OBDtuning ECU connection diagram: https://wiki.obdtuning.de/index.php/Hauptseite Support OBD2, GPT, and Boot mode without dissembling. 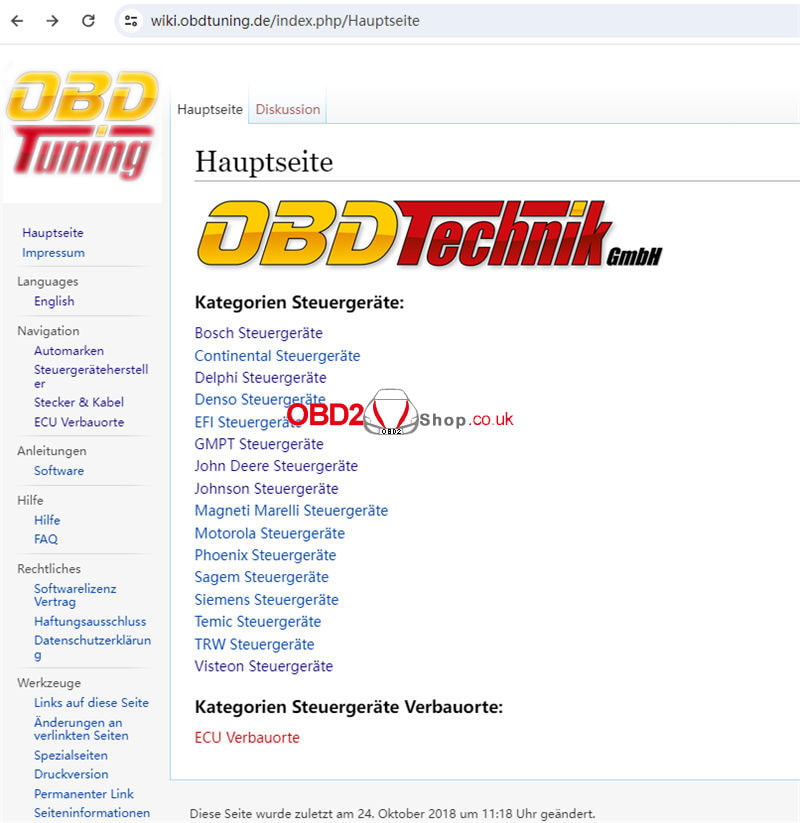 
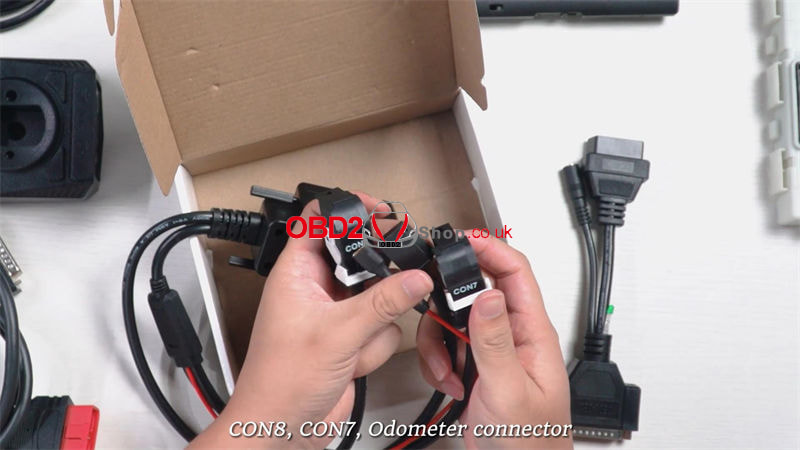
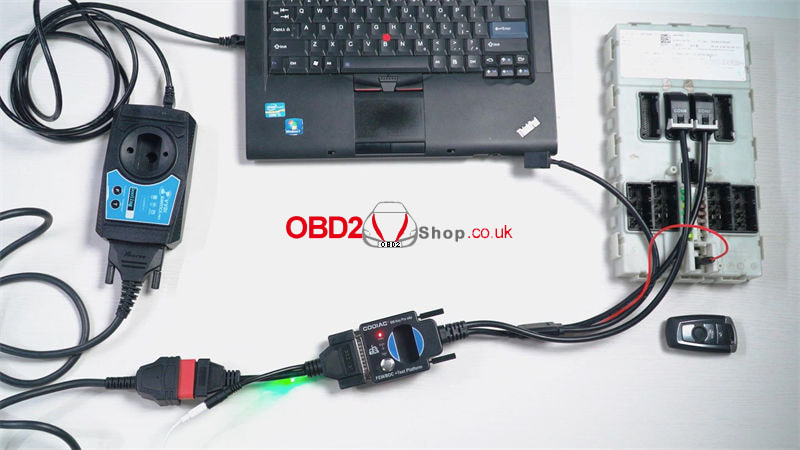
This is a demonstration of how to use the Xhorse VVDI BIMTOOL PRO + GODIAG Test Platform to identify BMW FEM/BDC keys. With the help of GODIAG, engineers can easily test whether the communication is normal or there's any malfunction in FEM/BDC module.
Check the full video to learn:
Connection
GODIAG BMW Test Platform has 4 lines: CON8, CON7, Odometer connector and FEM/BDC power connector. - Connect BIMTOOL Pro to PC via USB cable - Connect BIMTOOL Pro & GODIAG via OBD2 to BD25 cable. - Connect GODIAG to FEM/BDC module via 4 lines. - Plug in the power. 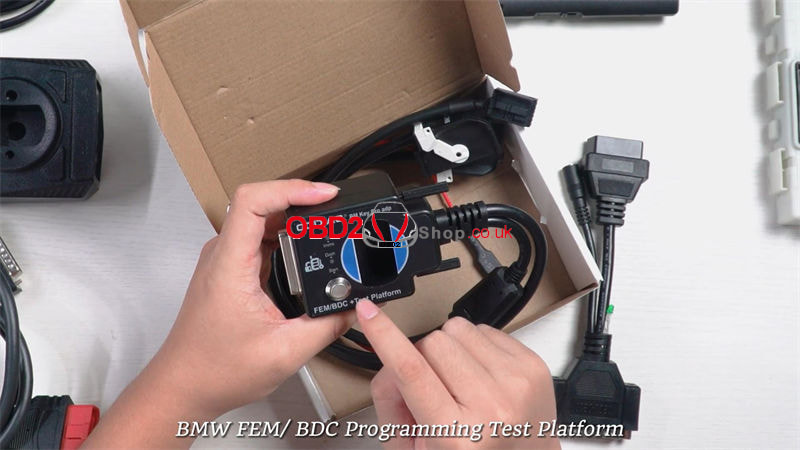
Programming
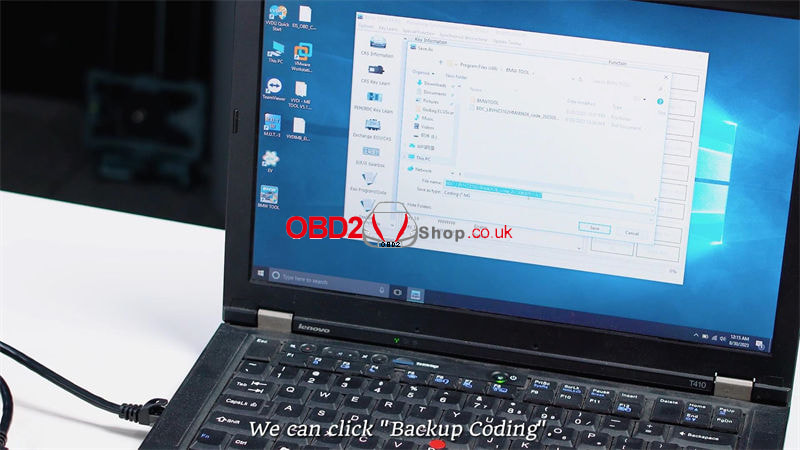
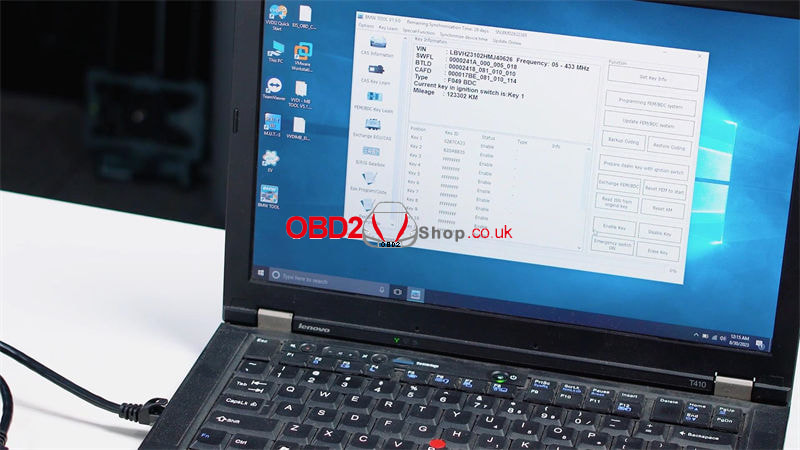
Open the BMW Tool Software to start key identification. Put the key into the identification area of the GODIAG BMW FEM/BDC programming test platform. Then press the button. VVDI will display all key information in the software. After successful recognition, we can click "Backup Coding". 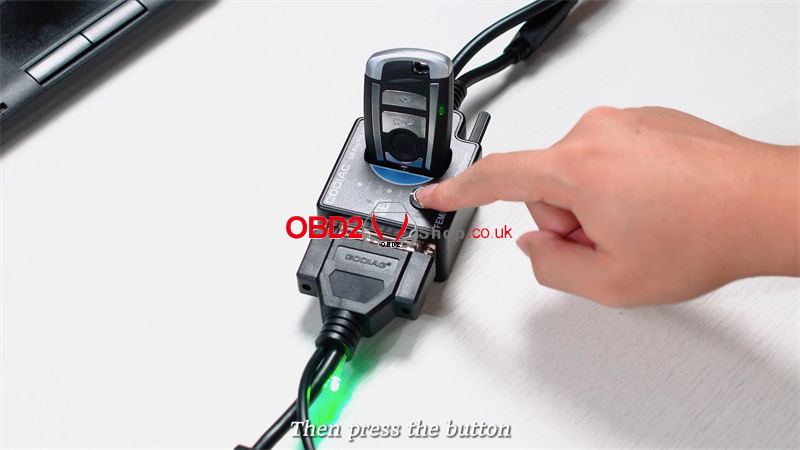
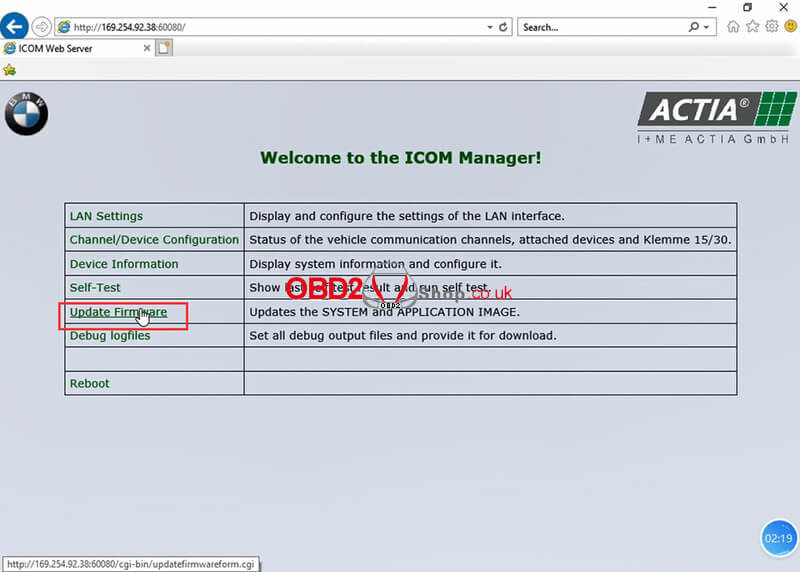
This post will guide you on how to update Super ICOM Pro N3+ firmware.
Upgrade file free download: https://mega.nz/file/xnoilRaS#AhYeUW231K_vl9mMnLVGWwJZnWLGSsi4v2L3CEk-5Mo Here comes the steps: Step 1. Connect the Super ICOM Pro N3+ to the computer with a USB cable and power it on with a 12V power adapter. Step 2. Open http://169.524.92.36:60080/ with IE browser, enter user name: root and password: NZY11502. 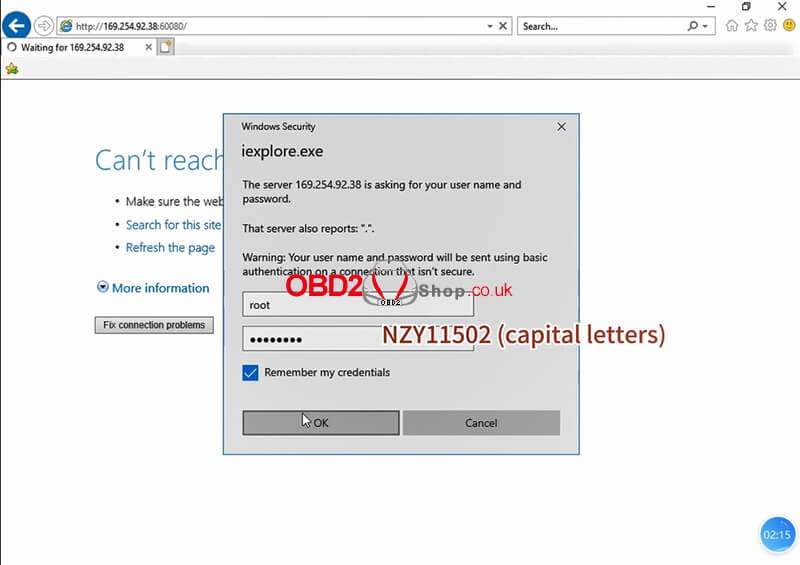
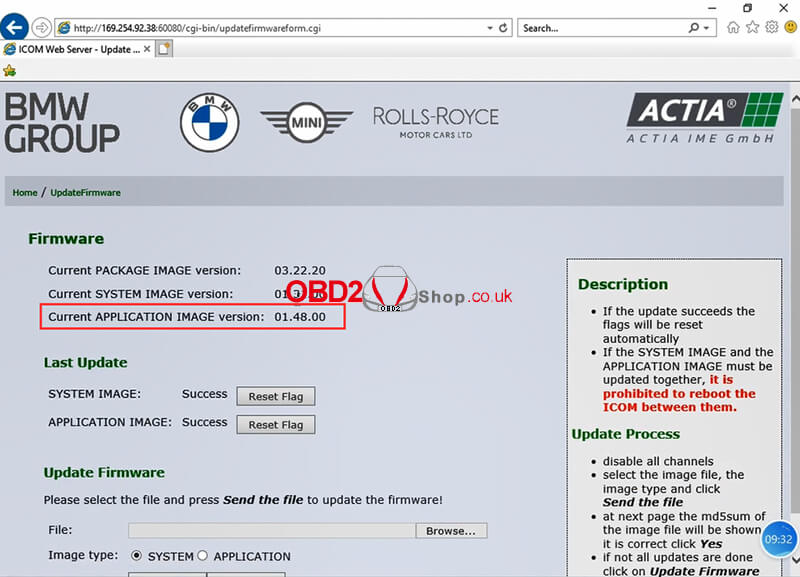
Step 3. Click "Update firmware" and you will see the version information of ICOM firmware.
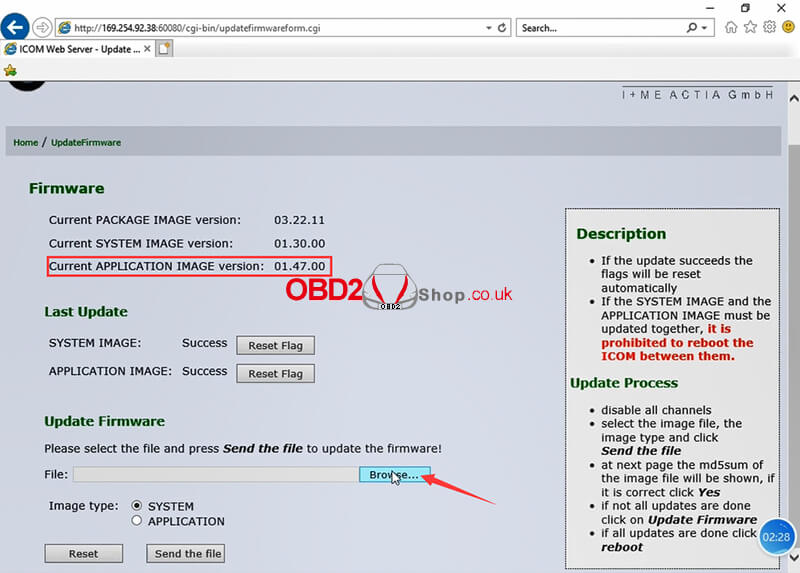
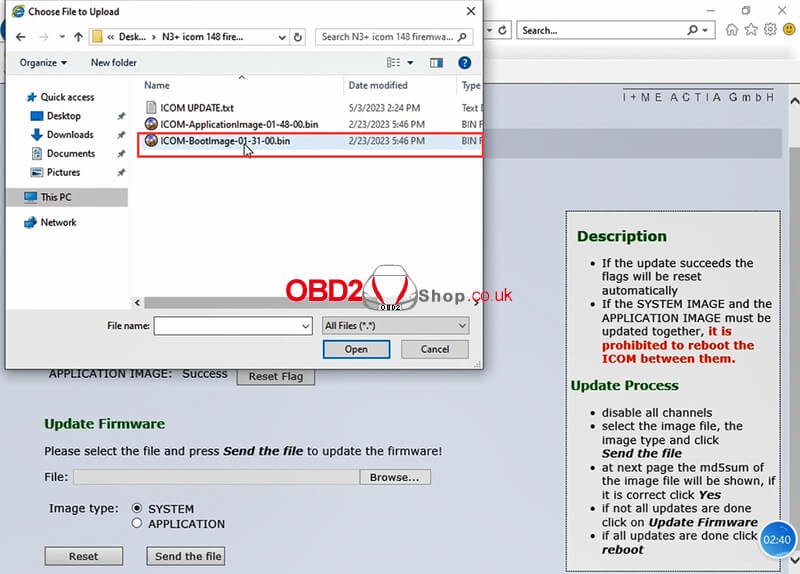
Step 4. In the "Update Firmware", click on "Browse" and select the file "ICOM-Bootimage-01-31-00 .bin", set the image type to the system, and click "Send the file".
Step 5. It says "Write the image file to the flash?", click "Yes" and the ICOM light will turn red.
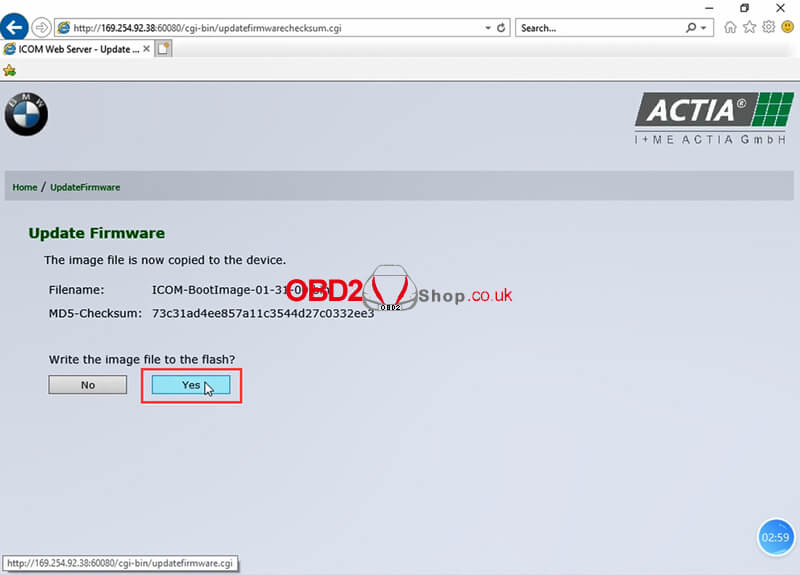
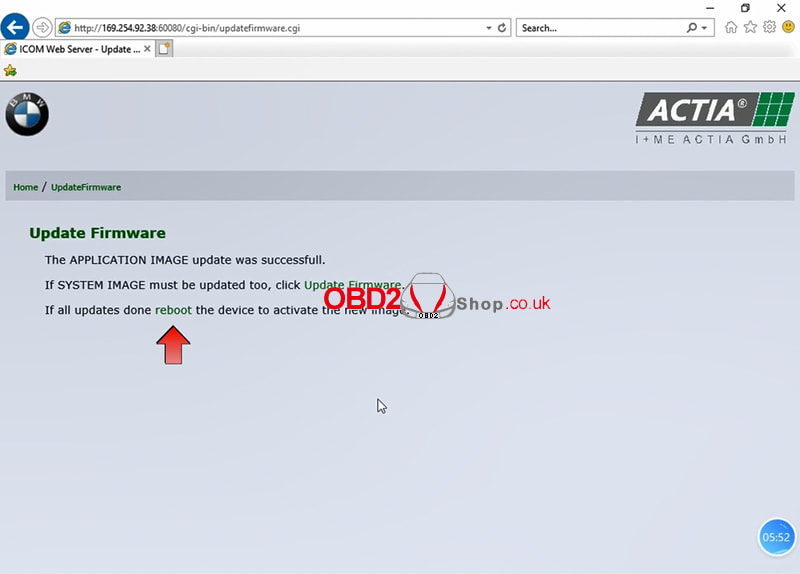
Step 6. When it prompts "the system image updates was successful", click "update firmware".
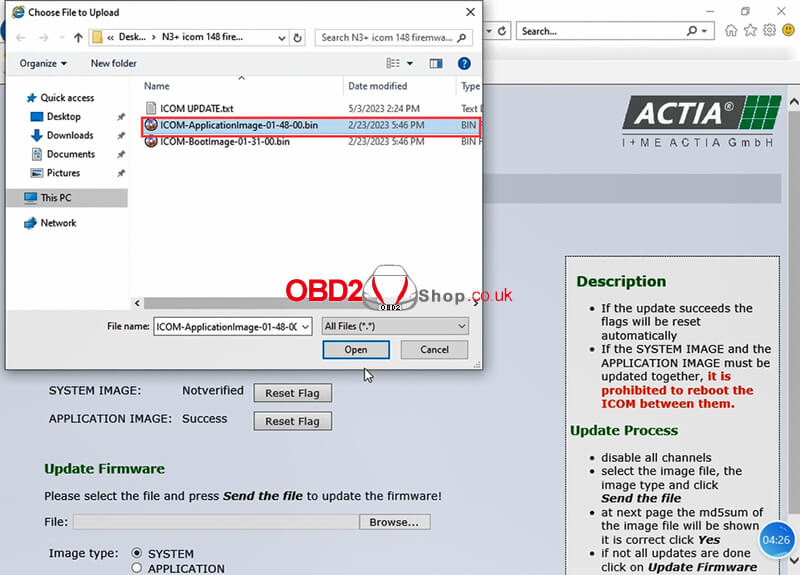
Step 7. Select "ICOM-Applicationimage-01-48-00.bin", set the image type to application, and click "Send the file". The file will take a few minutes. 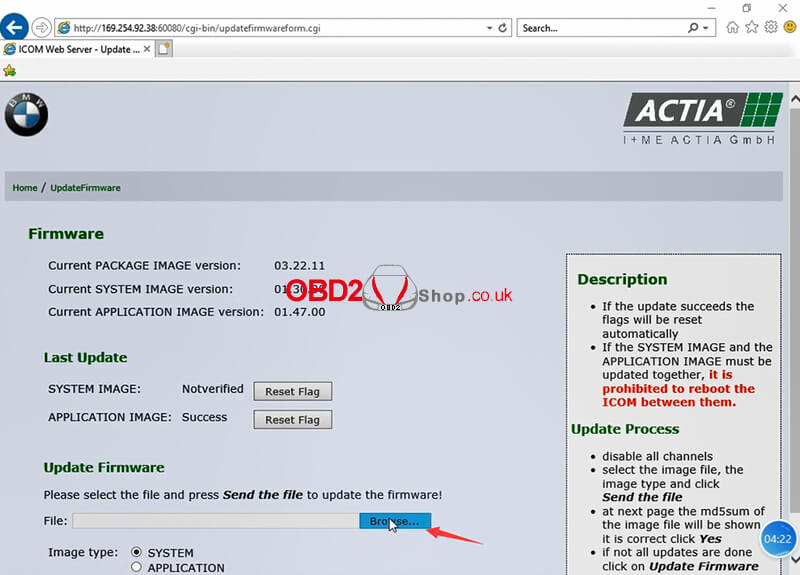
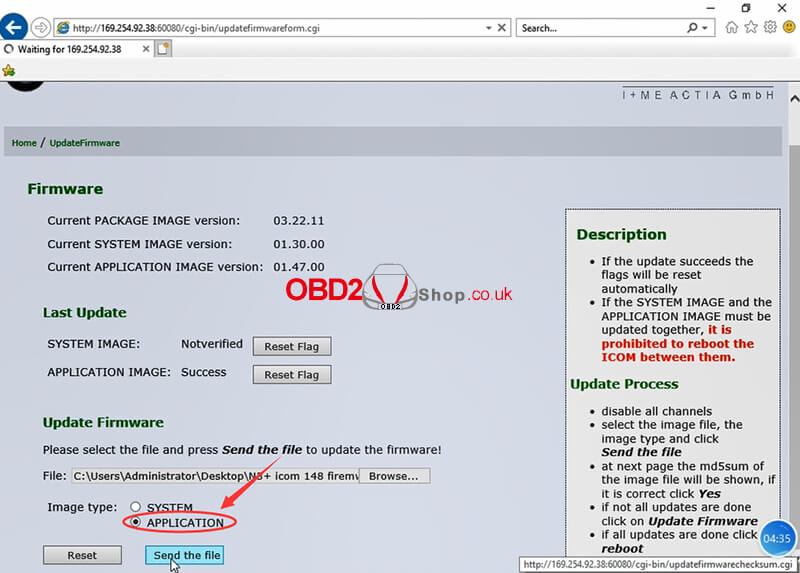
Step 8. It says "Write the image file to the flash?", click "Yes" and the light of ICOM will turn red for the second time.

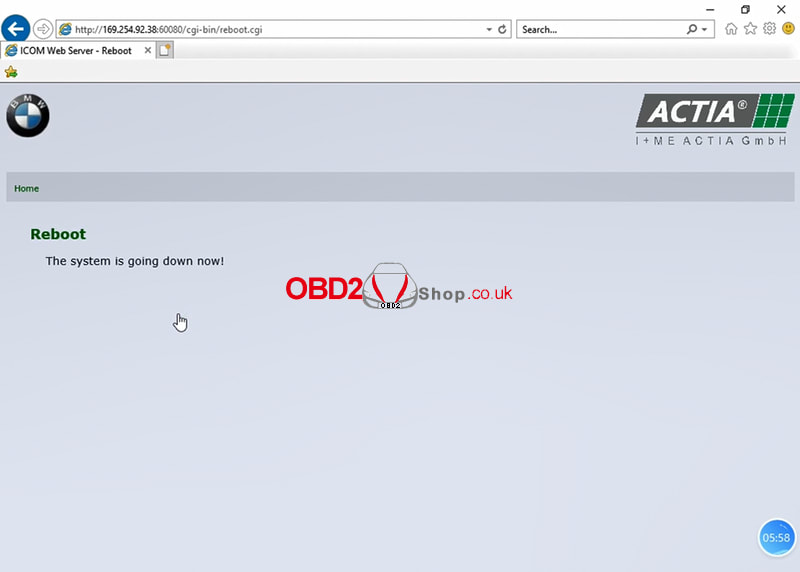
Step 9. When it is all right, click "reboot".
Step 10. The system is going down now! Click "Home" in the upper left corner to return, and you can see the version has been upgraded to 01.48.00.
For more detailed steps, please refer to the video:
This article will guide you on how to use the Super ICOM pro N3+ bmw diagnostic tool. The communication interface between N3+ and the computer adopts wired + wireless mode. 1. USB Mode 1) Connect the N3+ to the power supply or connect the OBD to the vehicle.  2) Use a USB cable to connect your N3+ to your computer. Note: For the first use, you need to configure a dedicated IP address ① Open the computer network configuration interface and find the "Realtek USB FE Family Controller "network. 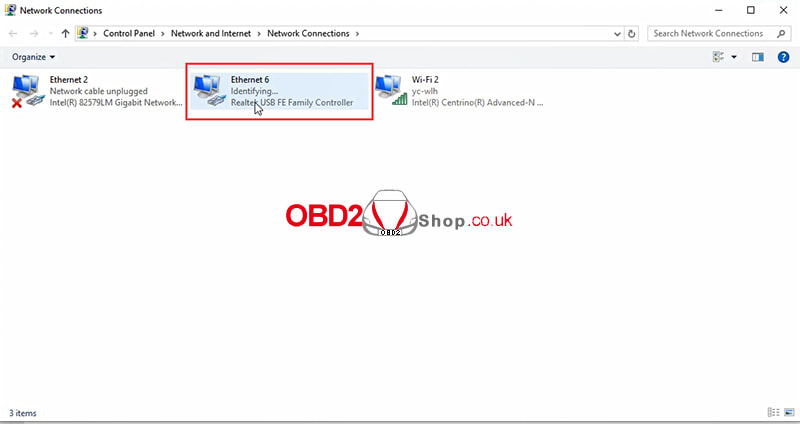 ② Click Properties, select TCP/IPV4, and set the IP address as shown below. ③ Click OK to complete the wired network setup. 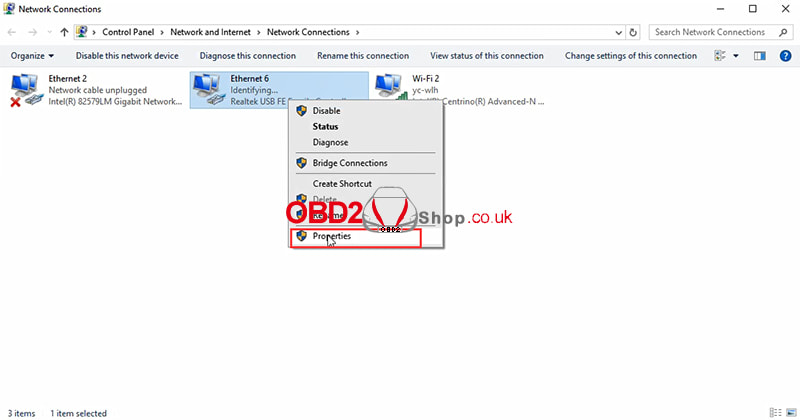  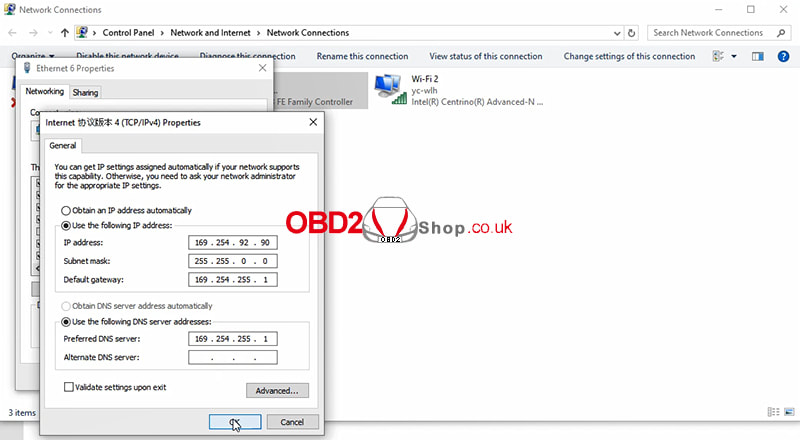 2. WIFI Mode Unplug the USB cable from the computer first, then you will find the SSID is N3+ ICOM-****, connect directly, and enter the password 123456789. Note: The cable must be unplugged to have wireless, one machine one number. 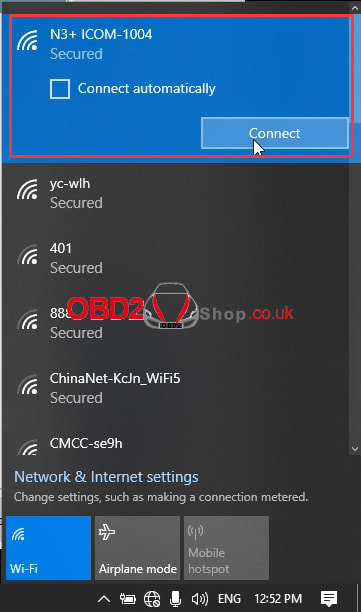 After completing the connection (wired or wireless), you can use the special inspection software to test.
For more information about Super ICOM pro N3+, please follow https://www.obd2shop.co.uk/wholesale/super-icom-pro-n3-plus-bmw-diagnostic-tool.html Super ICOM Pro N3+ BMW Diagnostic Tool is developed by optimizing and upgrading the advantages of BMW special inspection devices A1, A2, A3, and N3. Fully 100% compatible with the original BMW special inspection test software without any changes. Furthermore, N3+ has added J2534 and DOIP on the basis of BMW special inspection(N3+=BMW special inspection + J2534 + DOIP). As the upgraded version of N3, what's new & different? Let's take a look. 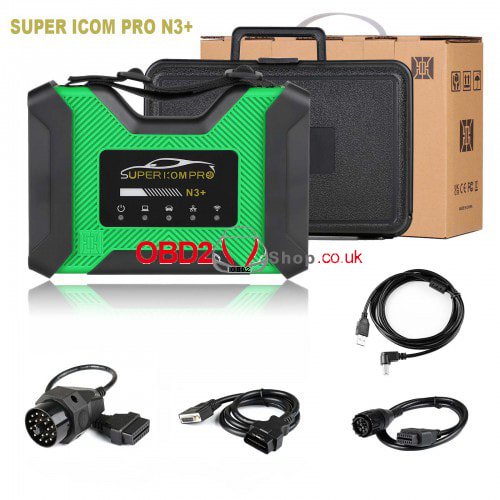 Super ICOM Pro N3+ vs. N3 Comparison 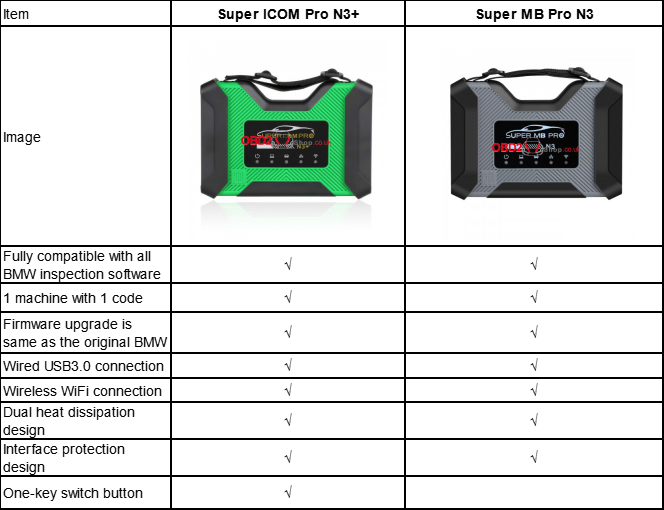 New Features 1. N3+ has added a one-key switch button to allow freely switch between the special inspection and J2534 software. 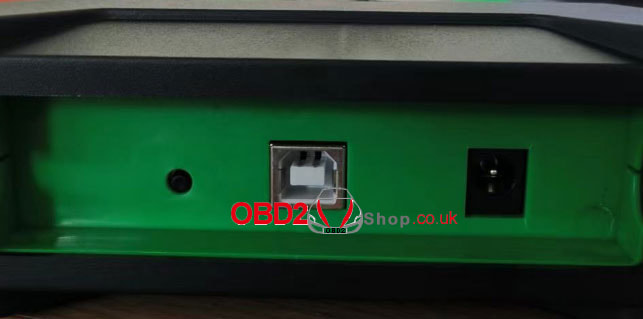 2. N3+ firmware has upgraded to the latest 147 version. Users can download it from the official website for further upgrades. 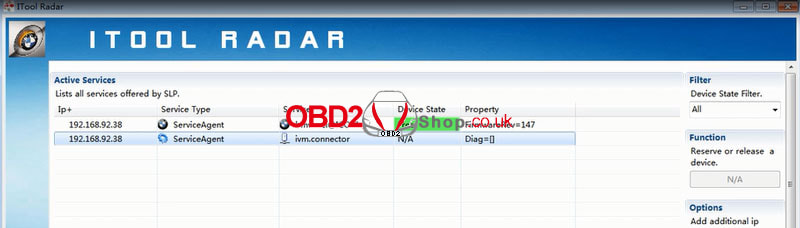 3. After N3+ one-key switch, users can read by the J2534 protocol. Compatible with OBD 6 and 14-pin CAN, 7-pin K-line communication. Eg. VW, Benz, and Toyota special inspection software with J2534 interface.
4. After N3+ one-key switch, DOIP network communication can be used to solve the problem that VW 5054 or Benz C4 cannot test a new car without DOIP. 5. After N3+ one-key switch, users can perform BMW hid and test features or test Benz, VW, and Land Rover(-2023) DOIP by WiFi connection. More convenient and faster. Order link: https://www.obd2shop.co.uk/wholesale/super-icom-pro-n3-plus-bmw-diagnostic-tool.html GODIAG GT107 + DSG Plus Gearbox Data Adapter can connect to Benz, BMW, and VAG ECU like DQ250, DQ200, VL381, VL300, DQ500, and DL501 for maintenance or diagnosis. Compare to the old version GT107 DSG, what's new and different? Let's take the comparison table for reference. 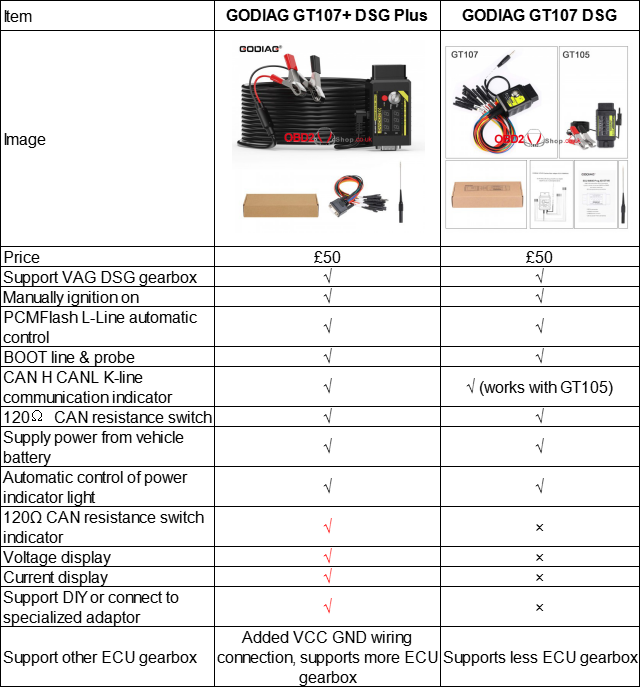 New Features 1. Added 120Ω CAN resistance switch indicator, voltage display and current display. 2. No need to work with GODIAG GT105 any more. 3. Added GND VCC port for BMW and Benz gearbox connection. 4. Supports disassembling and customising connectors for DIY development. 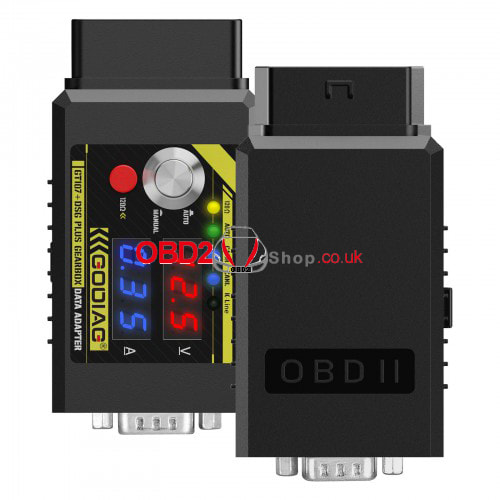 GT107+ DSG Plus is compatible with PCMFlash, FCMTuner and KessV2 diagnostic software to repair the DSG gearbox ECU. Order link:
https://www.obd2shop.co.uk/wholesale/godiag-gt107-dsg-plus-gearbox-data-adapter.html
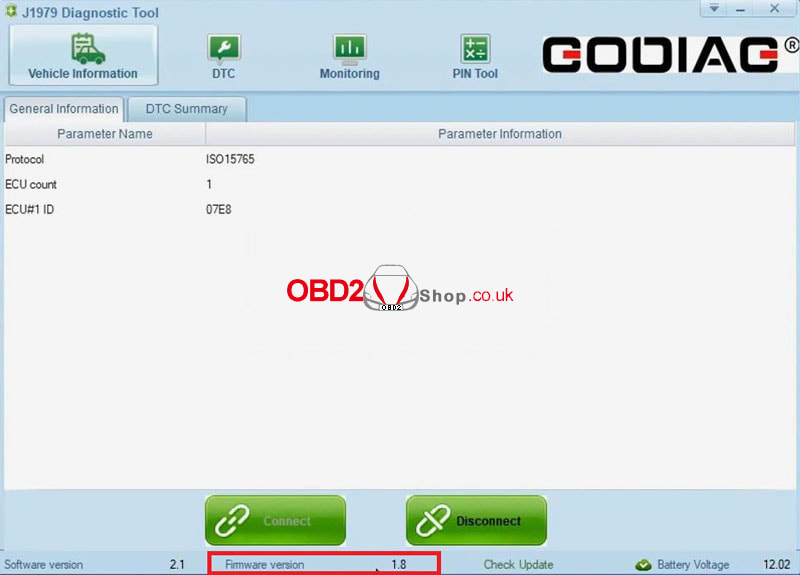
Here we provide Godiag GD101 J2534 firmware free download, installation & upgrade guide step by step. Godiag GD101 is a device to work between diagnostic software and vehicle, compatible with J2534 Passthru and ELM327.
Free download Godiag J2534 Driver V2.1 Operating system: Win 8/10/11, 32/64bit (Better Not Install on Win7!)
How to install Godiag J2534 driver?
Run Godiag J2534 driver >> Select language >> Select destination location >> Select components >> Select start menu folder >> Select additional tasks >> Install 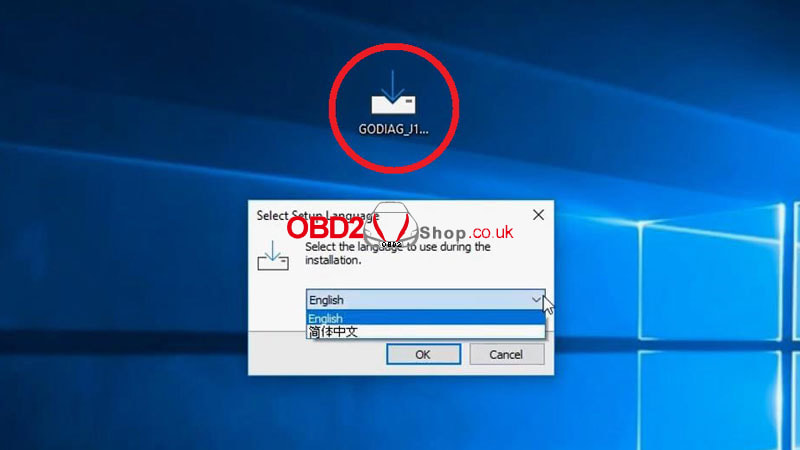
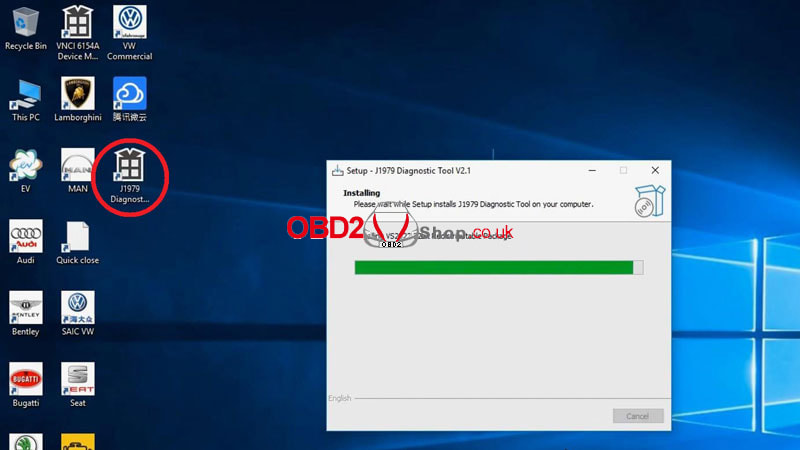
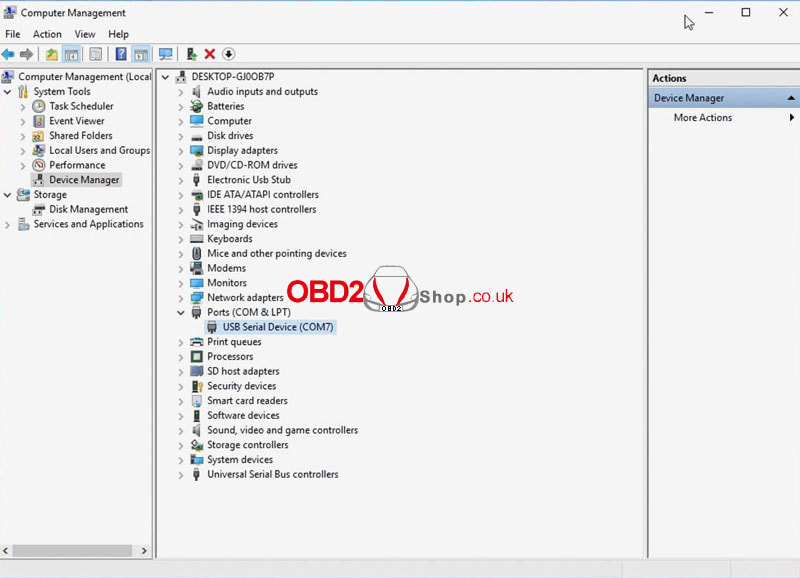
Noted to check if Godiag J1979 driver is installed successfully.
Connect Godiag J2534 & ECU to computer. Computer management >> System tools >> Device manager >> Ports (COM & LPT) >> USB Serial Device(COM7) 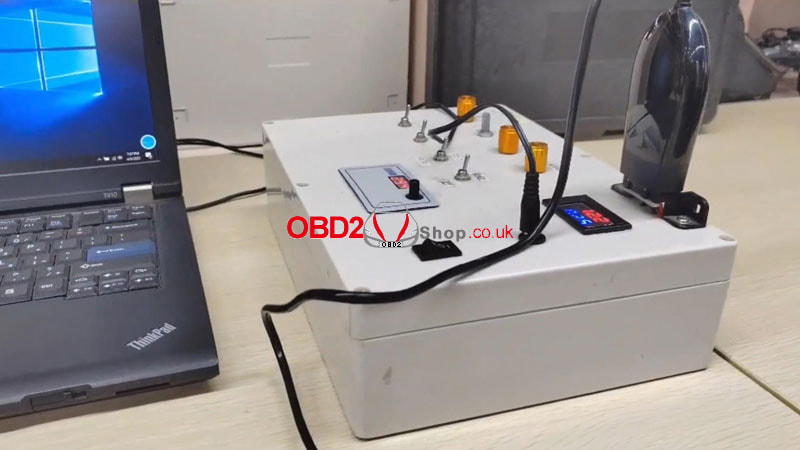
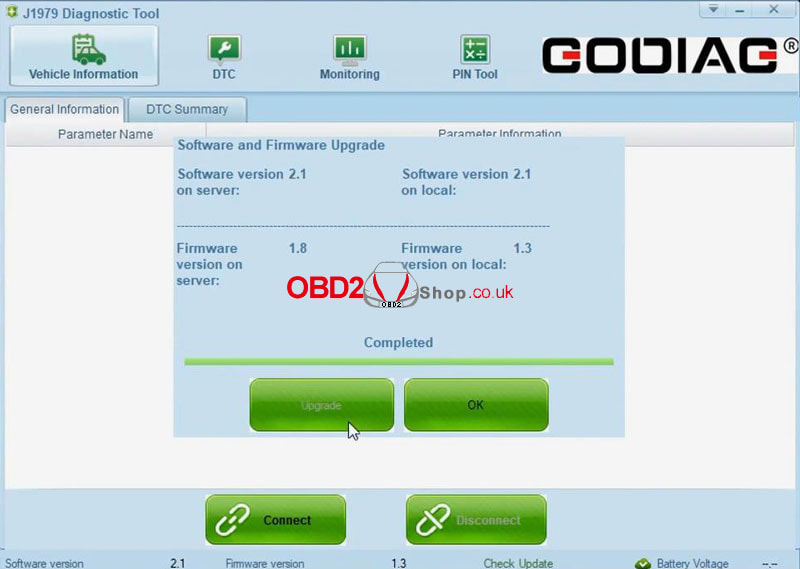
How to update Godiag GD101 J2534 firmware?
Start Godiag J2534 software >> Connect >> Check update Must disconnect with device before upgrade! Disconnect >> Check update >> Update Completed. Now you can connect the device again for start. 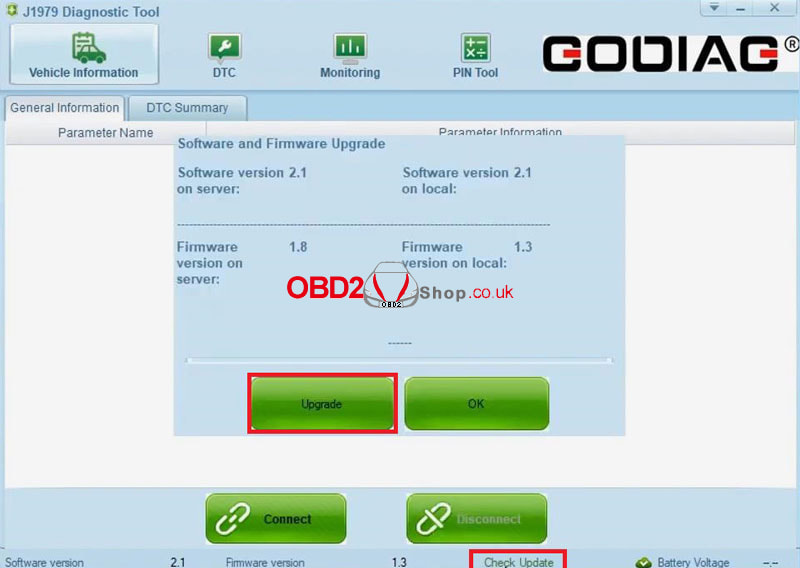
GODIAG GT105 + GT107 DSG Gearbox Adapter can work for DQ250, DQ200, VL381, VL300, DQ500, DL501 with ECU tuning tools. It can read&write DSG gearbox data with fast response, giving great convenience for engineers. Godiag ECU IMMO Kit is compatible with many programmers like PCMTuner, Kess V2, PCMFlash, KTMBench, etc. Following we gonna show how to diagnose & read VW Simos 18.1 ECU as an example. Vident iSmart800 Pro + GODIAG GT105 & GT107 Diagnose VW ECU Connection 1. Connect GODIAG GT105 & GT107 first, the other end of GT105 is connected to OBD cable. 2. Connect the OBD cable to the iSmart800 Pro tablet. 3. Power on GT105. Diagnostic >> OBDII It'll display the system status automatically, press "ESC" to enter into the diagnostic menu. Here we can perform: read codes, erase codes, live data, freeze frame, I/M readiness, O2 monitor test, on-board monitor test, component test, vehicle info, module present, and DTC lockup.  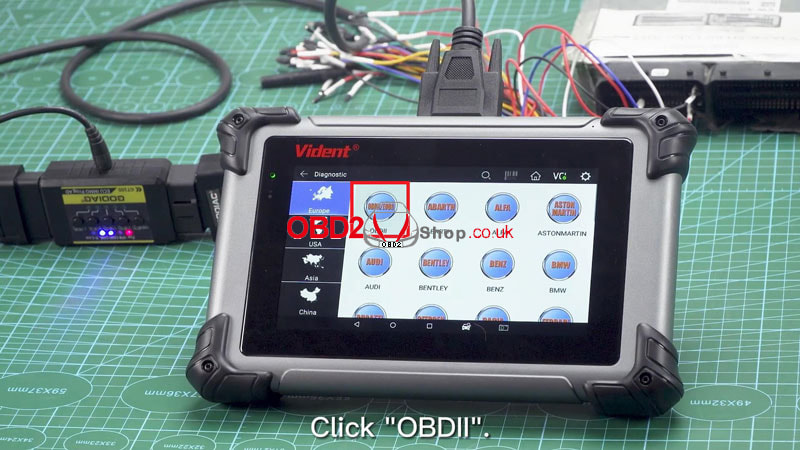 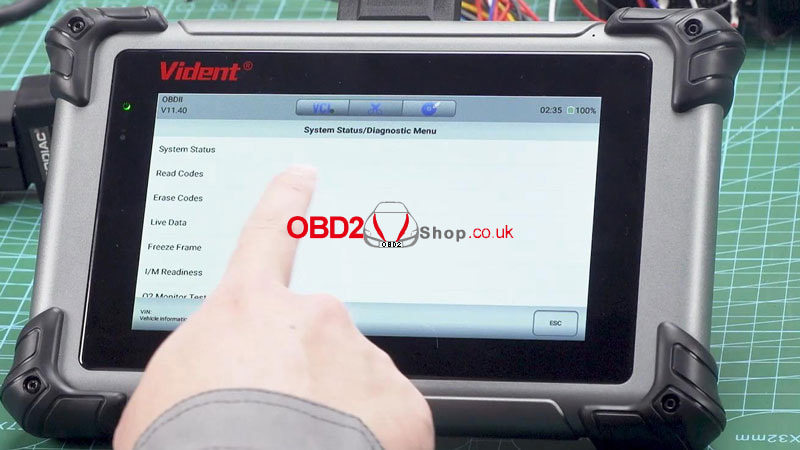 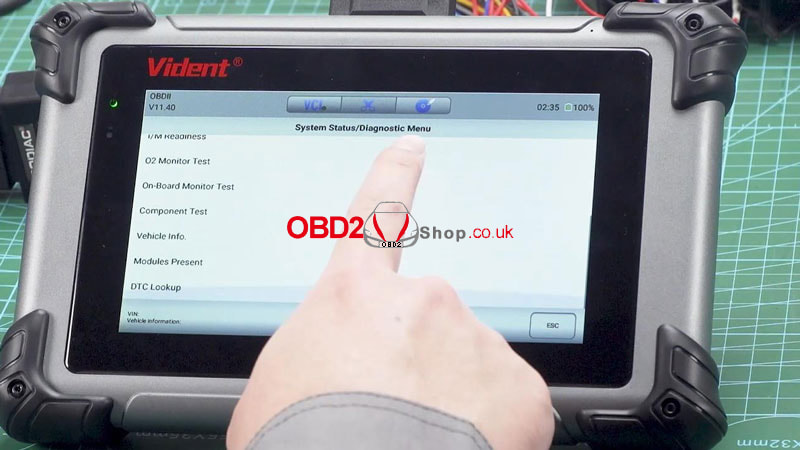 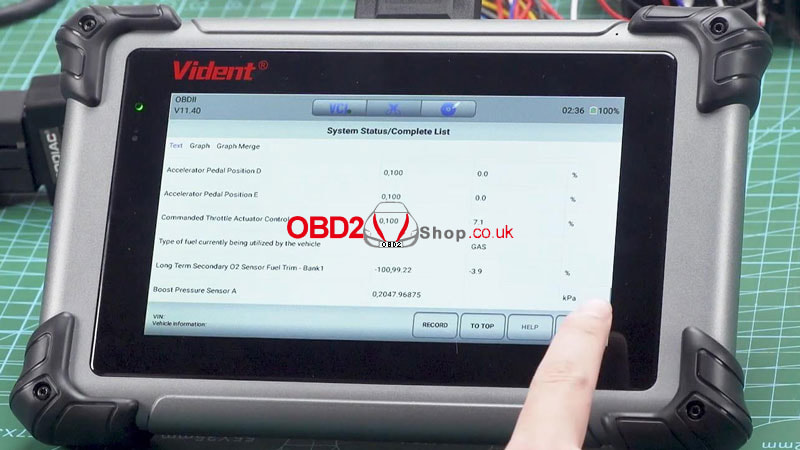 FoxFlash + GODIAG GT105 & GT107 Read VW ECU Connection 1. Connect GODIAG GT105 & GT107 first, plug the other end of GT105 to OBD cable. 2. Connect the OBD cable to FoxFlash. 3. Connect FoxFlash to the computer via USB. 4. Power on GT105. Run and download FoxFlash software on the computer. Select ECU model: VOLKSWAGEN >> BEETLE - 5C1 - >> 1.8/2.0 TSI 170/210/220CV SMOS 18.1 'CAN >> OK Read ECU data success. 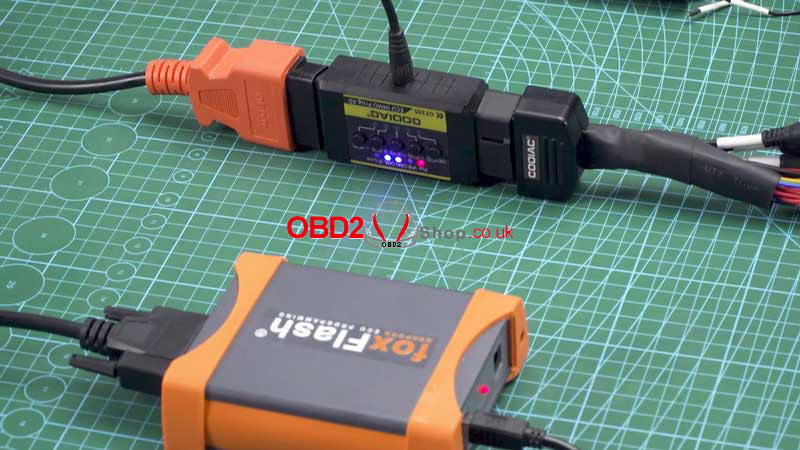 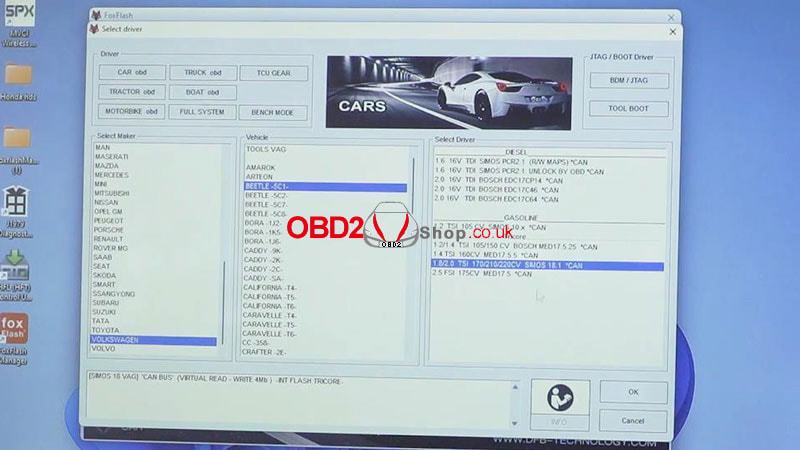 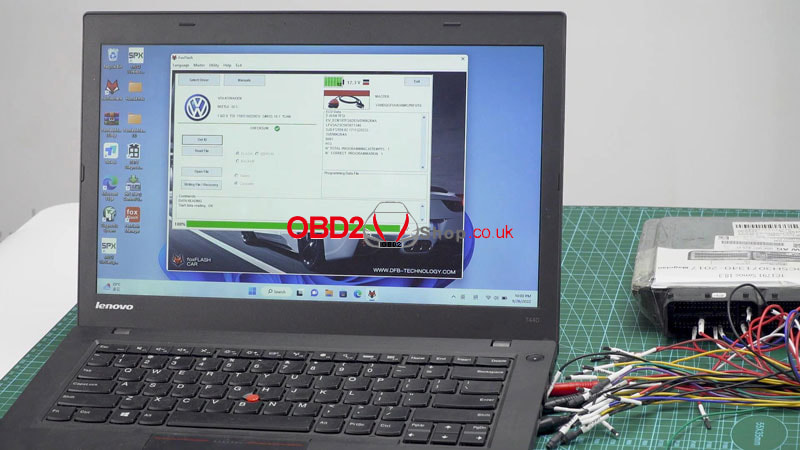
Here we introduce Vident iSmart800 Pro automotive diagnostic analysis scanner highlights and special functions. Guide to use one-click translation, OBD charging, diagnose cars and reset settings for beginners.
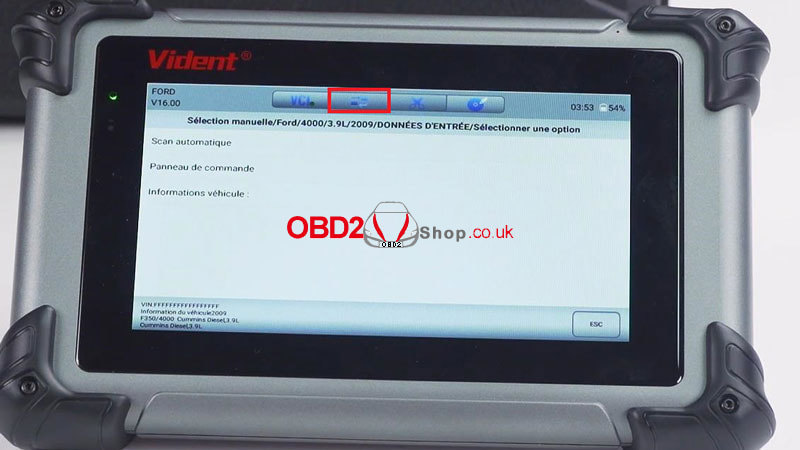
One-click Translation iSmart800 Pro supports 18 languages available & online one-click translation. How to use One-click Translation? 1. Change the iSmart800 Pro tablet language to French in Settings. 2. Click on model diagnosis, here we can see that Auto Scan is still in English, not shown in Fresh. Click the second button above to translate with one-click. After translation, we can find that it has become French. 
OBD Charging
When using the OBD cable to connect car and iSmart800 Pro for testing, it can charge the tablet directly. It can also be used when the tablet is out of power. 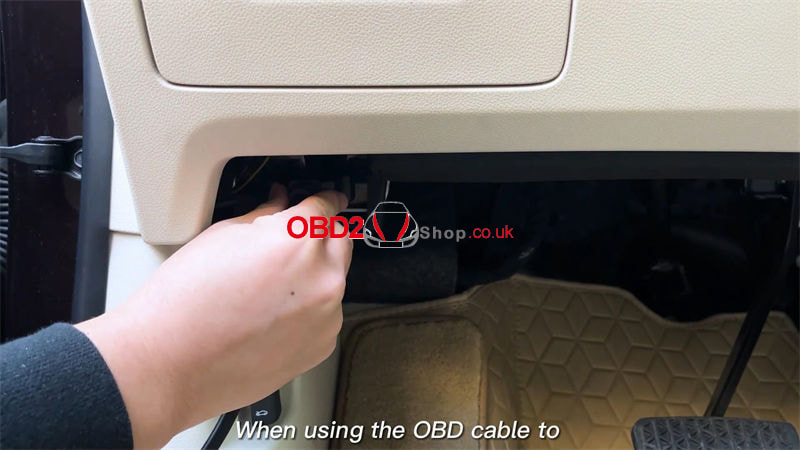
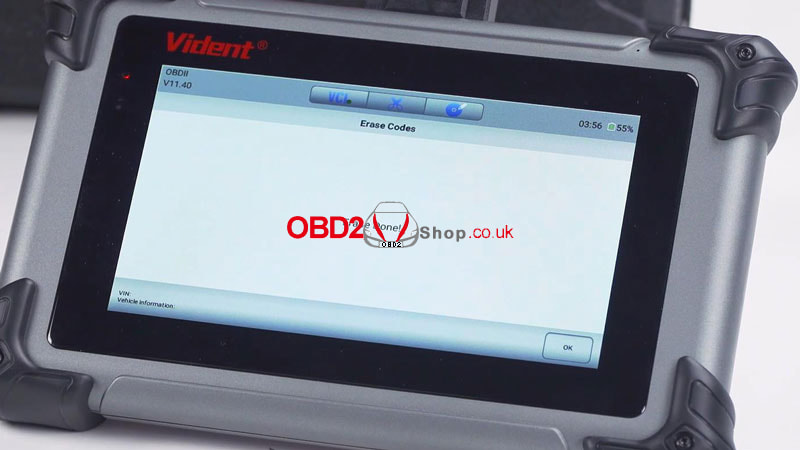
Diagnose Cars with CAN FD Protocol
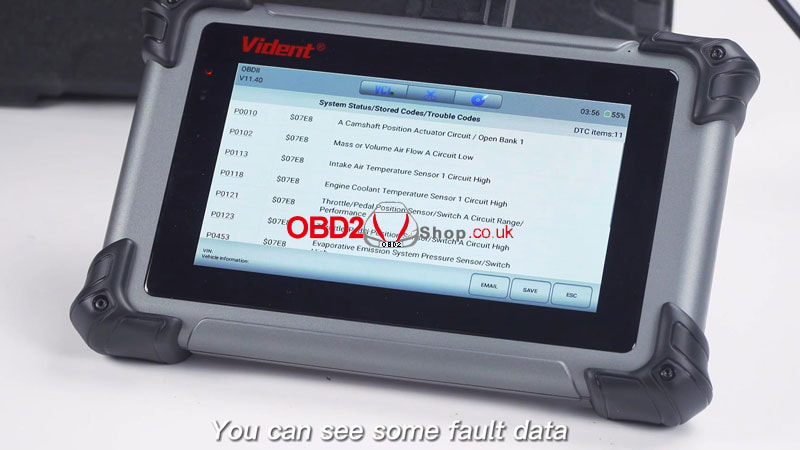
Click on Diagnostics, select OBD for Auto Scan. After entering, we can see the diagnostic menu: system status, read codes, erase codes, live data, freeze frame, I/M readiness, O2 monitor test. 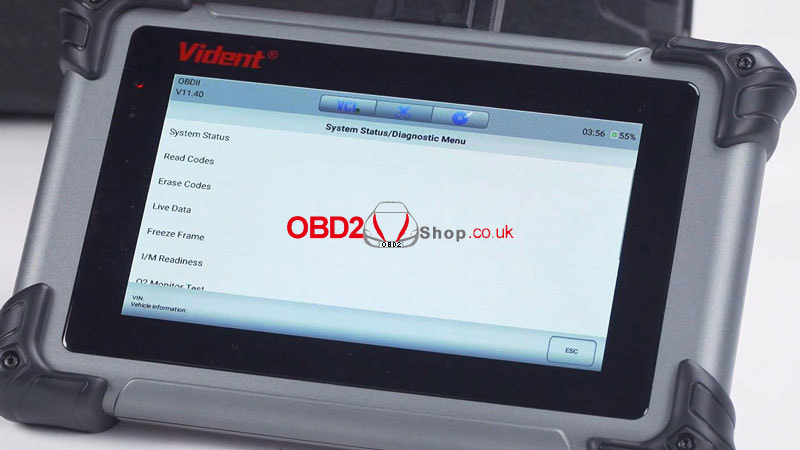
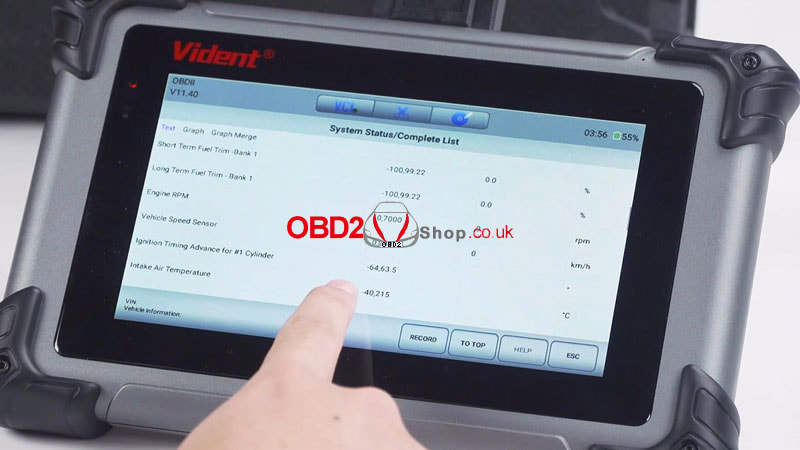
How to check real-time data waveform display?
Connect iSmart800 Pro with OBD cable for car. Enter the Diagnostic >> Live Data >> Engine RPM >> Graph When stepping on the accelerator, we can see the engine RPM waveform and its data changes. 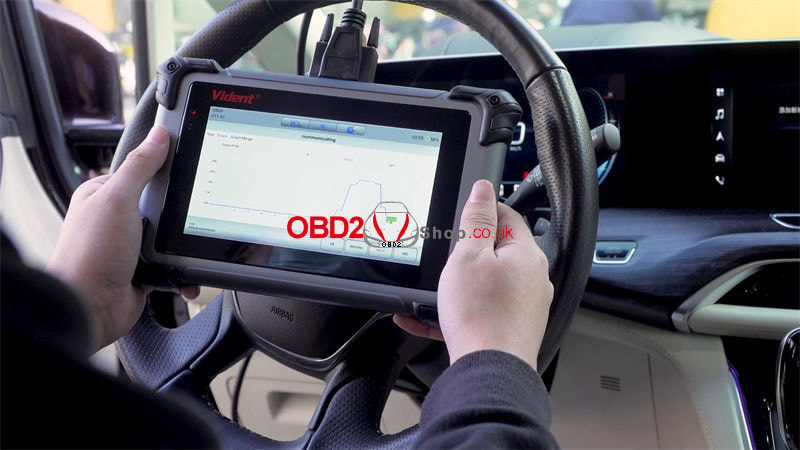
Highlights and special features on Youtube:
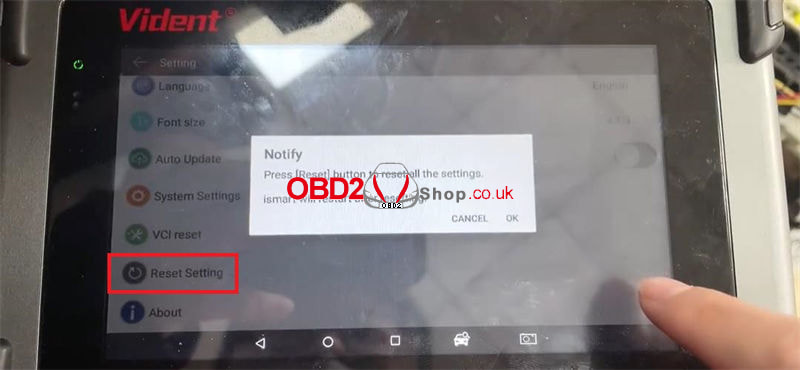
How to reset iSmart800 Pro settings?
Setting >> Reset Setting Press Reset button to reset all the settings. iSmart will reset after resetting. Press "OK". 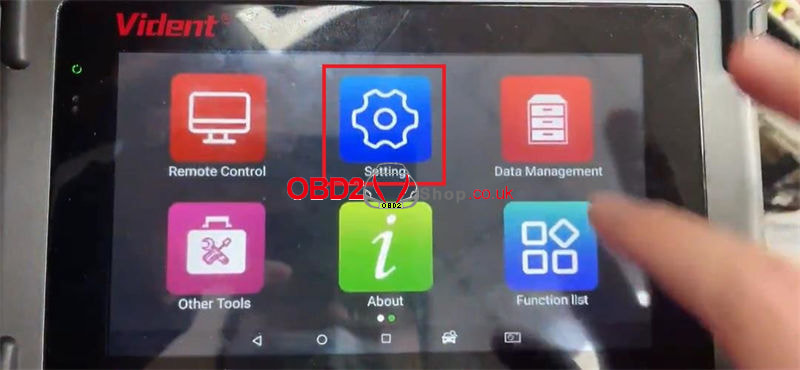
Reset setting display on Youtube:
|
