|
We usually have encountered this situation in the maintenance of vehicles: vehicle tire pressure alarm does not display tire value as shown in the picture. Today I'll introduce the device Launch X431 CRT5011E + LTR-01 RF Sensor that can do car tire pressure. Initial Setup 1) Hold down the power button for 3s while using it. 2) Open X431 CRT5011E, go to the Home screen to select "Set Up". 3) After entering, modify the pressure unit & language for your own use. How to reset TPMS sensors? The faulty vehicle was a 2017 Porsche Macan. The instrument's left rear tire pressure displays an abnormal alarm. Open X431 CRT5011E, Tire Pressure System >> Porsche >> Macan >> 2014/01-2022/12(433MHz) >> Check Sensor Trigger against the valve nozzle as shown. You can see the other 3 sensors are normal, the left rear tire pressure sensor is abnormal. 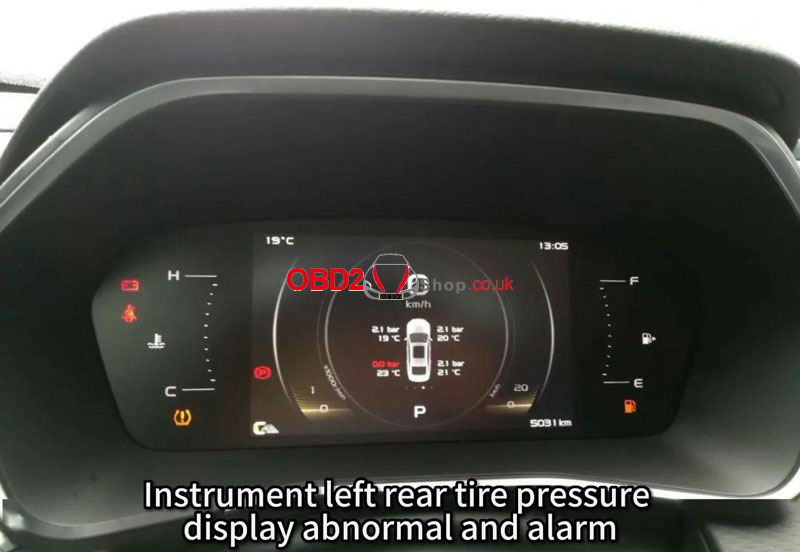 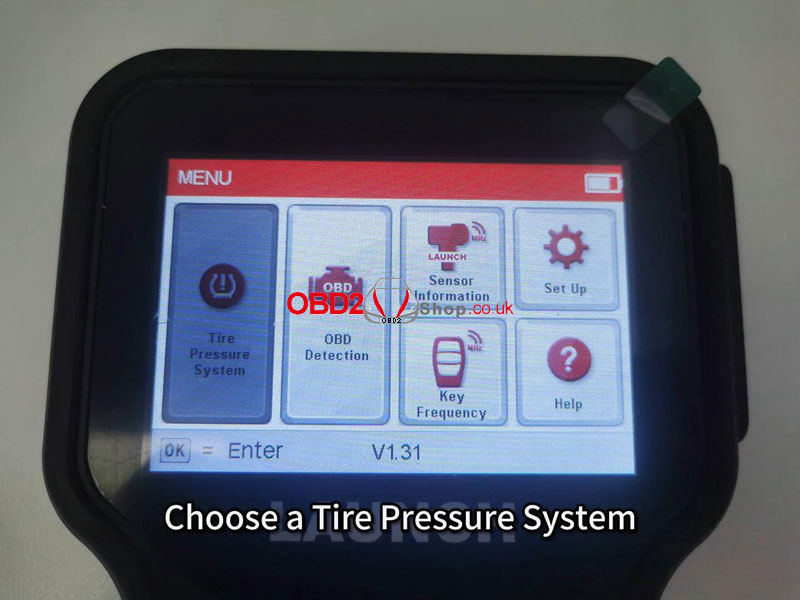 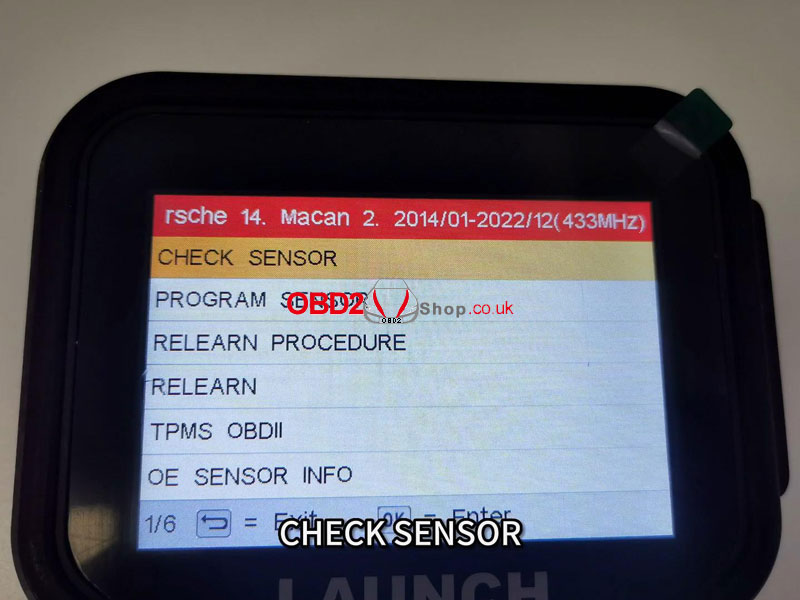 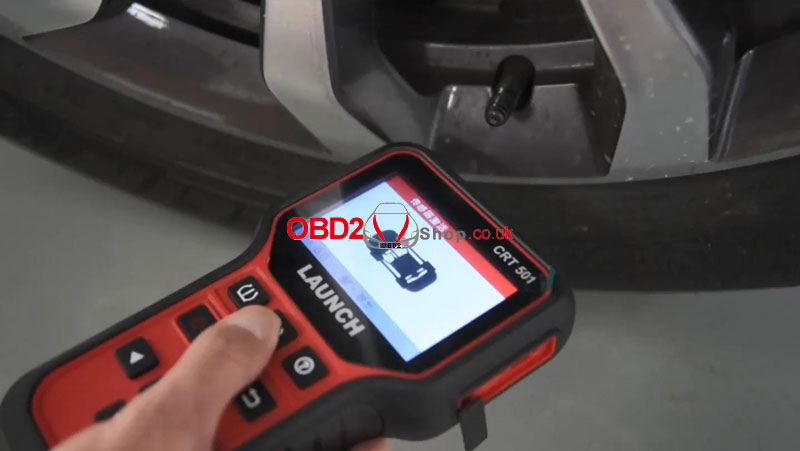 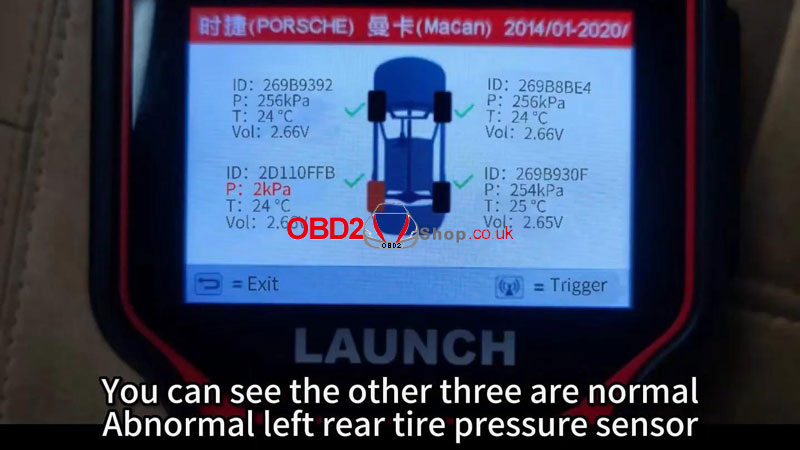 Method 1 Use the Launch LTR-01 RF Sensor to replace the damaged tire pressure sensor. Program Sensor >> Manual Input/ copy ID by OBD 1) Write the left rear sensor ID of the original car into the tire pressure sensor under Launch. You can see the message of programming success. 2) Follow the tire pressure sensor installation instructions to put a new sensor in the left rear tire of the car. Select "Check Sensor" on the function screen. 3) Then trigger 4 tire pressure sensors against the valve ports. The left rear has been successfully replaced by the new Launch tire pressure sensor. 4) Clear the trouble code. The vehicle instrument tire pressure monitoring system has returned to normal. 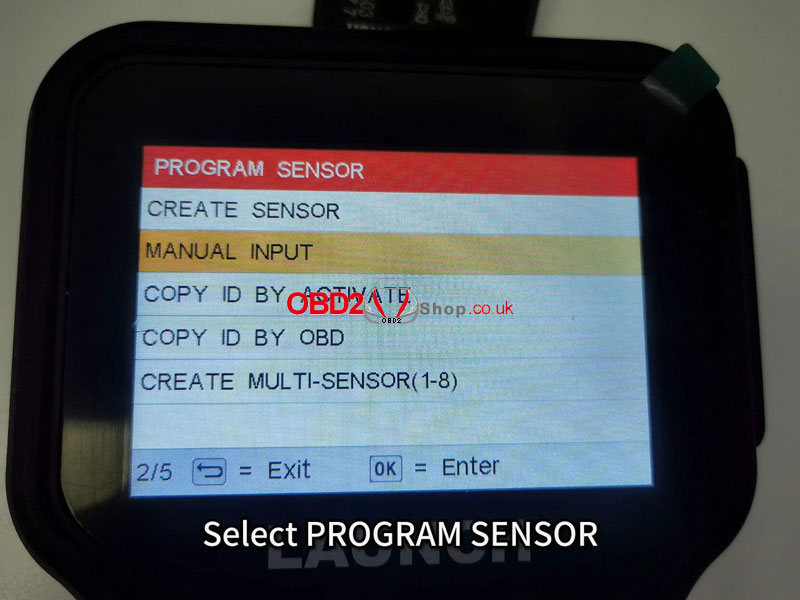 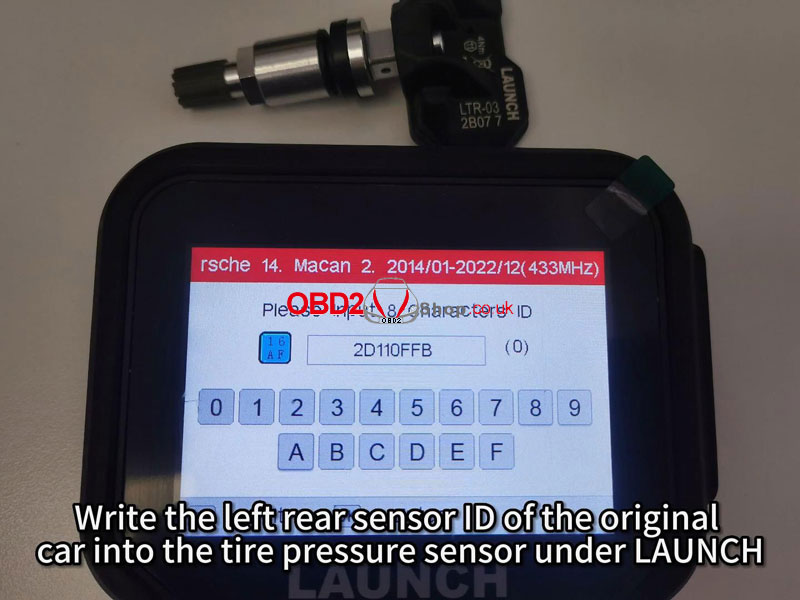 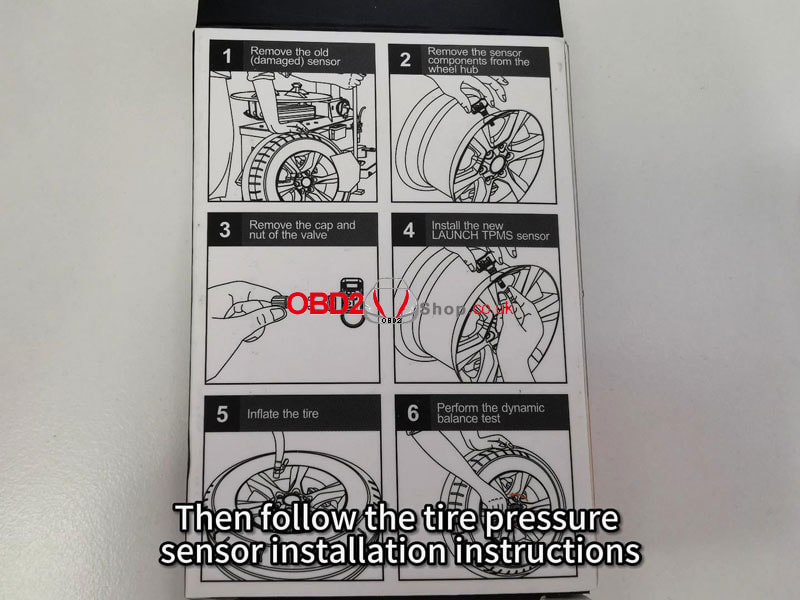  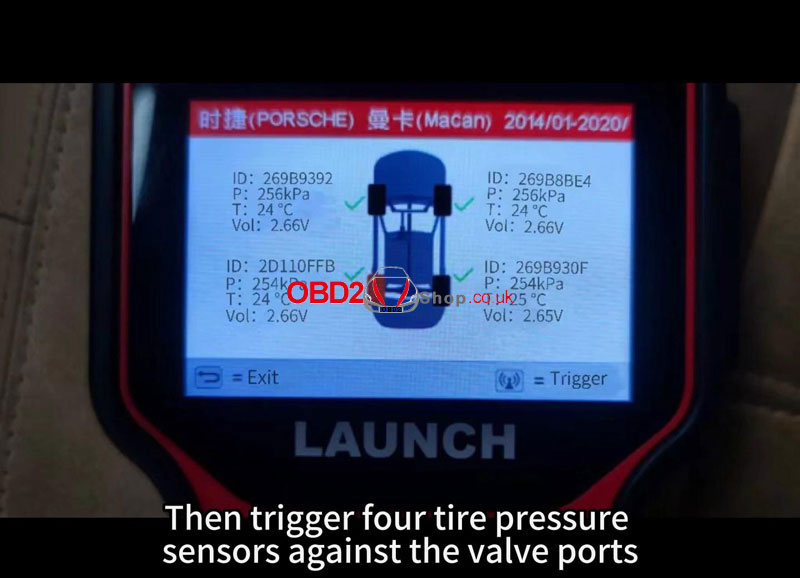 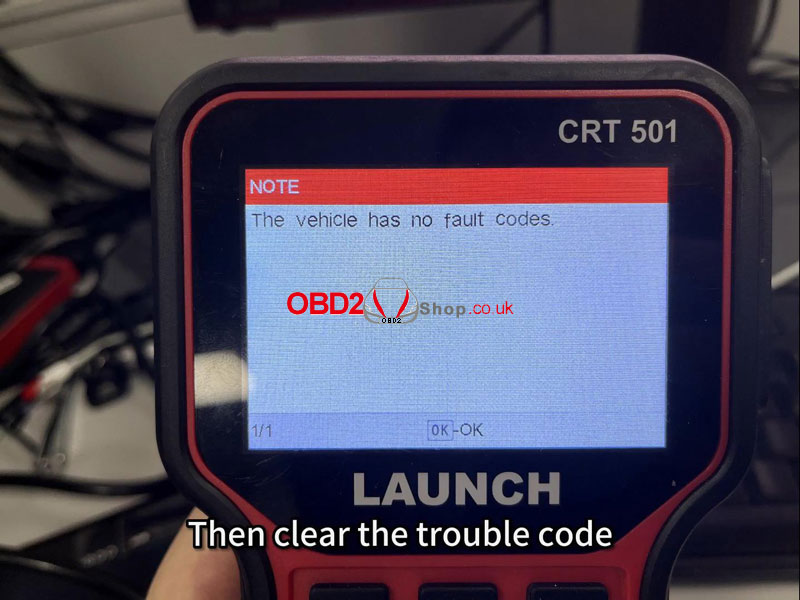 Method 2 Of course, you can also replace the original tire pressure sensor directly. This tire pressure sensor in Turi is ID D2319C3E. 1) Select "Check Sensor" on the function screen. 2) Trigger 4 tire pressure sensors against the valve port. You can see that the left rear tire pressure sensor is the new ID. 3) Return to select "Relearn >> OBD Relearn". 4) Take out the OBDII diagnostic main line according to the prompts, and connect the vehicle OBDII diagnostic socket to the 5011E device. Then continue, it'll indicate success in learning. The vehicle instrument tire pressure monitoring system has returned to normal. 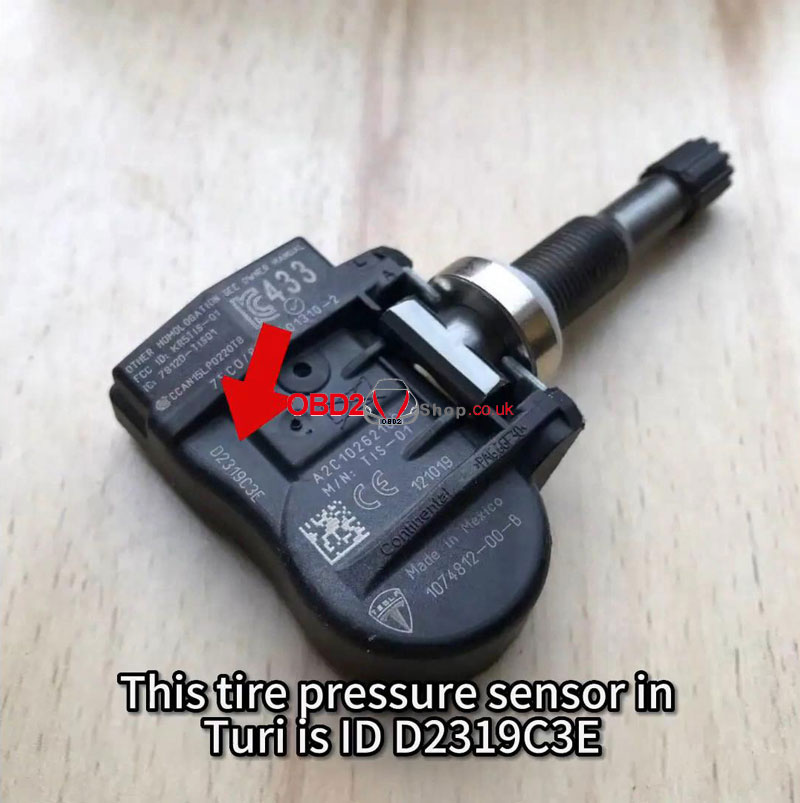 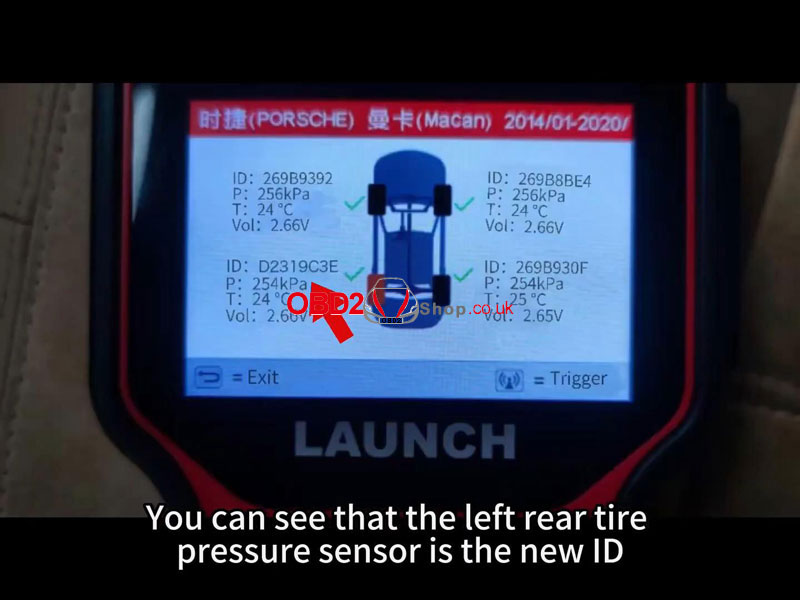 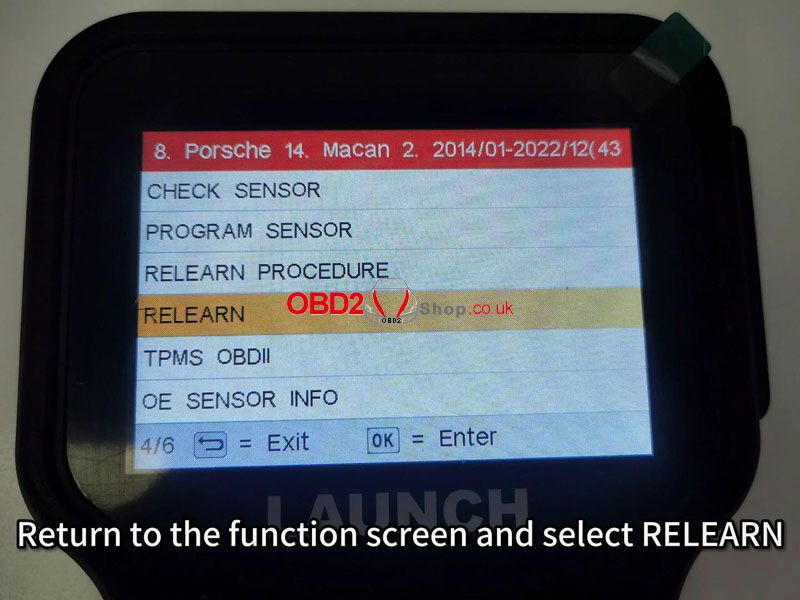 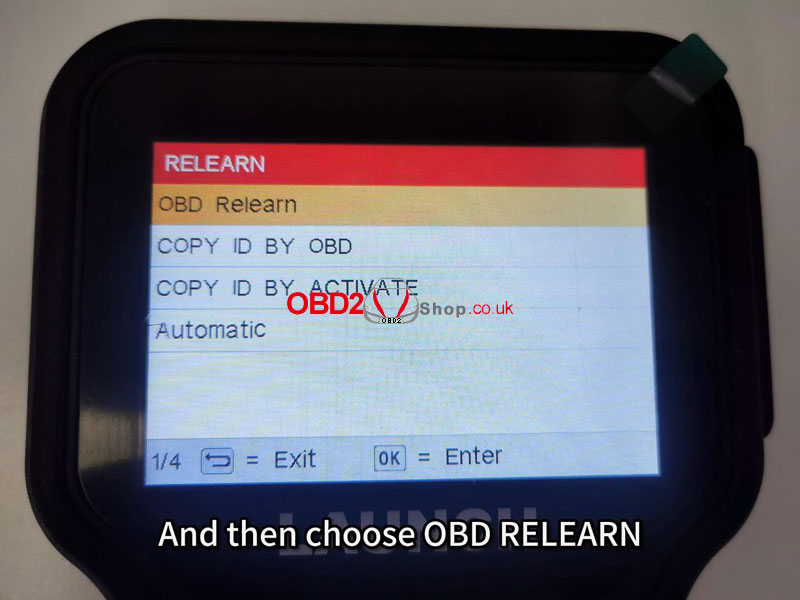 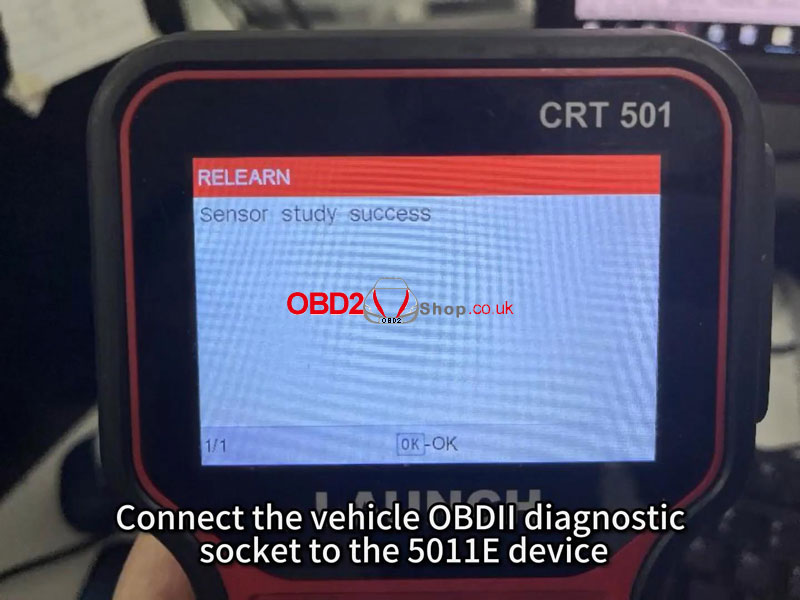 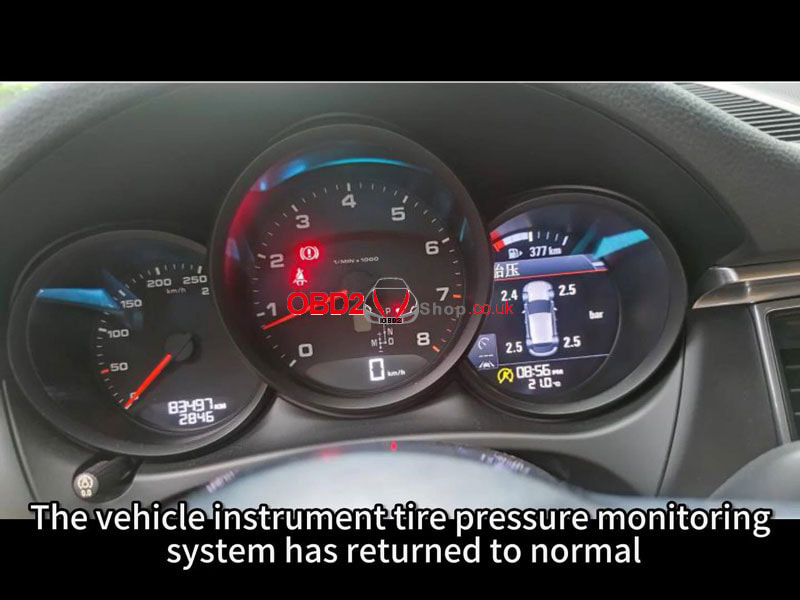
0 Comments
What are the differences between Launch X431 CRP123X, CRP129X, CRP919X & CRP919X BT diagnostic tools? Here we've compared them in price, hardware configuration, and software features in detail, hoping to help a lot. Comparison Table: 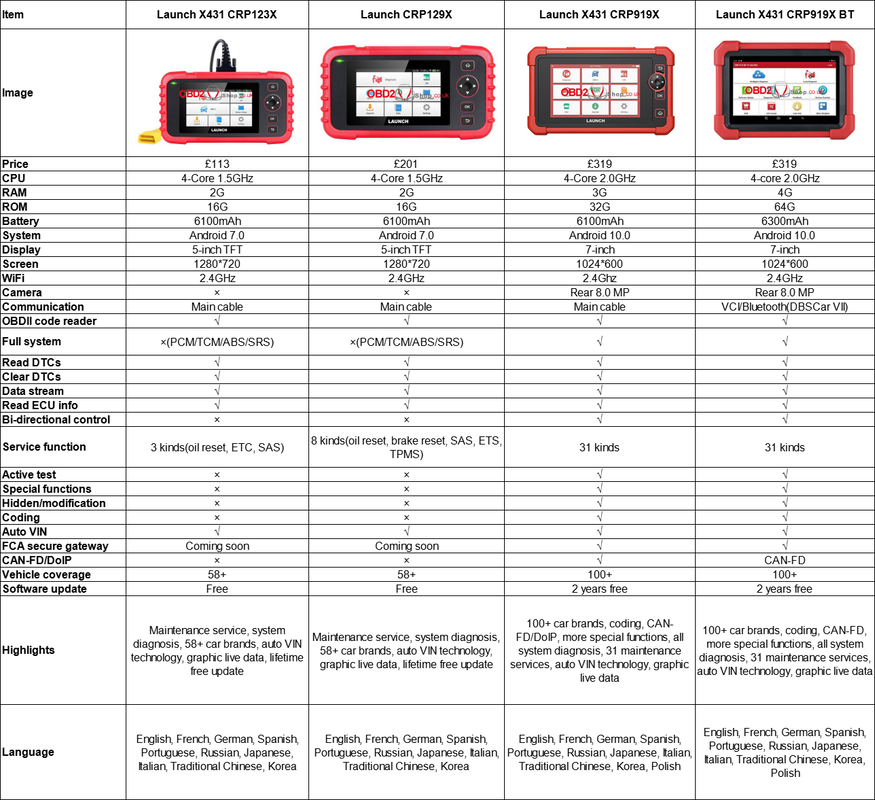 Differences
1. CRP123X is the cheapest while CRP919X/CRP919X BT are the most valuable. 2. X431 CRP919X/CRP919X BT supports more service functions(31 kinds) and vehicle brands(100+) than others. 3. X431 CRP919X/CRP919X BT supports full system diagnosis, bi-directional control, active test, hidden/modification, coding, and FCA secure gateway while other tools cannot. 4. Only CRP919X BT supports wireless connection via Bluetooth. 5. Only CRP919 can support CAN-FD/DoIP meanwhile. Conclusion In general, Launch CRP123X is the most affordable for beginners. Launch CRP919X/CRP919X BT are coming with better hardware and more diagnostic features for experienced mechanics. Customers can select according to their actual budget and functional needs. www.obd2shop.co.uk In this article, we'll delve into the key differences between Launch X431 V+, X431 Pro5, and X431 PAD VII, focusing on hardware specifications, main functions, and online programming support. 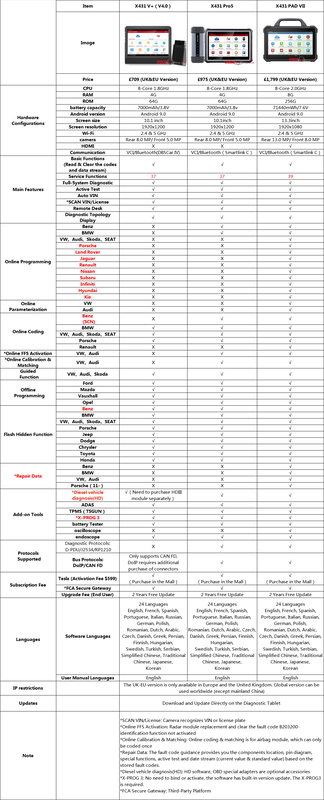 In conclusion, while the X431 V+ and Pro5 offer robust diagnostic capabilities, the X431 PAD VII emerges as the flagship model with its superior hardware upgrades, expanded functionality, and comprehensive support for online programming and coding across various vehicle makes. Whether it's enhanced communication, additional service functions, or comprehensive online programming support, the Launch X431 PAD VII sets a new standard for automotive diagnostics.
www.obd2shop.co.uk This is a tutorial on how to use Launch X431 IMMO PLUS/ X431 IMMO Elite to add Hyundai smart keys by OBD. Follow the steps below to learn.  IMMO >> Hyundai >> Immobilizer System Detection >> Smart Key Unit >> Special Function Smart Key Code Saving. [Condition] Ignition off. Insert key to teach and press the OK button. 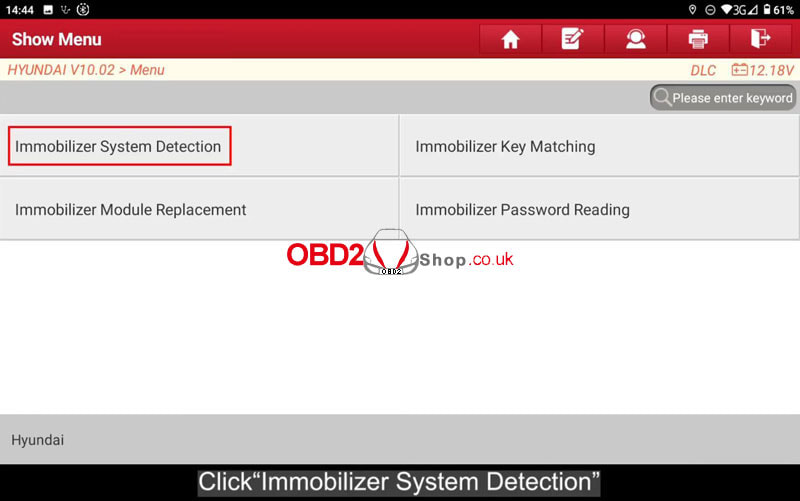 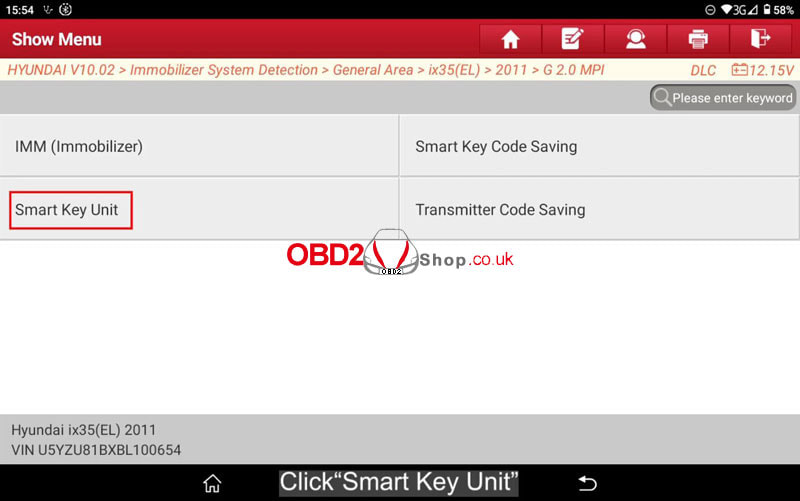 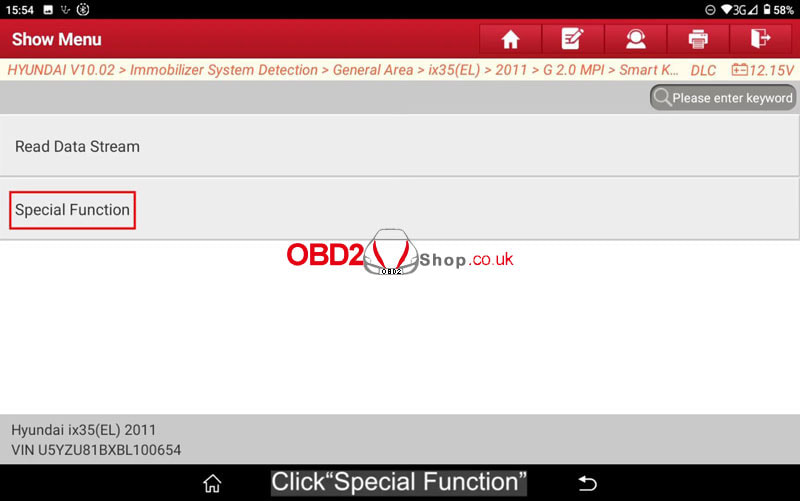 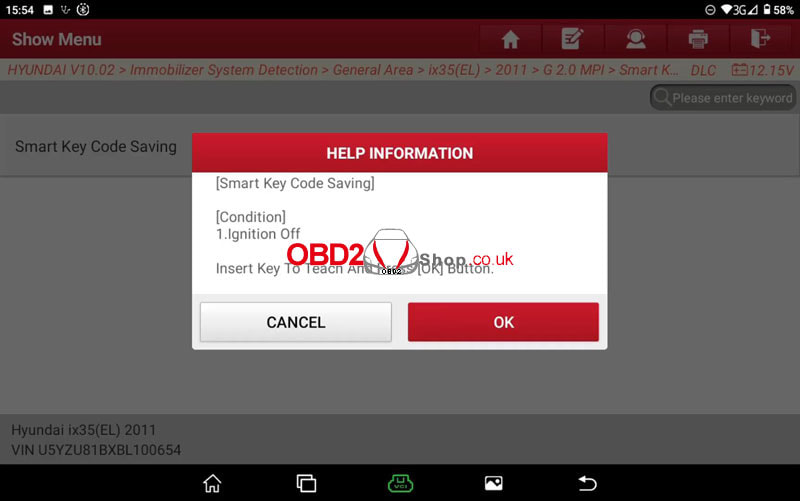 Input >> Input 6 PIN code and press the OK button. Are you sure? OK [Teaching] 1st key teaching Continue? OK 1st key teaching completed! 2nd key teaching continue? OK Press the OK button before removing the key. Insert the 2nd key to teach and press the OK button. [Smart key code saving] 2nd key teaching completed! Smart key teaching completed! Number of taught FOB keys: 255. This is using X431 IMMO PLUS to program Hyundai key matching successfully. 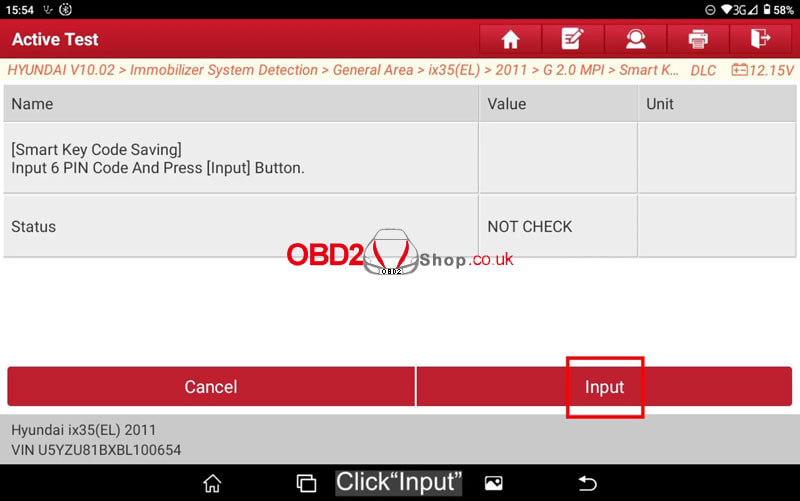   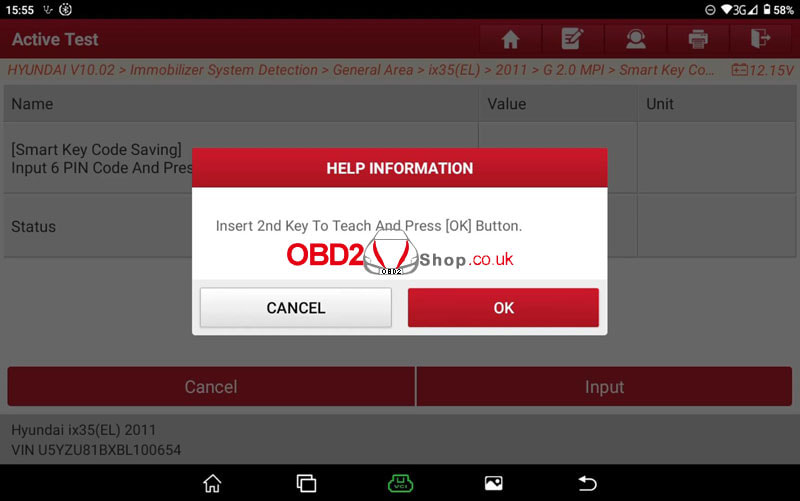 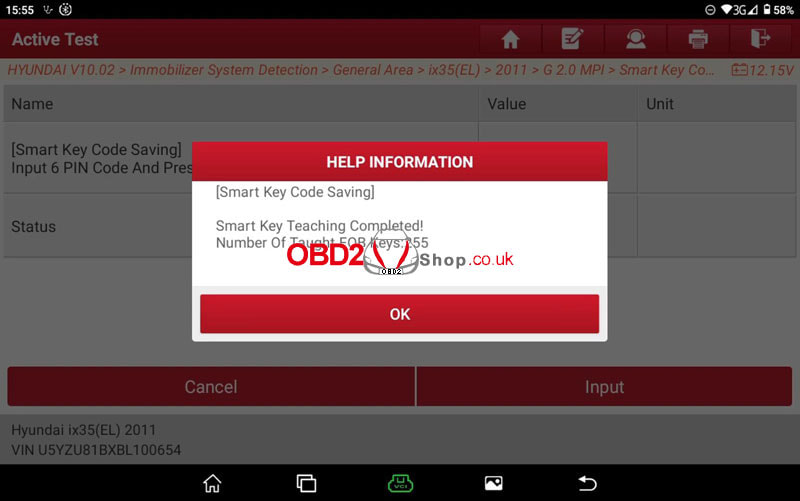 This is a tutorial on how to program the Suzuki Alto key with Launch X431 IMMO Plus by OBD. The procedure includes 3 steps: read the PIN code, program the key with PIN, and register the key. As for X431 IMMO Elite or IMMO PRO can follow the same way for key programming. 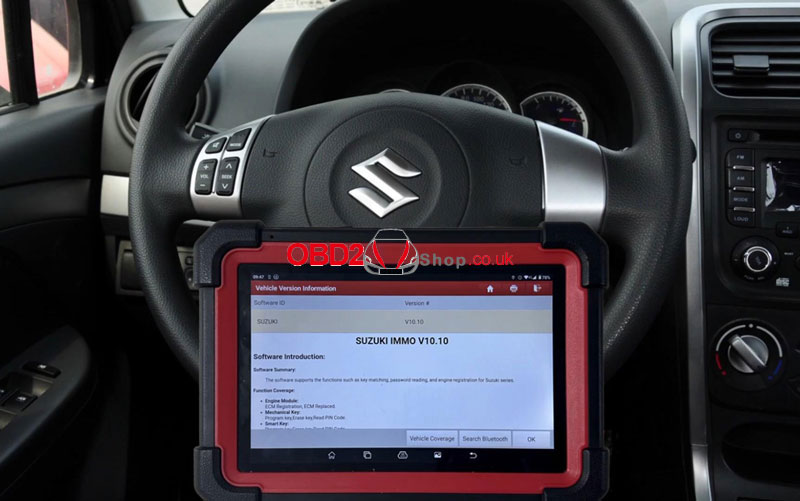 Step1. Read Pin Code Connect X431 IMMO Plus to OBD port. IMMO >> SUZUKI >> Anti-Theft Password Reading >> 8 Digit PIN >> Input 20 digit ID code(ID code can be read from key programming menu) The PIN result is: B614AC78 Remember the password. 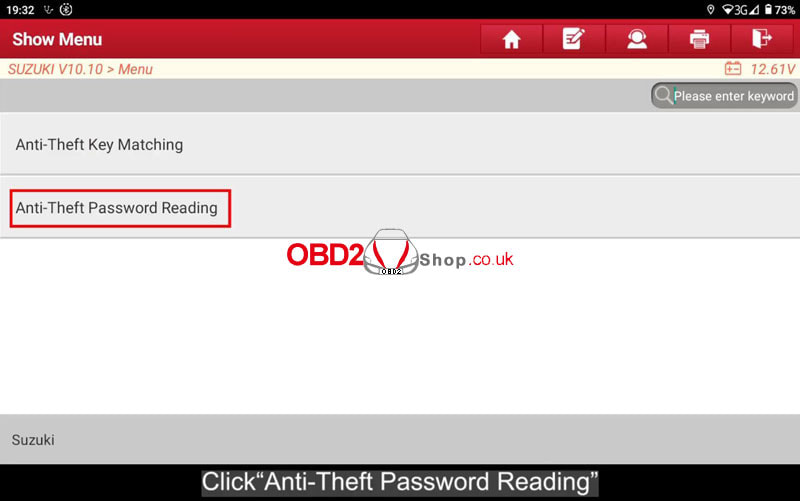 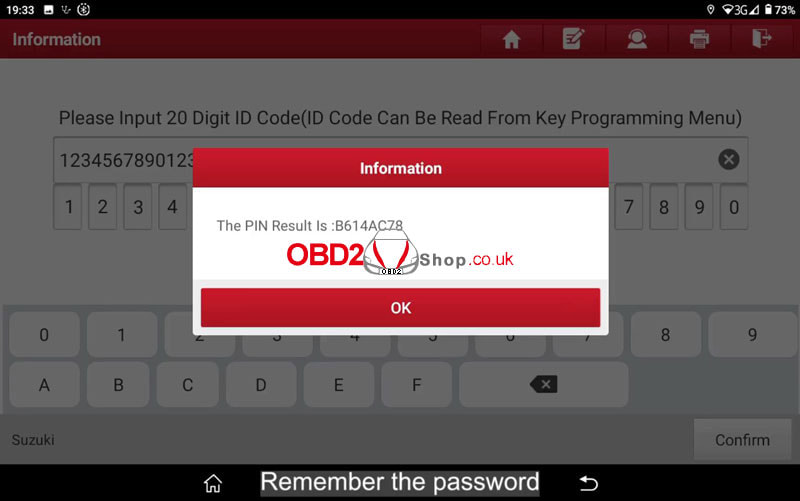 Step2. Program Key with PIN Select from area >> India >> Alto >> Type 3(KLS 8 digit PIN) >> Program keys with PIN This function allows you to read the ID code stored in the immobilizer system, and turn on the ignition switch. Press "OK" to confirm the ID code. This function is used to check the current condition of immobilizer registration and to register the immobilizer key Etc. Perform the following operations according to key types: Mechanical key: turn on the ignition switch with the mechanical key to be matched. Intelligent key: attach the Micro-label position of the intelligent key to be matched to the start button. Knob-type intelligent key: insert the smart key of the intelligent key into the knob lock cylinder, and put the intelligent card close to the knob switch. Please input the security code(8 digits). Note: Before performing "Immobilizer Key Registration", make sure that the key is inserted in the key cylinder. If the key is not inserted, click the "Cancel" button and insert it in the key cylinder. For the vehicle with the engine switch(Start/Stop button), make sure that the remote controller is inside the vehicle. For the vehicle with the engine switch(start/stop button), do not turn off the ignition switch during immobilizer registration! 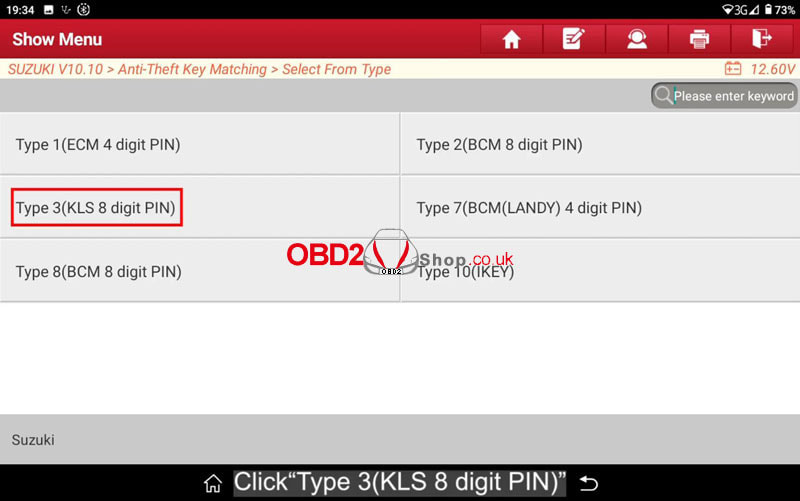 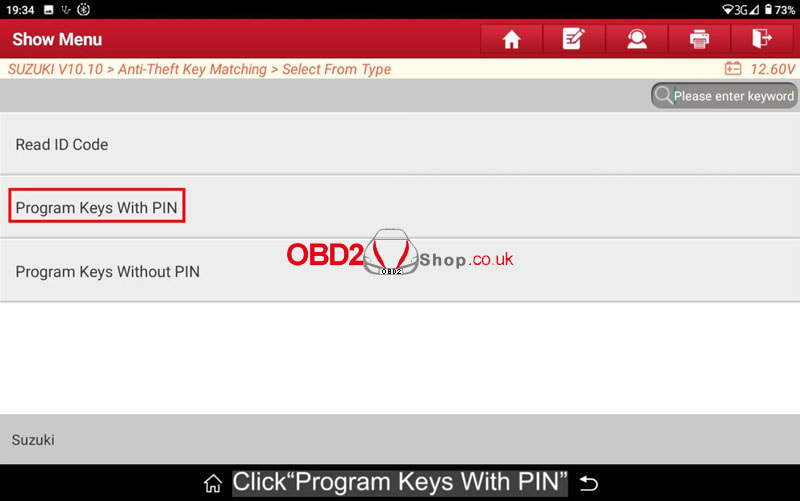 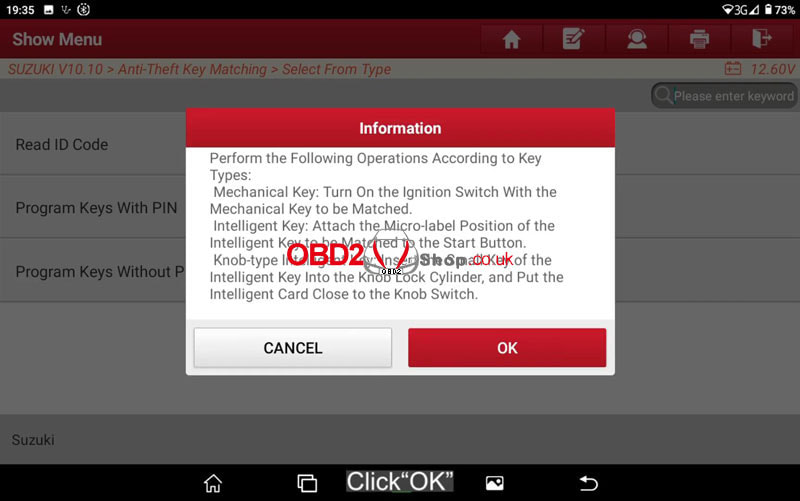 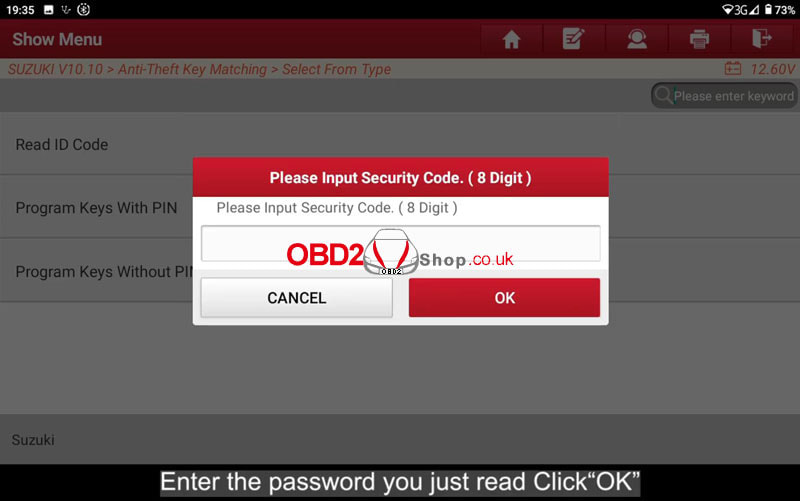 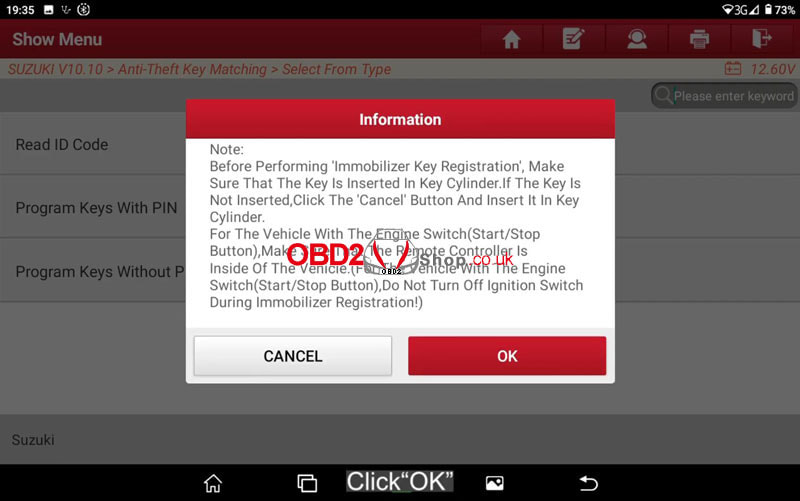 Step3. Register Key Click "Immobilizer Key Registration". Important! Previous vehicle information will be totally cleared. Prepare all transmitters or remote controllers for registration. Previously registered information will be cleared. Register the transmitter or the remote controller. For the vehicle with the ignition switch, click the "OK" button to go to the next step. For the vehicle with the engine switch, hold by applying the remote controller to the engine switch, and then click the "OK" button. The transmitter or the remote controller has been registered. Click the "OK" button to register another. Click the "Cancel" button to finish the immobilizer registration. Prepare another transmitter for the next registration. After replacing it with another transmitter, turn on the ignition switch. When selecting "Immobilizer Registration" from the menu, execute "Read ID Code" again. Program successful. 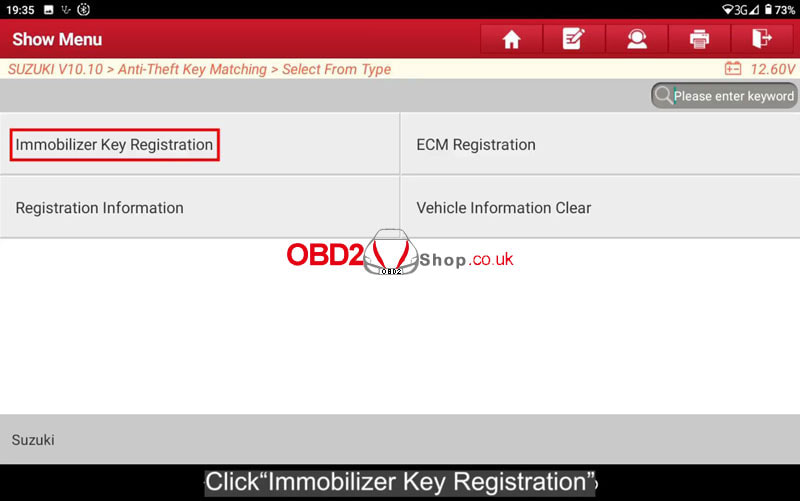 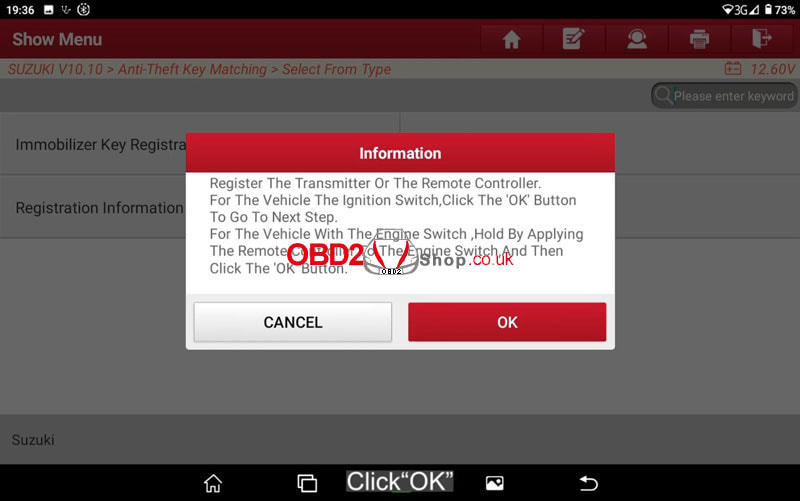 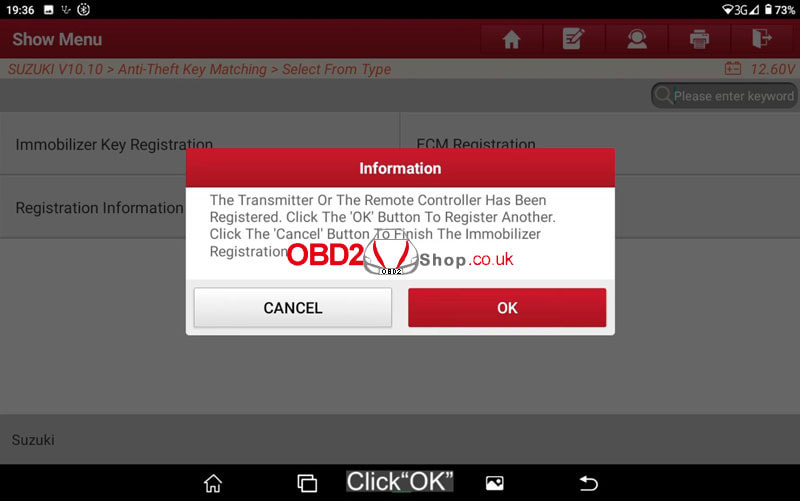 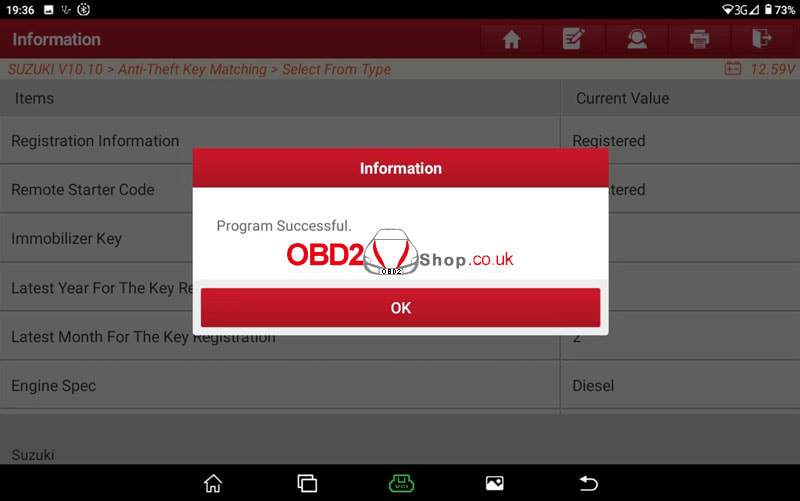 The 2011 BMW F10 520i has just retrofitted its headlight so that it comes with an "Adaptive Headlights failure" on the dashboard. Following we're gonna show how to use Launch X-431 diagnostic scanner to fix the error. Apply to Launch X-431 Pad 7, X431 PRO5, X431 V+, etc.  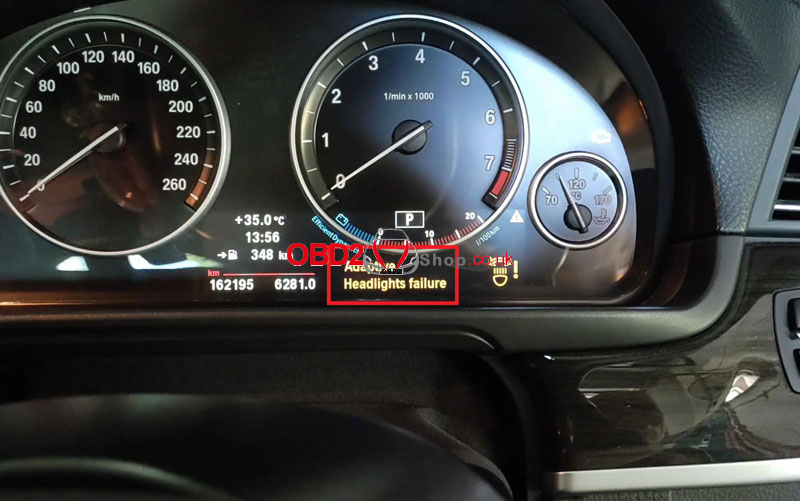 Local diagnose >> BMW >> OK >> Automatically Search >> Next >> High-speed Scan There are 2 fault codes in FRM(Footwell Module)/ TSGFA(Driver Door Control Unit): 800FC3 initialization fault in the Headlight driver module left. 800FC2 initialization fault in the headlight driver module, right. The headlight has been replaced with aftermarket, so FA(vehicle order) needs to be edited. 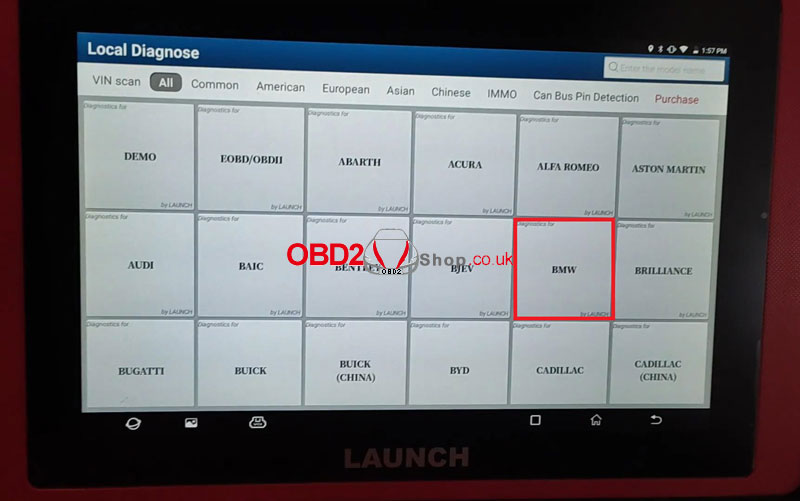 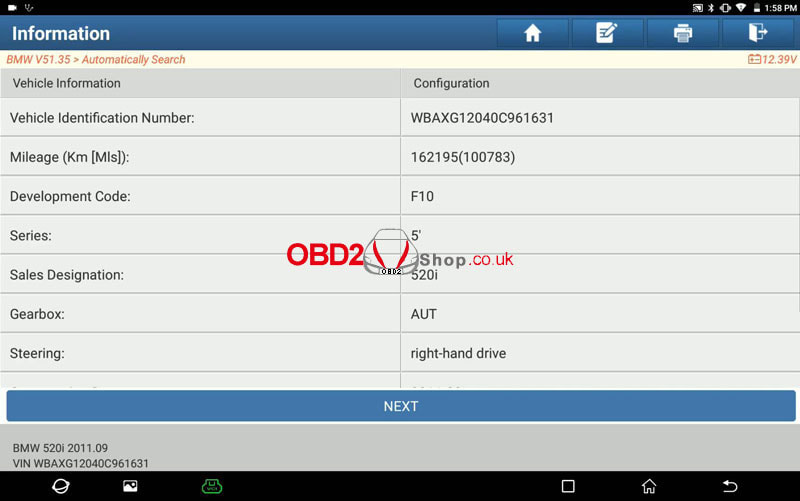 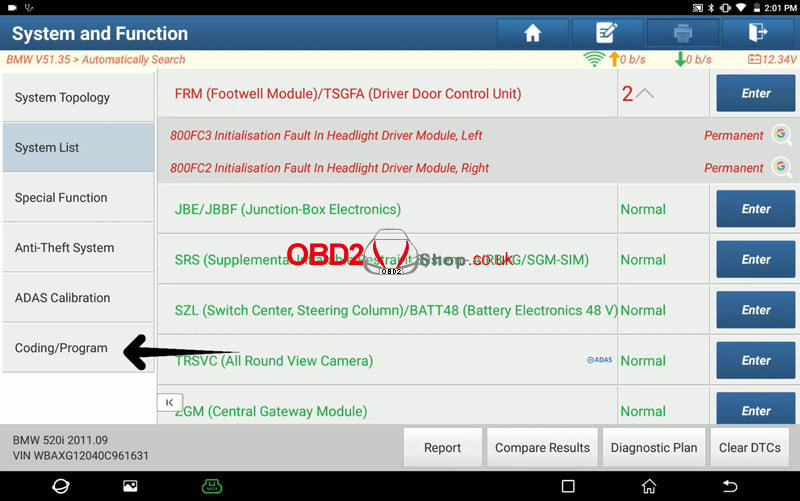 Coding/Program >> Retrofit >> Next >> Vehicle Order Change Switch off the ignition. Wait approx 10s... Switch on the ignition again. Continue in the next test step. Please confirm the vehicle is ready for programming. Programming/coding will start when OK is pressed. Notice This function has to modify vehicle data. Please record below initial data below as a backup in case of an error. Selected "524 Adaptive Headlights". Do you want to delete it? Yes Next >> Yes Notice The below data is what you want to write to ECU. Please check it, then press OK. Ultimatum: This function will change vehicle order. If you do not really know it. Please STOP it. If you lose the vehicle order, you must get them by yourself. Press OK. Please confirm the vehicle is ready for programming. Programming/coding will start when OK is pressed. Press OK. The data has been written to the ECU. Please diagnose the vehicle to ensure it is OK. You may also need to recode what you change. 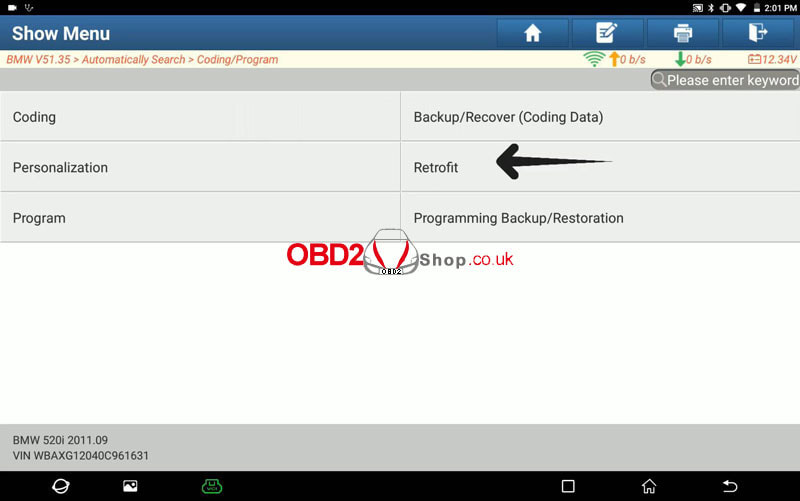 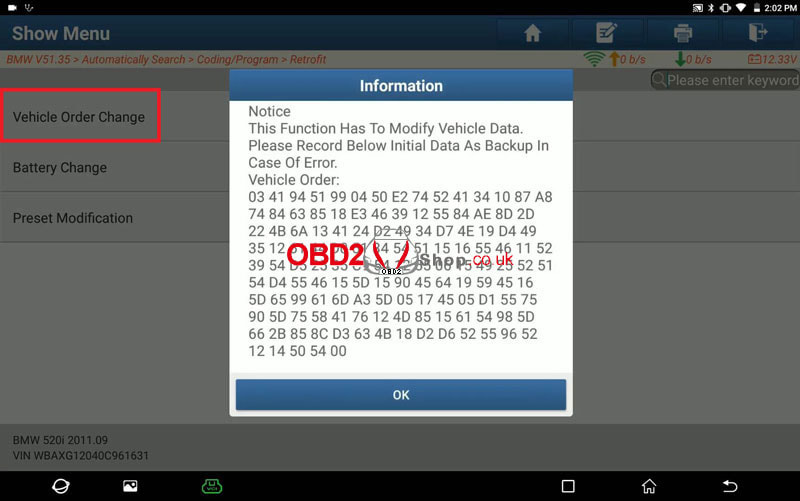 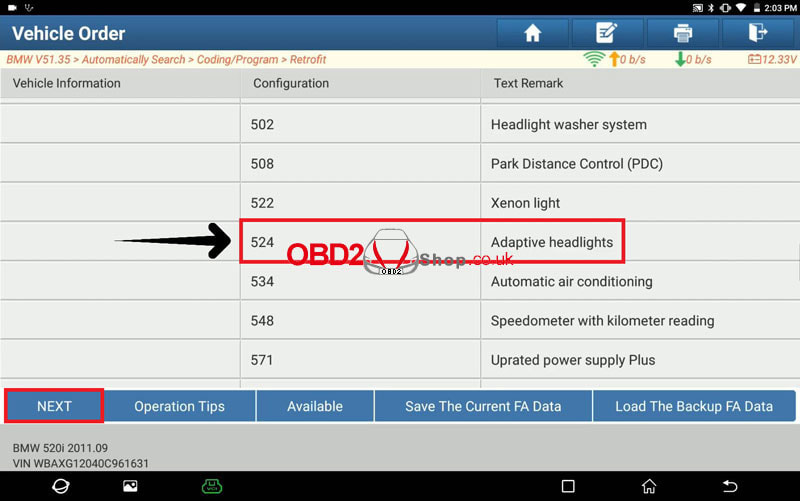  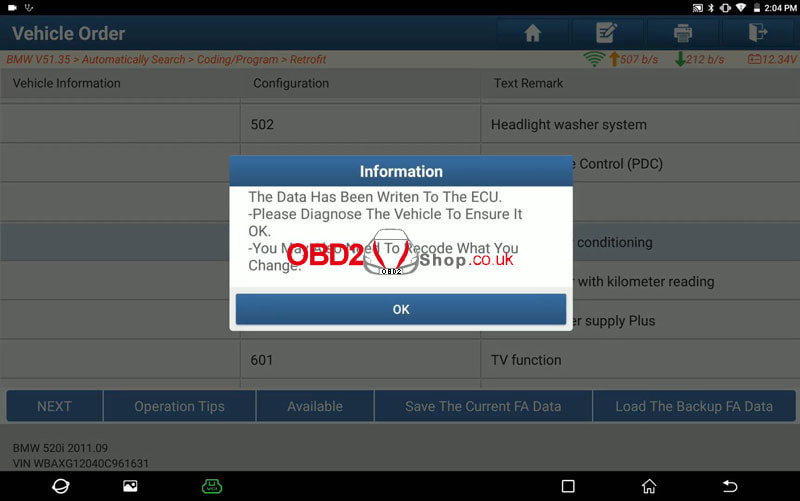 Coding/Program >> Coding >> Next >> FRM(Footwell Module)/ TSGFA(Driver door control unit) >> Yes Whether manually select the integration level of required encoded data? No Recoding has been completed. Note: After the procedure finishes, there may still be a warning light or fault code displayed until the vehicle has completed a road test. And the ignition switched off for 10s and on. The warning message has gone. The problem was solved. 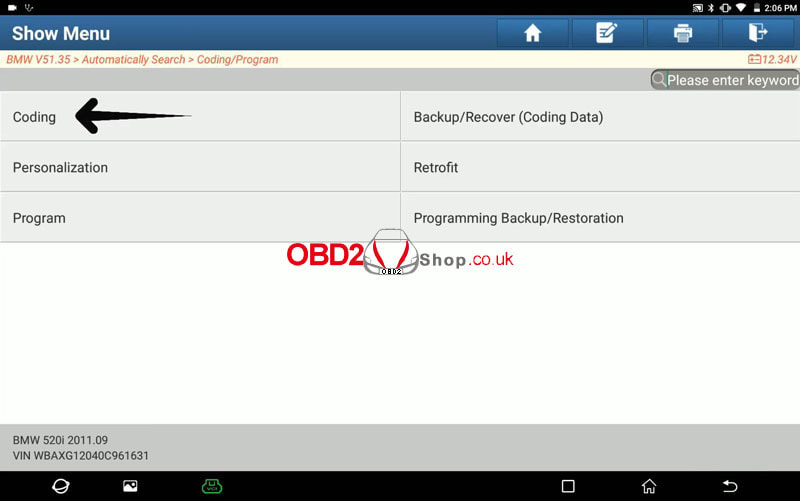 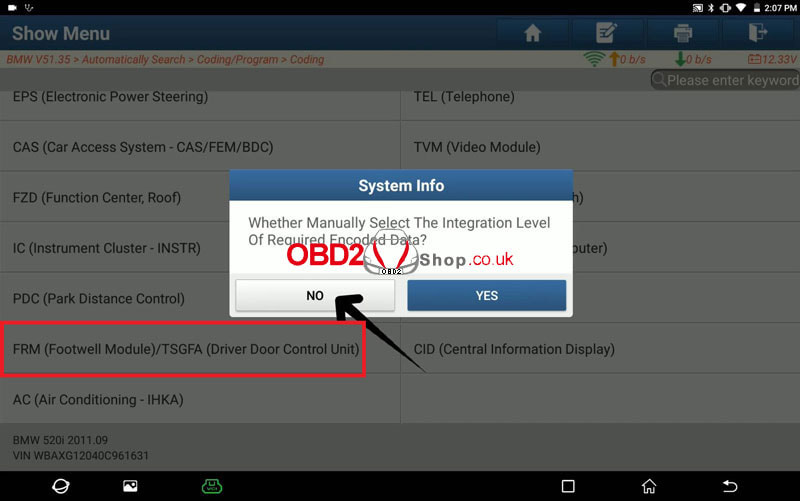 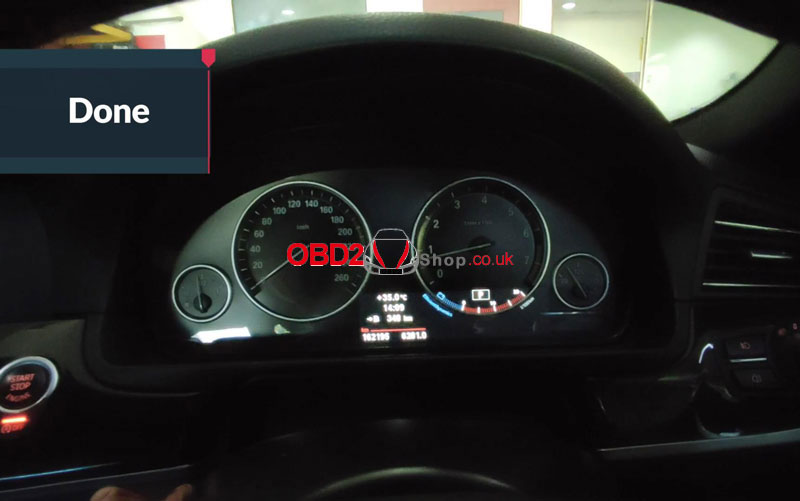 Launch i-TPMS Service Tool provides professional and comprehensive services for repair shops to develop their TPMS business. It can program Launch TR-RF Sensors for unlimited times to replace OE sensors. The sensor data can be read accurately and instantly. Including sensor ID, tire temperature, tire pressure, battery status, etc. Launch i-TPMS Features 98% vehicle coverage with a TPMS-equipped system. 314/433 MHz sensors 100% activated. Unlimited programming for Launch sensors. 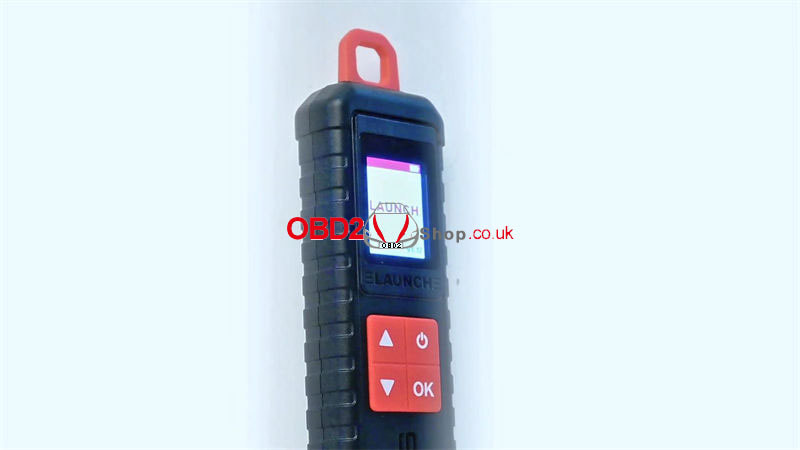 How to Activate Sensors for Troubleshooting? Start the engine, we can find an orange exclamation mark on the dashboard which means there's a fault code. By activating tire pressure sensors in turn, we can find out the faulted one.  1. Connect the i-TPMS Handheld Tool to the diagnostic tool, and turn both devices on. 2. X-431 PAD VII APP >> TPMS >> OK >> Overseas China >> Car Model: TOYOTA >> 2017/10-2021/12(433MHz) 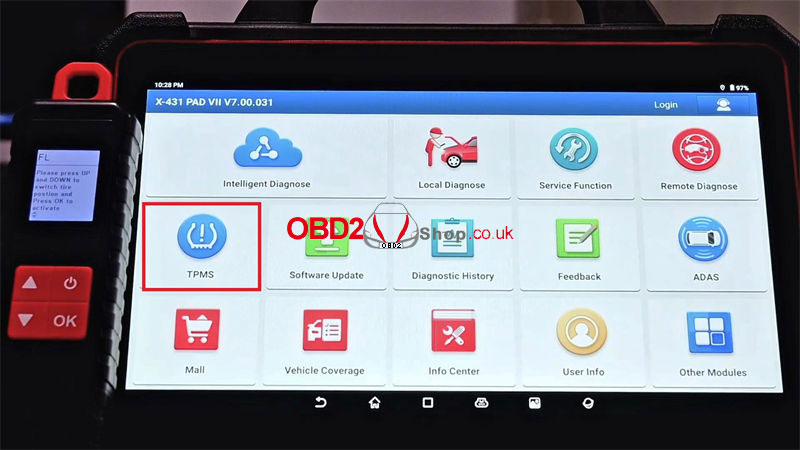 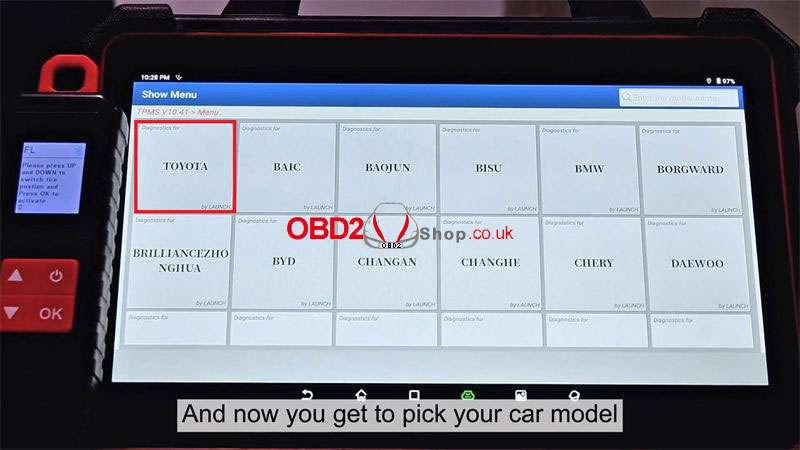 3. The data sheet is empty, so we'll have to activate the tires one by one. 1) Activate the sensor of the front left tire. 2) Activate the sensor of the front right tire. 3) Activate the sensor of the rear right tire. 4) Activate the rear left sensor. We notice that the sensor of the rear left tire has a problem. Thus, we just need to re-program the rear left sensor to fix it. 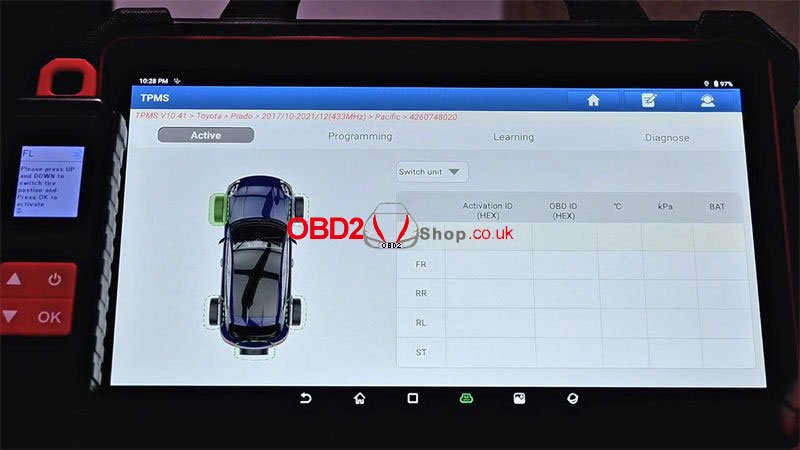 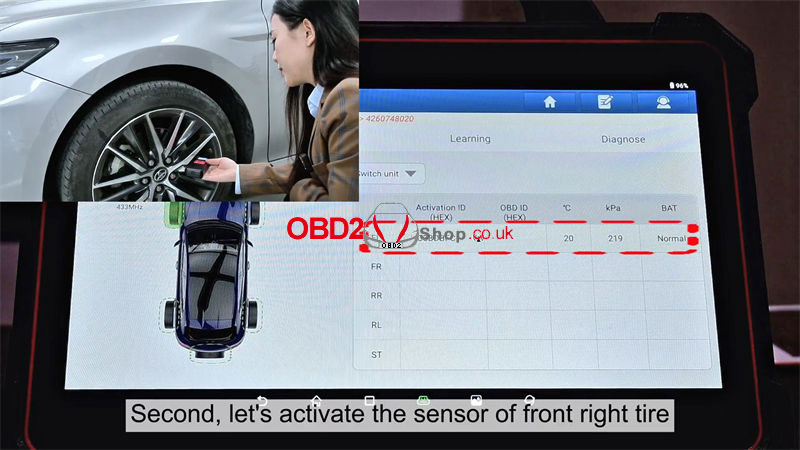 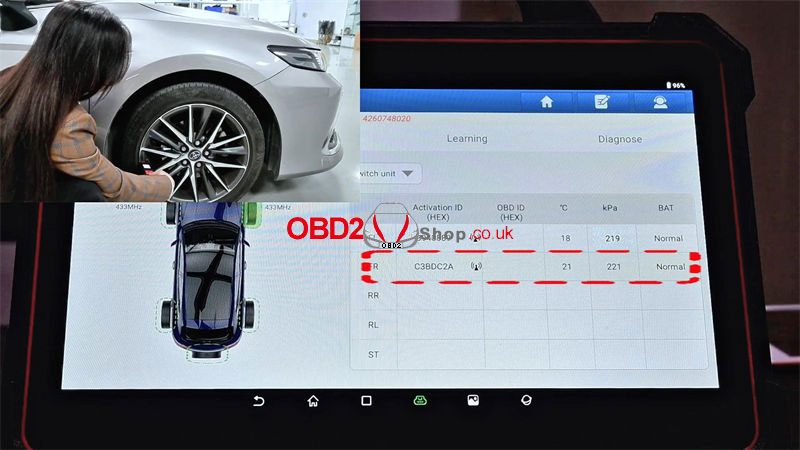 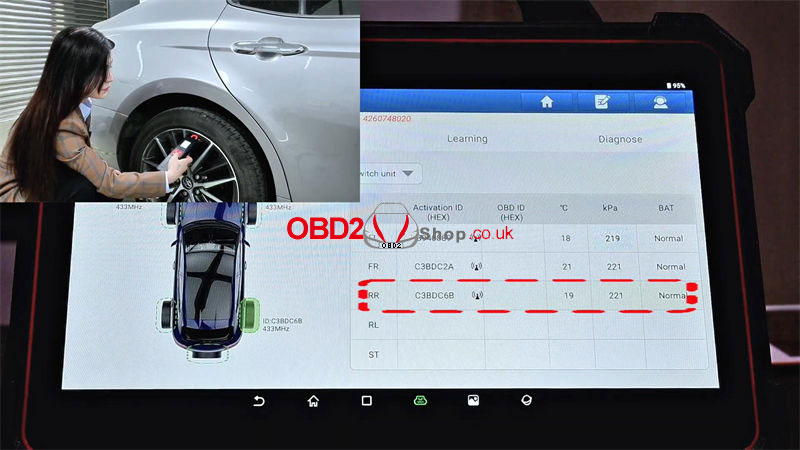 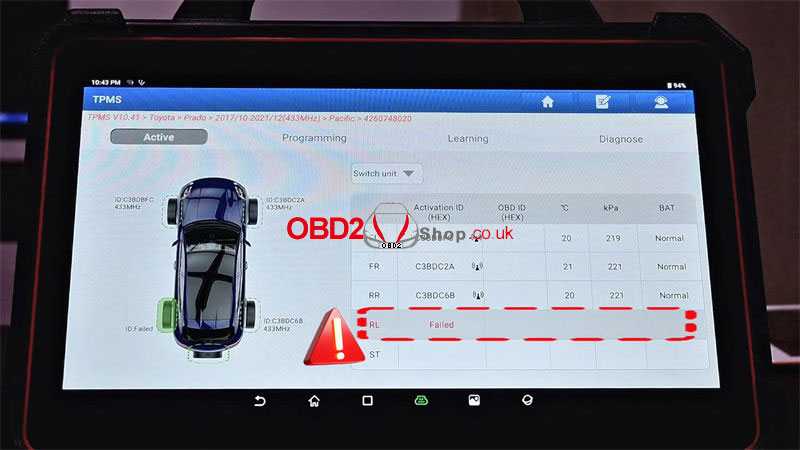 This is a guide on how to do recovery for the 2024 Launch X431 diagnostic tablet, which is an Android 10 system and has no volume button. Such as Launch X431 PRO Elite, X431 CRP919X BT, or X431 CRP919X... can all refer to this article. 1. Long press the power button to power off the Launch-X431 device. Then power on again. When the LAUNCH logo appears, press the power button 5 times quickly. 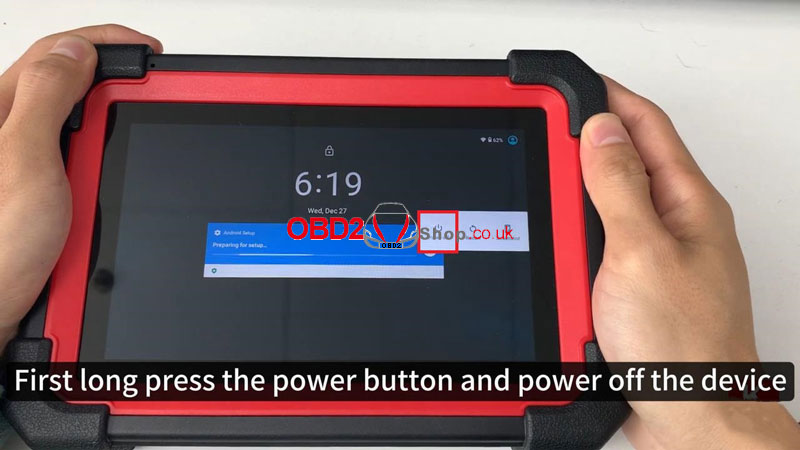  2. X431 device will enter the recovery page: Short press the power button to select "wipe cache partition" >> Long press the power button to confirm >> Yes >> wipe data/ factory reset >> Factory data reset >> Reboot the system now 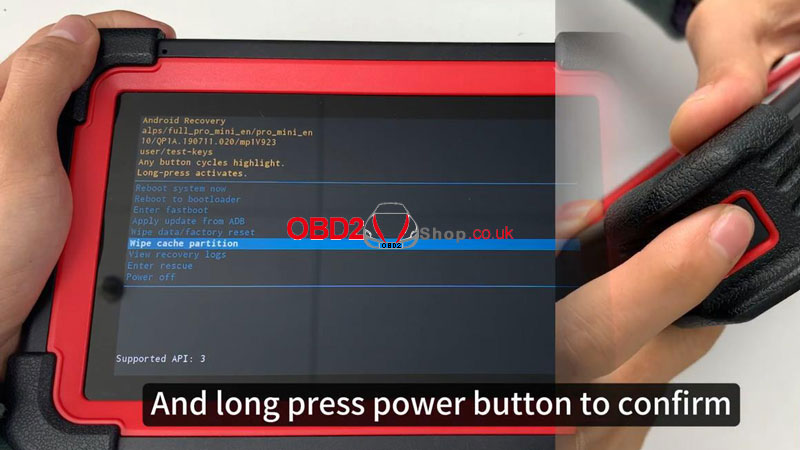 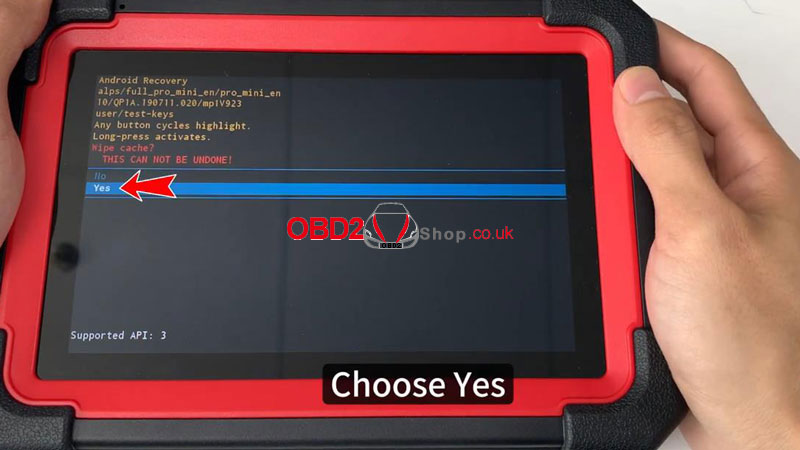 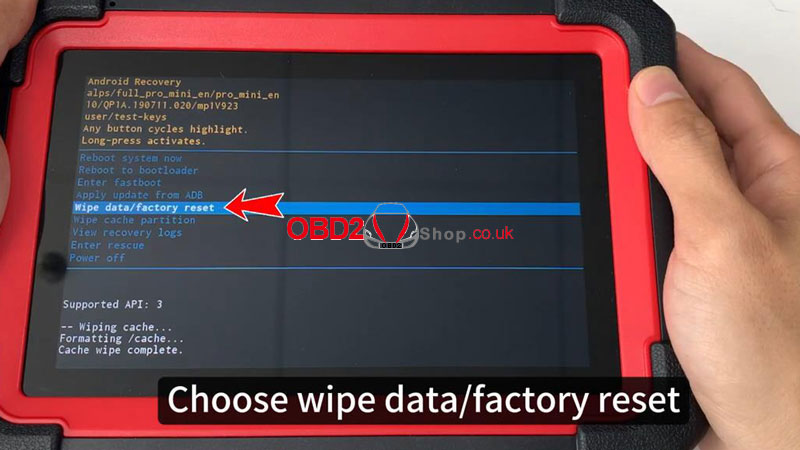 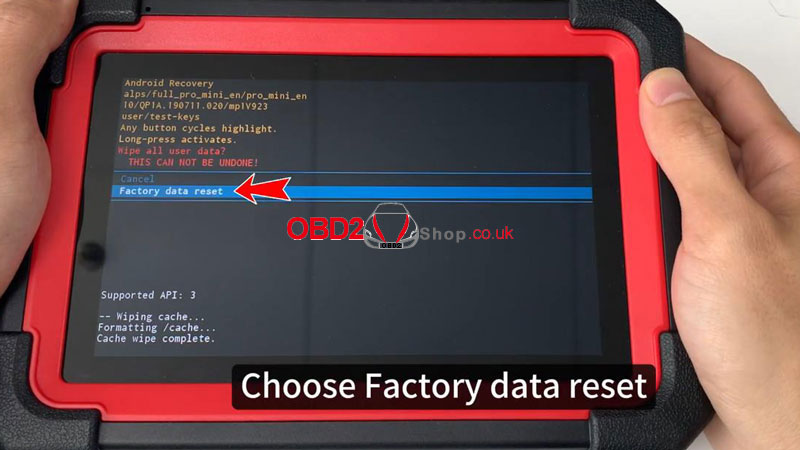 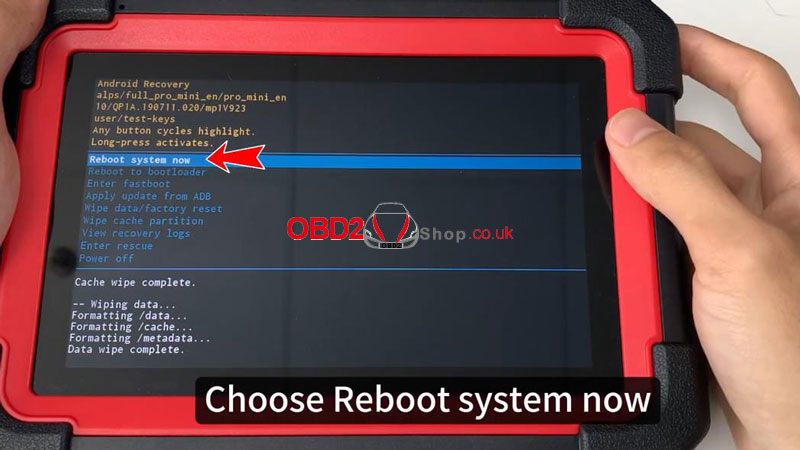 3. X431 device will restart and enter this page: Start >> Skip >> Continue >> Select time zone >> Accept Google Services >> Not now >> Skip anyway >> Setting >> Network & internet >> Connect WiFi 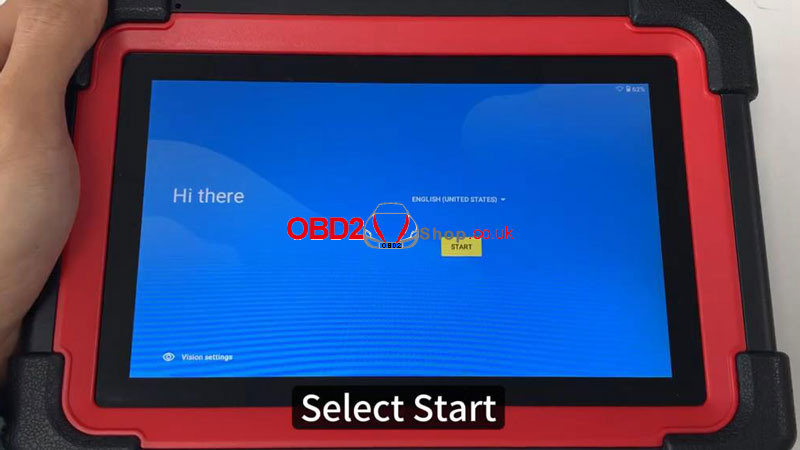 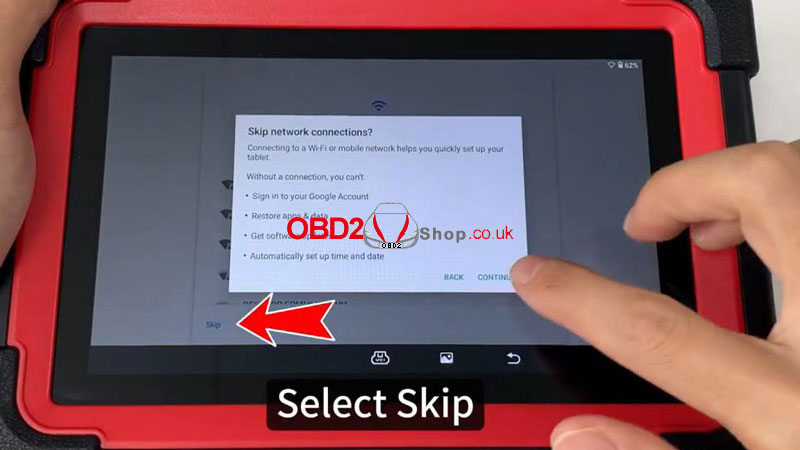 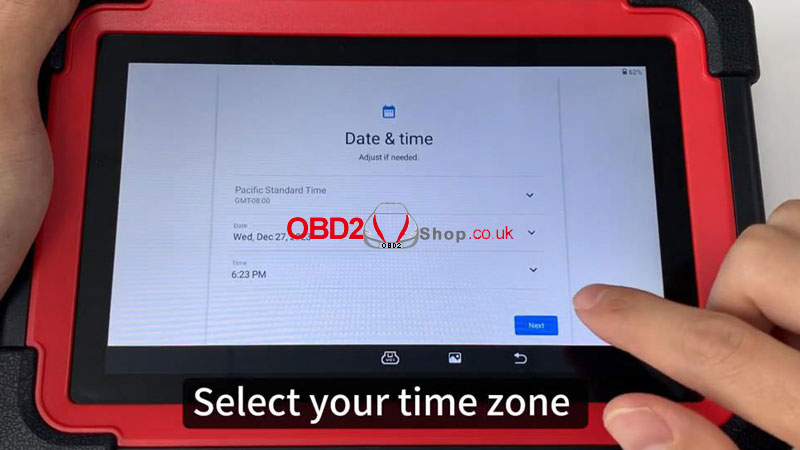 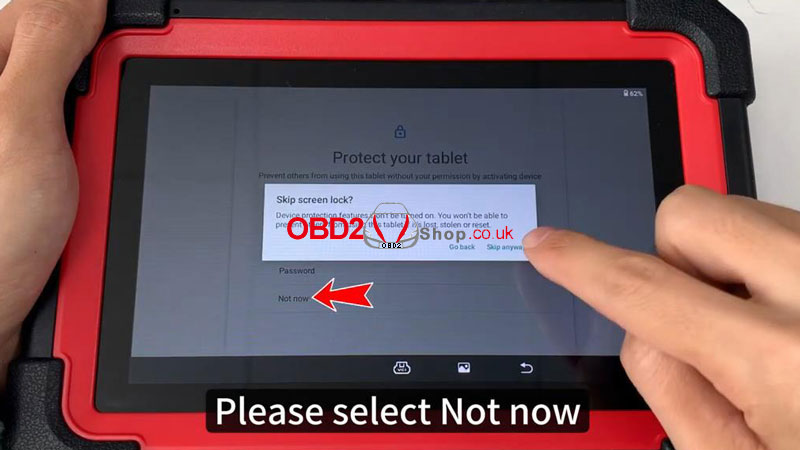 App init >> Input serial number(backside on tablet) >> OK Wait for the application to download and install... After installation successfully, open the application >> Allow all permissions 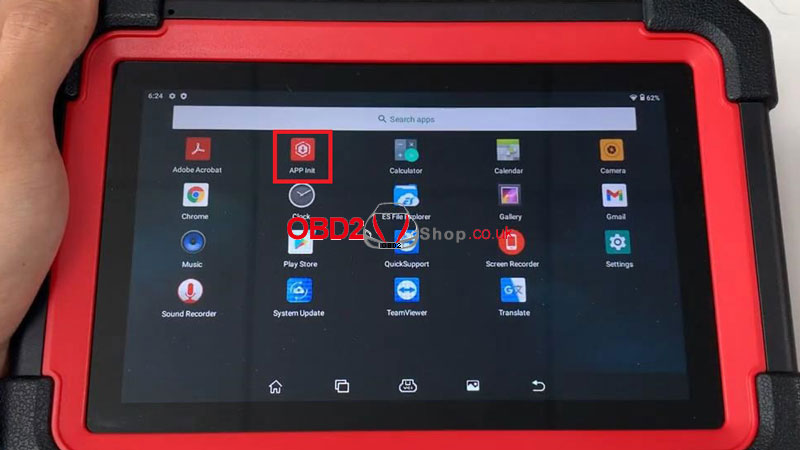 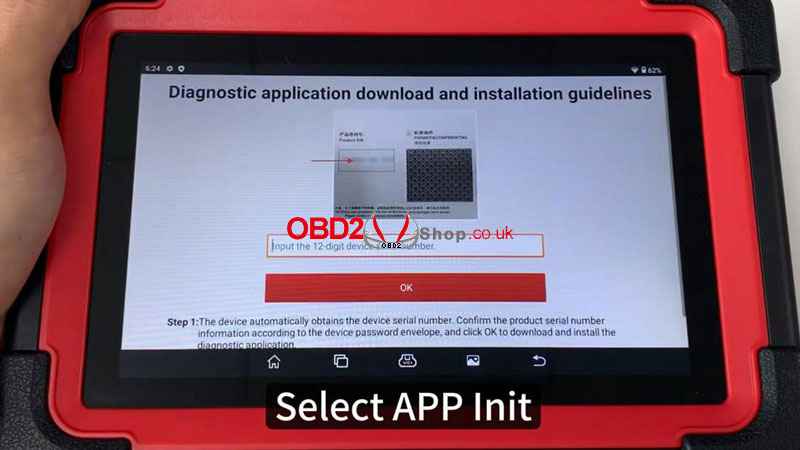   Log in account >> Software Update >> Update all  This is a demo on how to use Launch X431 ECU & TCU Programmer to clone Volkswagen MG1CA811 ECU on bench. Prepare an original ECU and a new one/or a second-hand module, follow the steps below to start cloning. 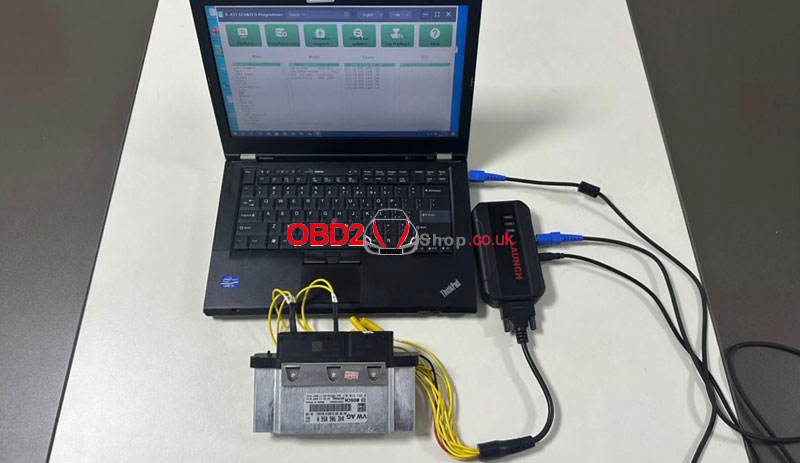 Open X431 ECU & TCU Programmer software, Search MG1CA811 Make: Skoda Model: Fabia 2006-2020 Engine: DFNB 998 67 ECU: MG1CA811 SPC58 Select "Direct connection of diagram" to check the wiring diagram. After a successful connection, click "Connect". 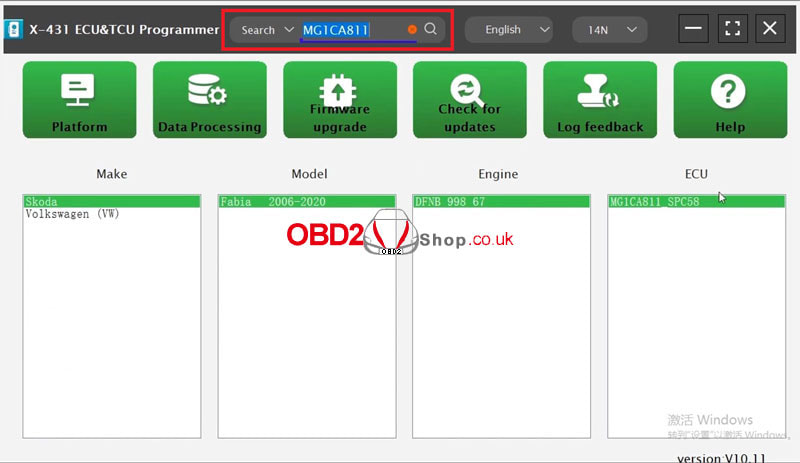 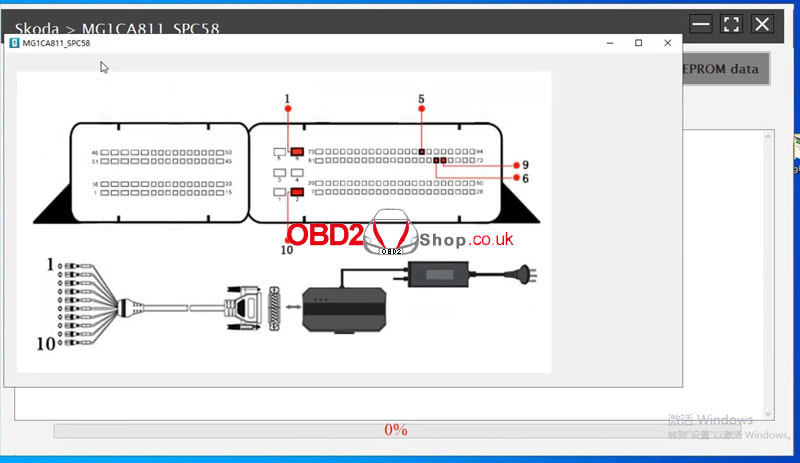 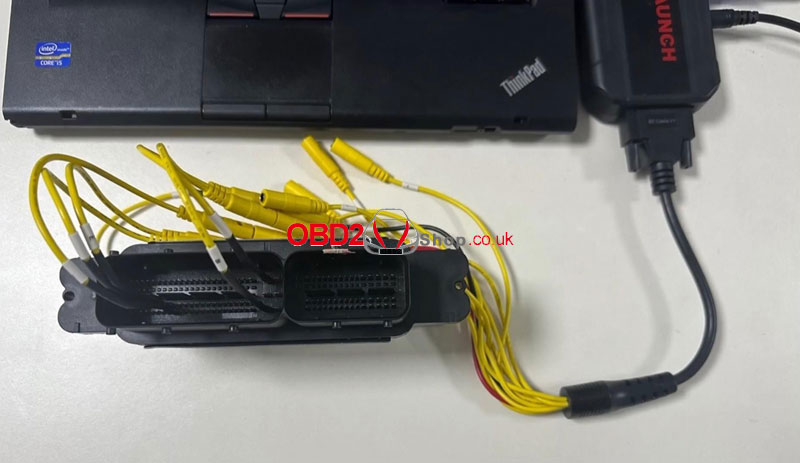 Click "Read EEPROM data". Reading EEPROM success. Save the EEPROM data file. Click "Read FLASH data". Reading FLASH success. Save the FLASH data file. 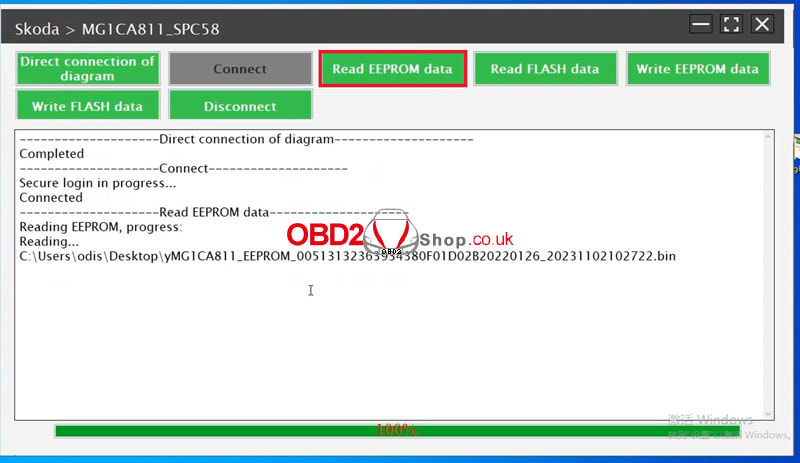 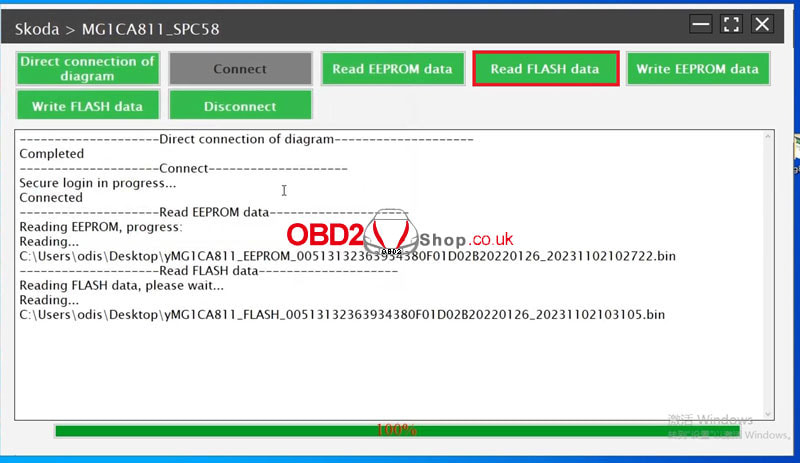 Disconnect to reconnect with another ECU. Click "Connect". Backup EEPROM data. Backup FLASH data. Write EEPROM data >> Load the saved file Writing EEPROM success. Write FLASH data >> Load the saved file Writing FLASH success. Clone VW/Skoda MG1CA811 ECU success. 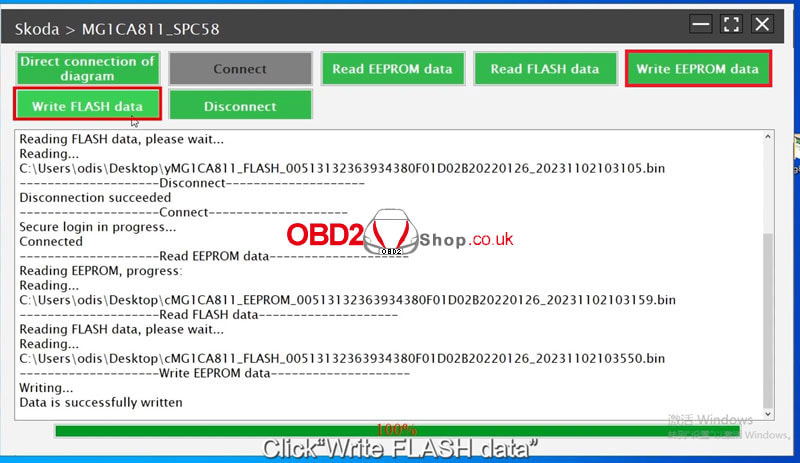 The VW Scirocco has just been replaced with a steering module. Its sensor is working but has a trouble code that can't be cleared. The DTCs is "00778, steering angle sensor no signal/ communication". That means the CAN communication is not working well. So we're going to use Launch X-431 Pad 7 to fix the problem. If you have other X431 diagnostic tools like X431 PRO5 or X431 V+ may refer to the procedure as well.  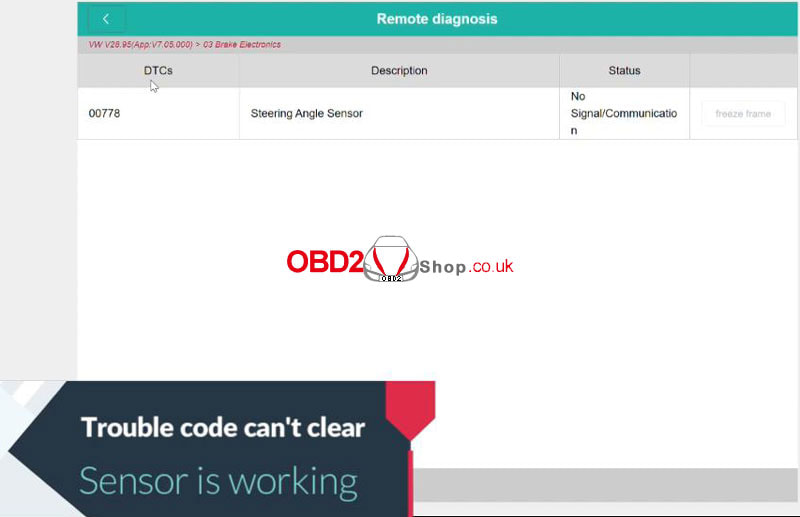 Step1. Check Sensor Status Firstly, do a quick diagnosis to check all data. Confirm vehicle info. Read data stream >> Read by list Selected "Steering angle-sensor(G85), Calibration-Status(G85), Steering Angle-Speed, initialization-Status(G85)". We can see the sensor is working fine. 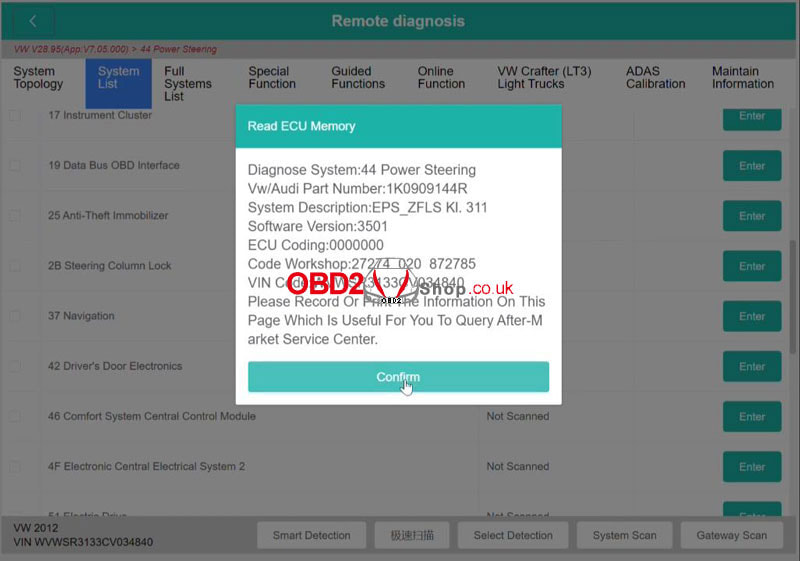 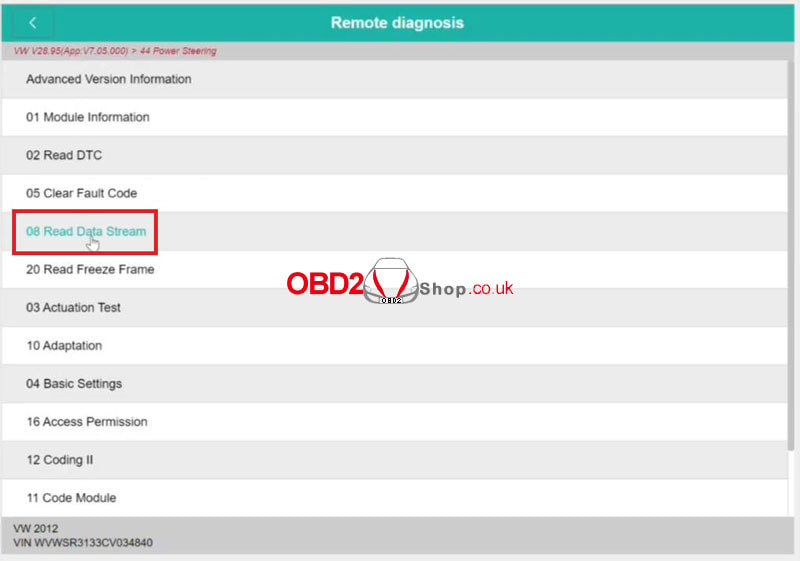 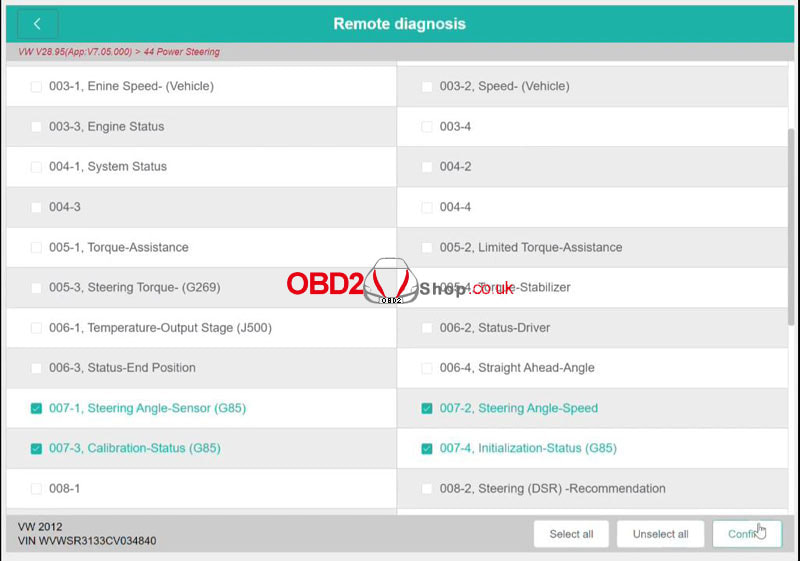 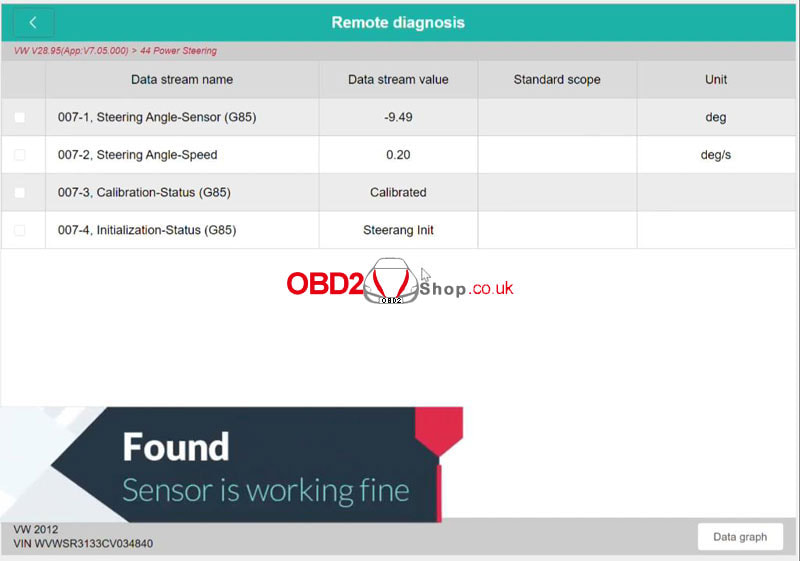 Step2. Input Sensor Value Adaptation >> Read by list >> Selected "Steering Angle Sensor" >> Input Matched value: 0 >> Save Adaptation success! 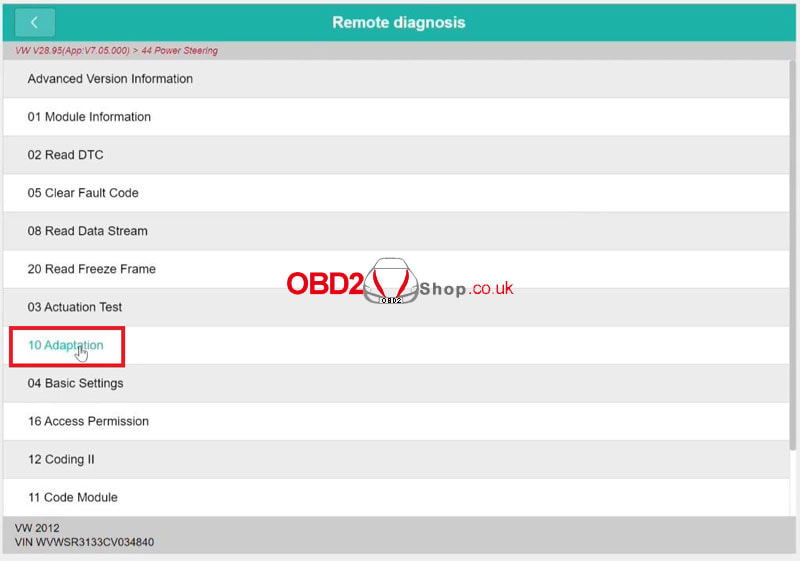 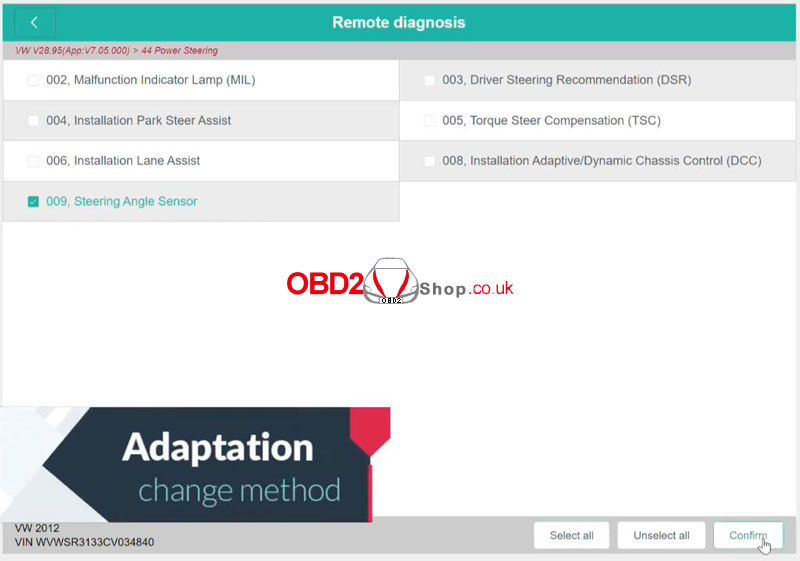 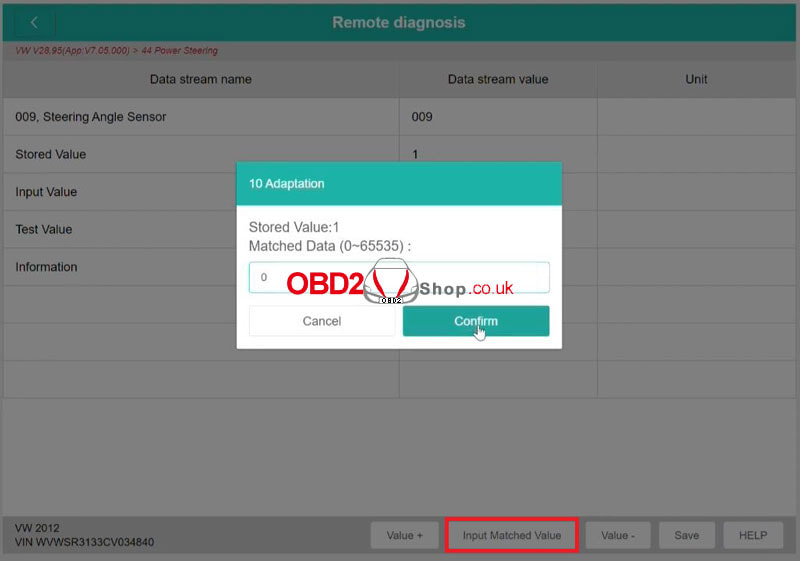 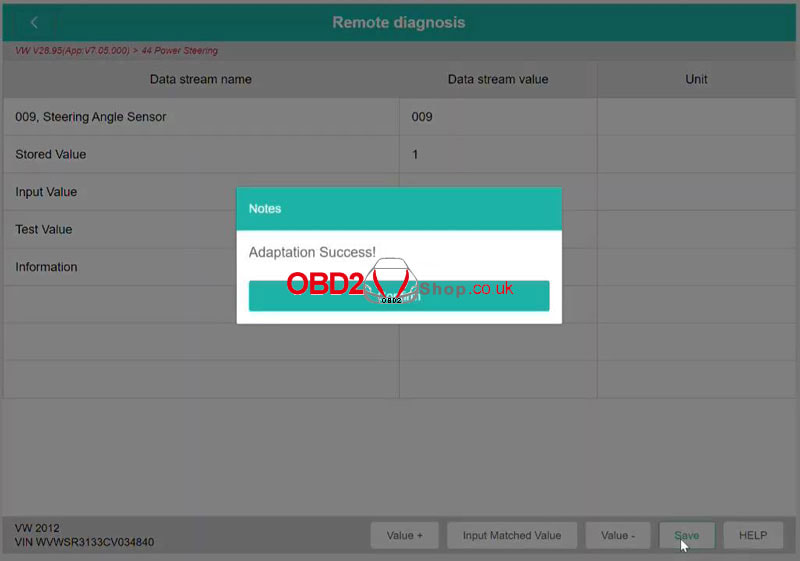 Go back to read DTC again. There's no DTC. Trouble code has been cleared. This is how to solve the VW 00778 sensor problem with X-431 Pad VII, all systems are back to normal! 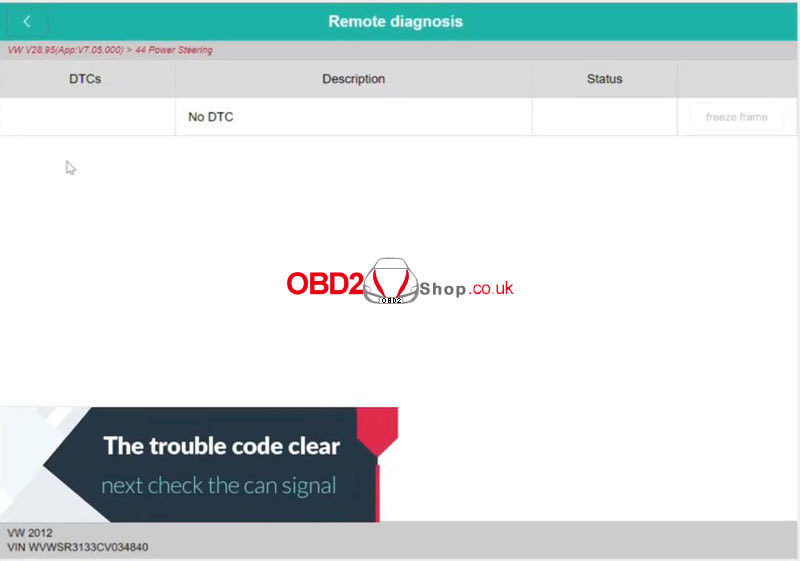 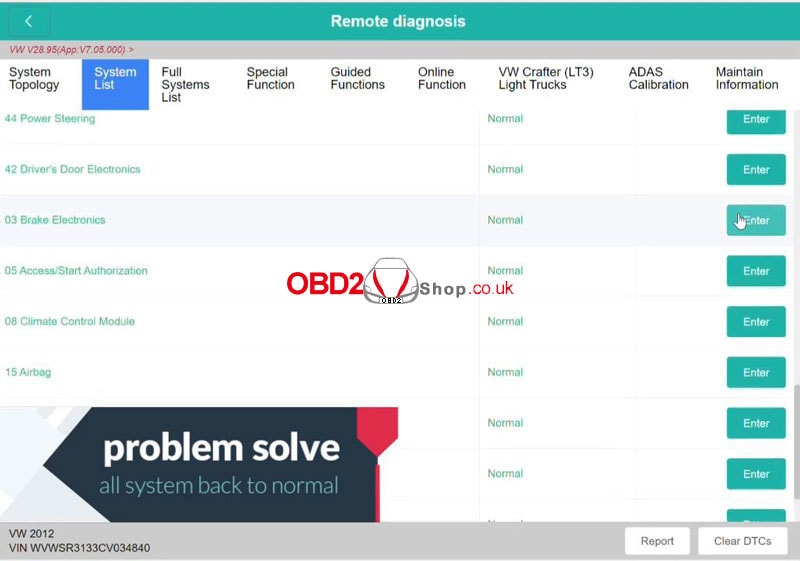 |
