|
KT200 ECU Programmer supports ECU maintenance chip tuning, remove DTC codes, OBD/BOOT/BDM/JTAG & multiple protocols. This is a guide on how to do self test with KT200 + Bench Box.
Video guides:
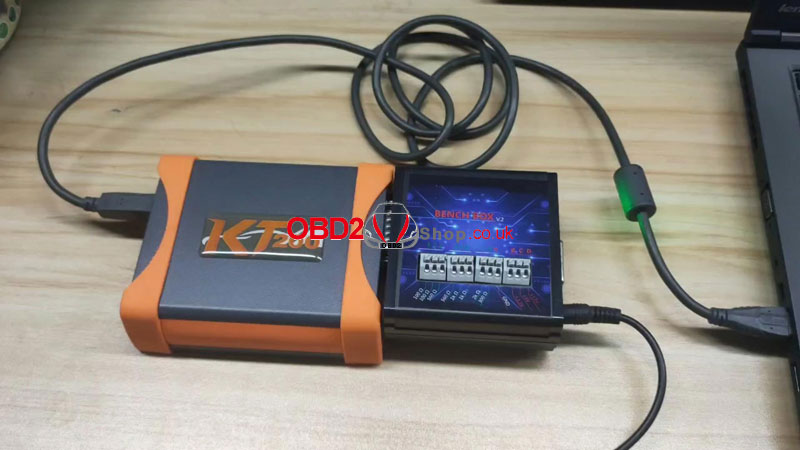
1. Connect KT200 & BENCH BOX to PC.
2. Start KT200 software:
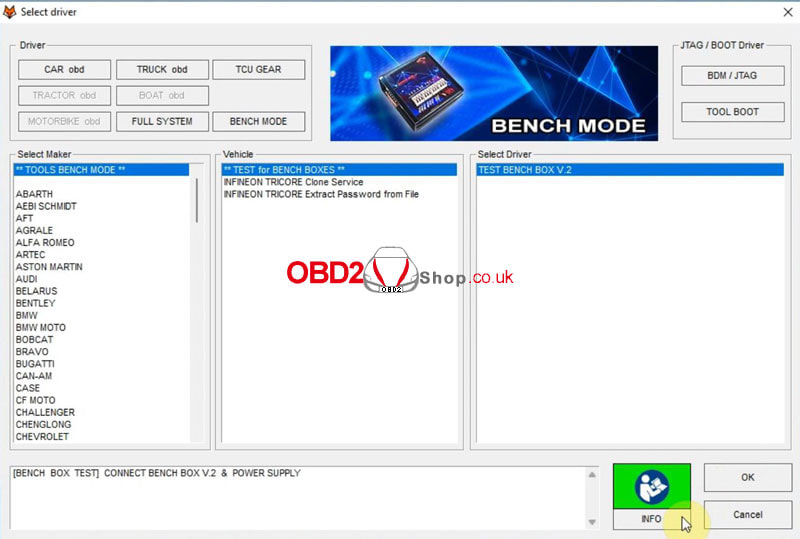
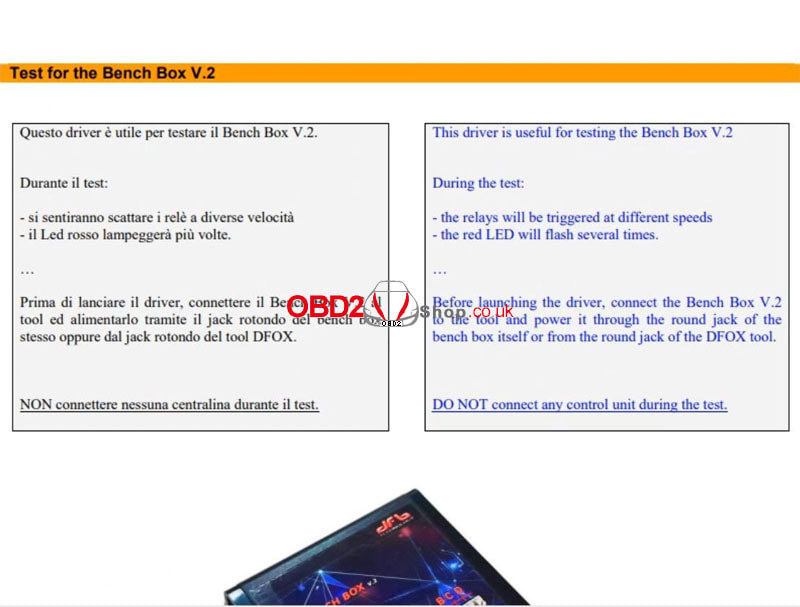
Select driver >> BENCH MODE >> TOOLS BENCH MODE >> TEST for BENCH BOXES >> TEST BENCH BOX V.2 >> INFO Here you can check the operation notice. This driver is useful for testing the Bench Box V.2 During the test: - the relays will be triggered at different speeds. - the read LED will flash several time ... Before launching the driver, connect the Bench Box V.2 to the tool and power it through the round jack of the bench box itself or from the round jack of the DFOX tool. 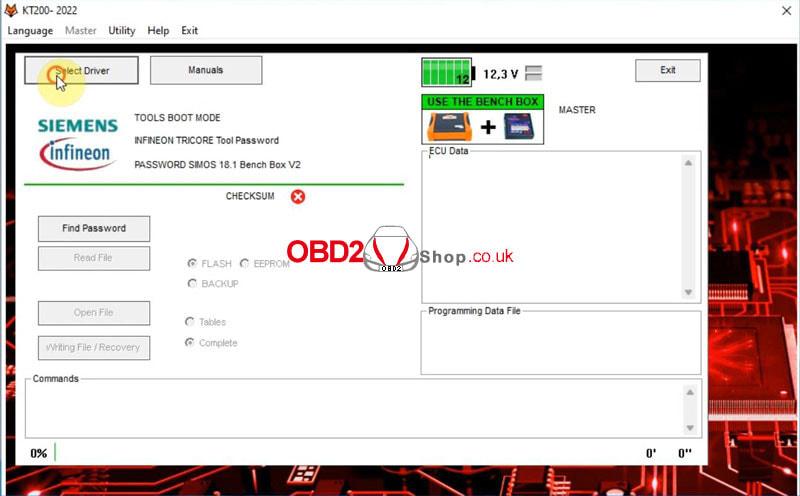
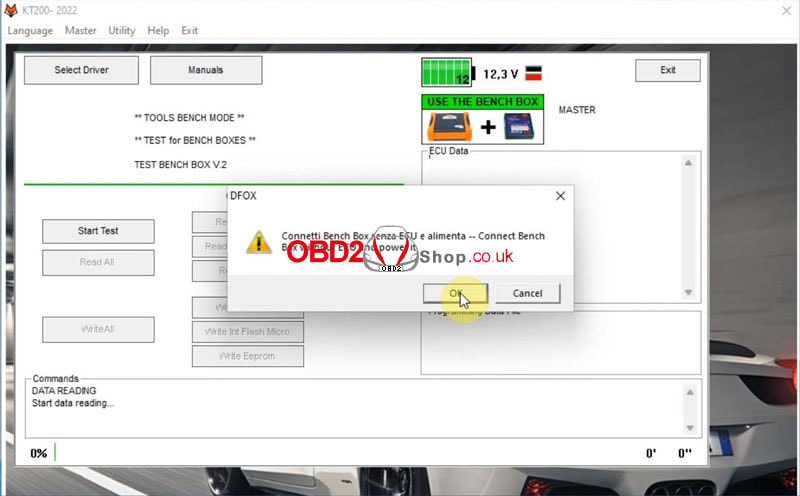
3. OK >> Start Test
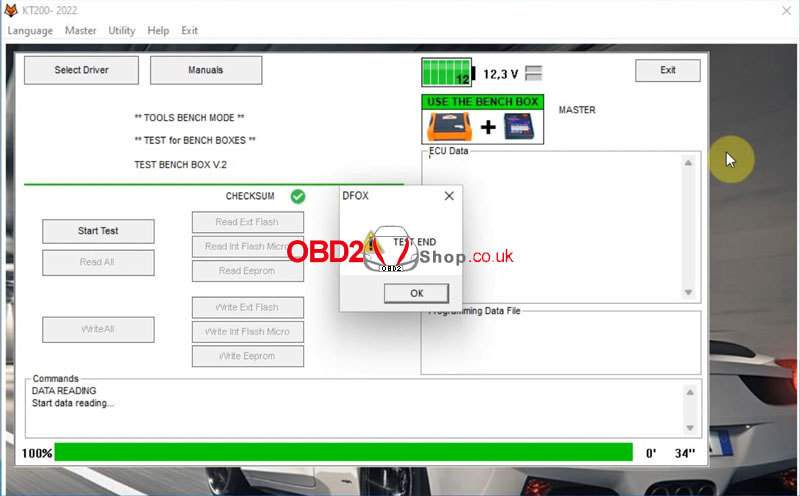
KT200 will start reading automatically... Connect Bench Box without ECU and power it, click "OK". Wait processing until 100%. Test End. Completed. 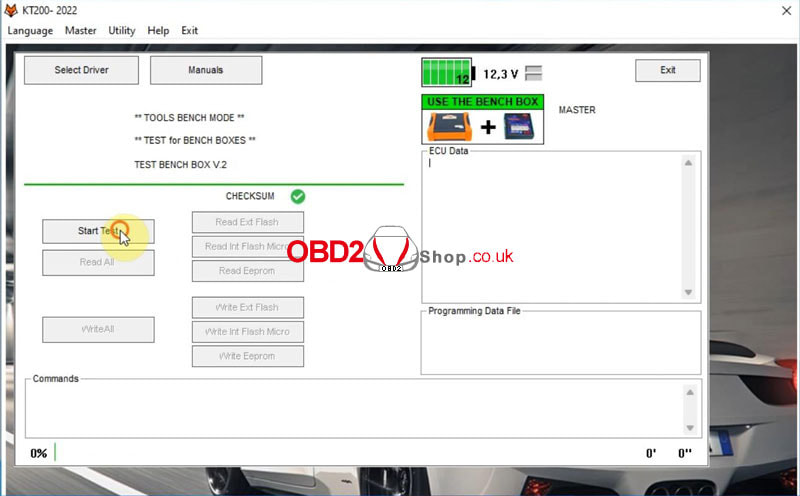
0 Comments
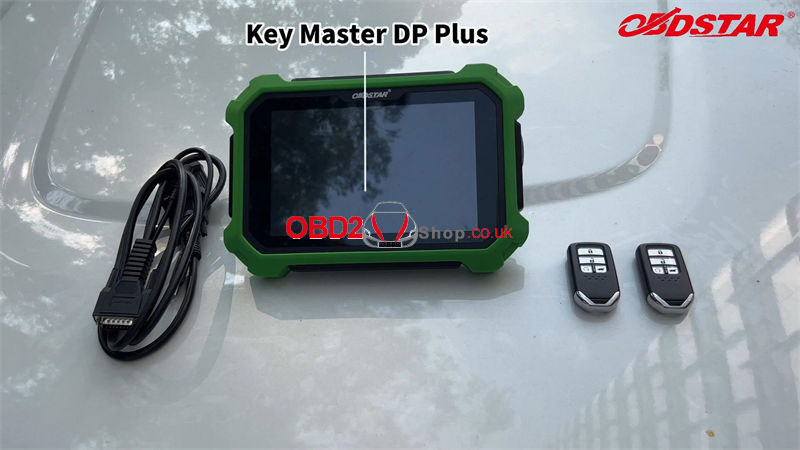
Using OBDSTAR X300 DP PLUS can program 2020 Honda Avancier all keys lost by OBD, which can save a lot of money from replacing a new IMMO box. Follow the tutorial to learn how to do it.
Tools Required Key Master DP Plus Main cable Universal Remote Key 
Video Guides:
Procedure
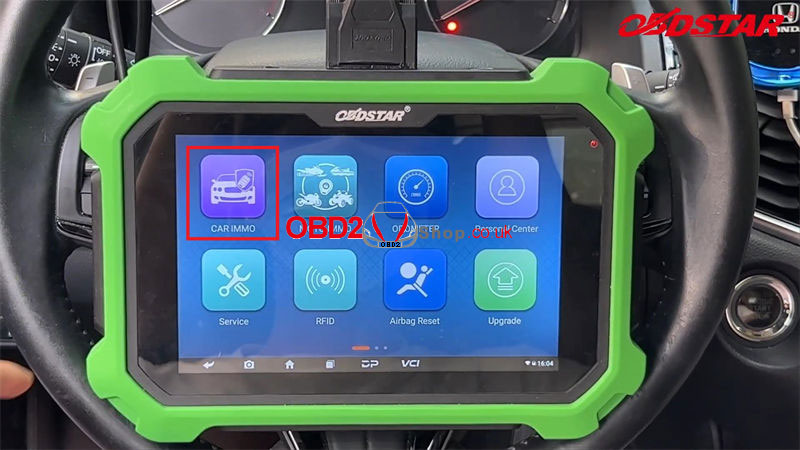
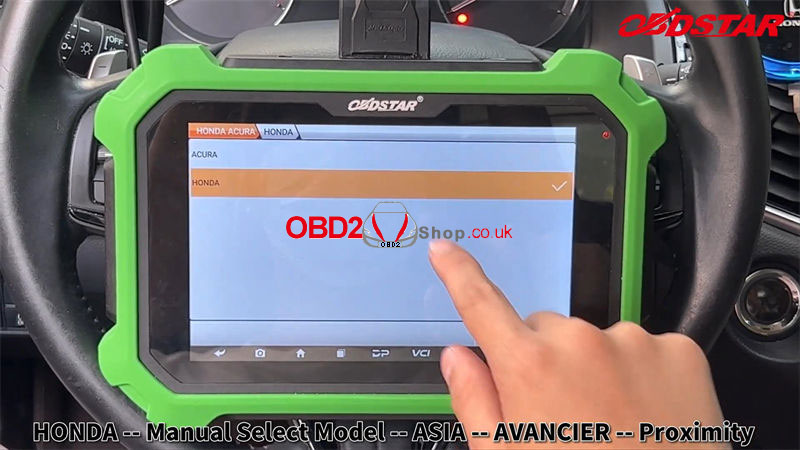
Connect X300 DP PLUS to OBD via the main cable. We can see the IMMO indicator is on. Car IMMO >> Honda Acura >> Latest version >> Honda >> Manual select model >> Asia >> Avancier >> Proximity >> Button >> Type 2(2019-) 
Double click the Start button, ignition is still off, click "Esc".
(If the ignition is on, please click "Enter".) Press and hold the Start button until the ignition is on. The ignition is turned on, please release the engine Start/Stop button. Smart key >> All smart keys lost Programming conditions 1. No fault codes. 2. Make sure you have all proximity keys to be programmed. Make sure the following matters, in order to minimize the noise source when programming the proximity key. Turn off the switch, such as a navigation system and audio. Keep the proximity key and the diagnostic tool separately by approximately 1m(3 feet). Close all windows, sunroofs and doors. Click "Enter". This function will erase all keys, click "Enter". Turn off the ignition. (Press the engine Start/Stop button. Be careful not to depress the brake.) Place a new key to be programmed in the vehicle. Click "Enter". Double-click the Start button, ignition is still off, click "Esc". Press and hold the Start button until the ignition on. The ignition is turned on, please release the engine Start/Stop button. Is it a new model(2020 or later)? Click "Enter". This function is available by connecting the server, please ensure the Internet connection is normal. Input numbers of smart keys to be registered. 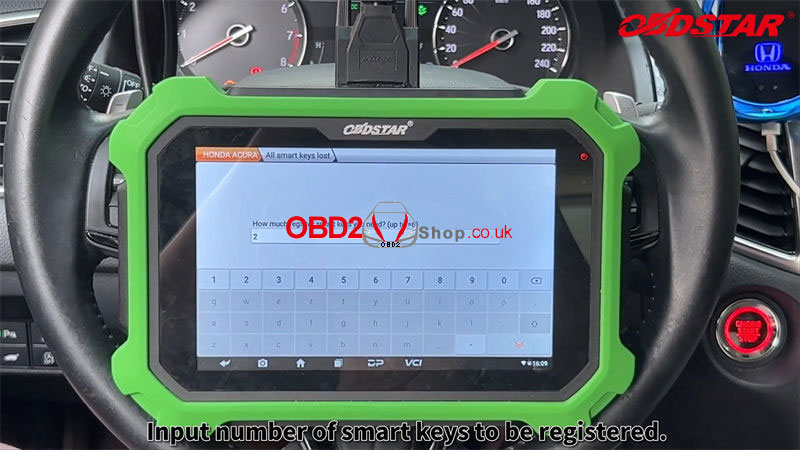
Take out all the registered proximity keys from the vehicle (make sure they are 2 meters away from the vehicle).
Only take 1 new smart key into the vehicle within 100s. Turn off the ignition. (Press the engine Start/Stop button. Be careful not to depress the brake.) Please take this proximity key to be programmed out of the vehicle. Place the first programmed key back into the vehicle. Turn on the ignition. (Press the engine Start/Stop button twice. Be careful not to depress the brake.) Take out all the registered proximity keys from the vehicle(make sure they are 2 meters away from the vehicle.) Only take 2 new smart key into the vehicle within 100s. The smart key has properly been registered. Turn off the ignition. (Press the engine Start/Stop button. Be careful not to depress the brake.) Turn on the ignition. (Press the engine Start/Stop button twice. Be careful not to depress the brake.) IMMO indicator is off, click "Enter". Turn off the ignition. (Press the engine Start/Stop button. Be careful not to depress the brake.) Turn on the ignition. (Press the engine Start/Stop button twice. Be careful not to depress the brake.) Registration has been completed. Turn off the ignition. (Press the engine Start/Stop button. Be careful not no depress the brake.) Turn on the ignition. (Press the engine Start/Stop button twice. Be careful not to depress the brake.) Click "Key quantity" to check. 2 keys are registered in the ECM/PCM. Test the keys, both can work well. Done. 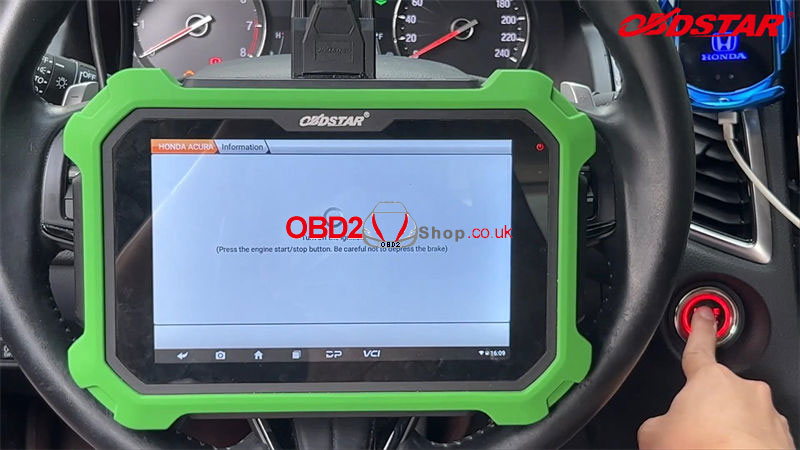
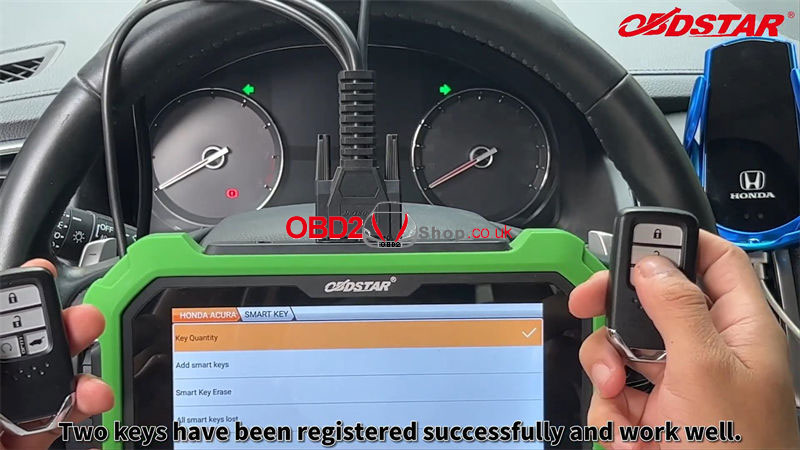
This is how to program 2020 Honda Avancier all keys lost with Obdstar X300 DP PAD2.
www.obd2shop.co.uk Latest Yanhua Mini ACDP Module 28 can clone ZF-9HP gearbox in BOOT mode. Supports Jaguar, Land Rover, Chrysler, Dodge, Fiat, Honda, Jeep, etc. Need to work with Mini ACDP basic module. 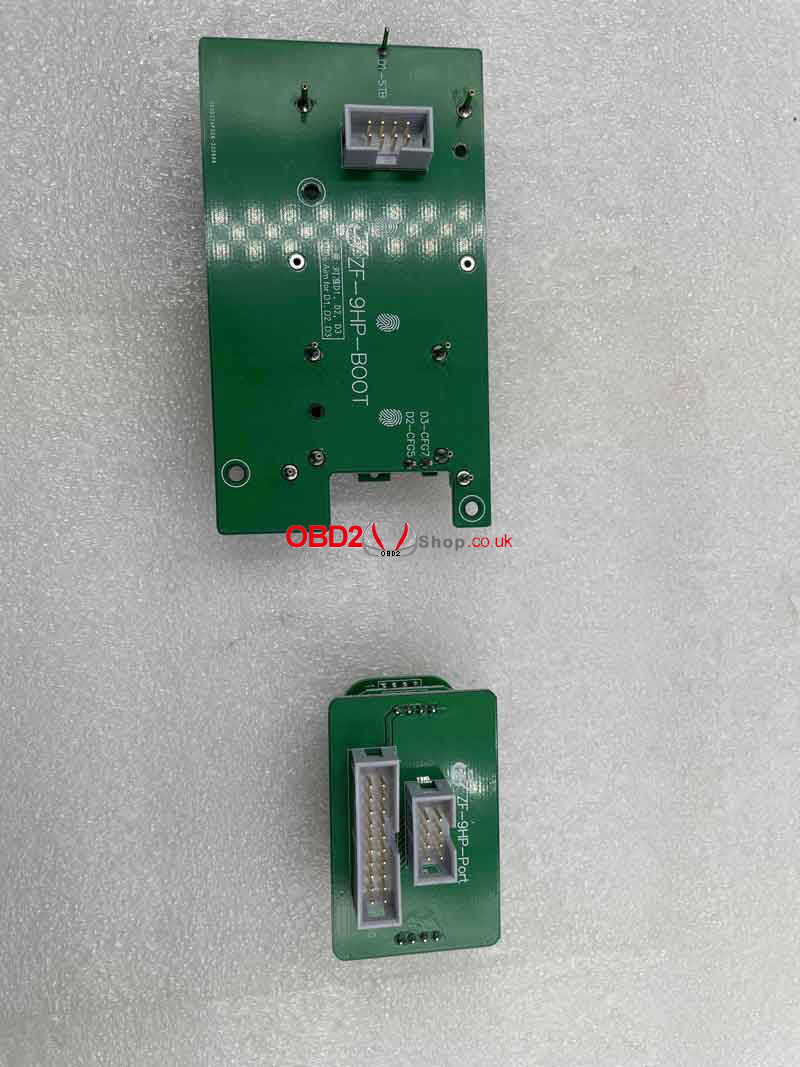 Features 1. The Interface board can be inserted blindly to align with the boot test point, no need magnifying glass for calibration or complex probe workbench operation. 2. It's more safer and reliable to use BOOT test point with pin detection function, data read & write. 3. It's more simple & efficient to use special interface board rather than cables. Why to buy Mini ACDP Module 28? Traditional BOOT mode: - Boot point needs to be aligned by the human eye with a magnifying glass; - Cable connection is risky to damage module due to misoperation. ACDP BOOT mode: - Interface board blind insertion - Boot test point with pin detection function. 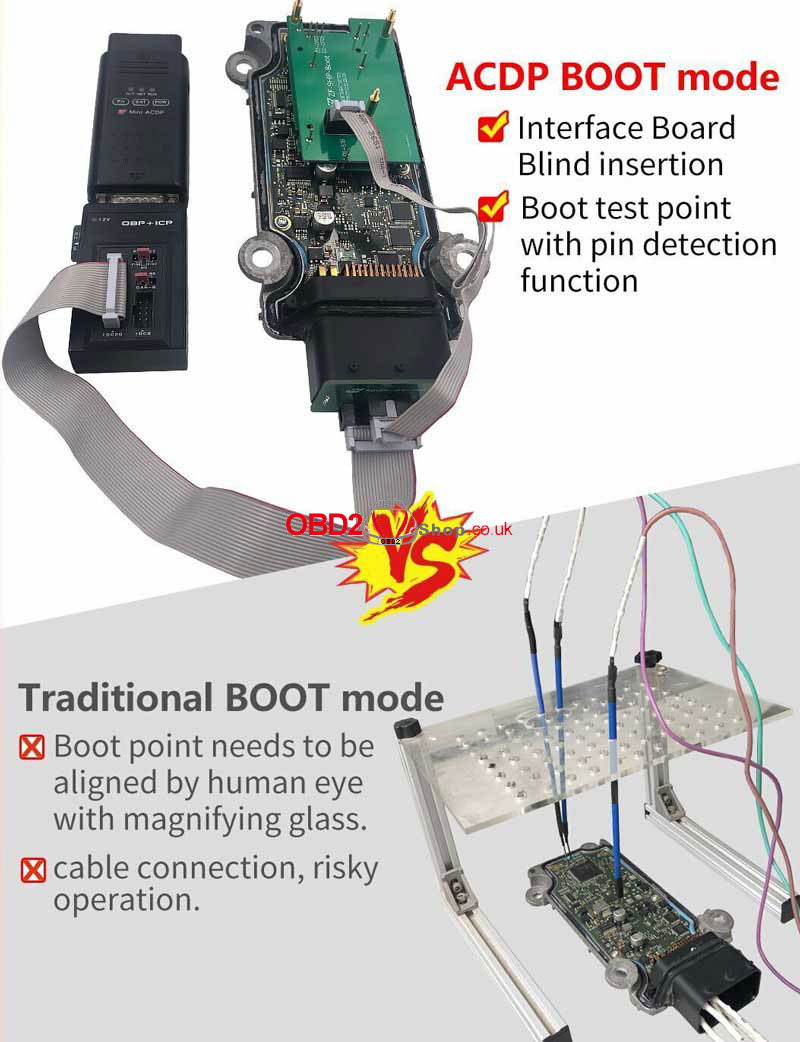 Good news! OBDSTAR MS80 Motorcycle Diagnostic Tool has launched E-Moto diagnosis software to meet the demands of the growing aftermarket. This is a quick demo on how to diagnose NIU E-Moto battery management & dashboard system. Tool Required OBDSTAR MS80 STD Charger or M002 for charging Main cable EM001(NIU diagnosis cable) *Please keep MS80 in charging during the whole process.  Connection 1. Connect M002 with external battery to supply power for OBDSTAR MS80. The red clipper with positive pole, the black one with negative. 2. Make sure 2 fuses of M002 are working well. 3. Charge MS80 via M002 or charger directly. 4. Connect MS80 with EM001(NIU diagnosis cable) via main cable. 5. Plug EM001 onto its diag socket. 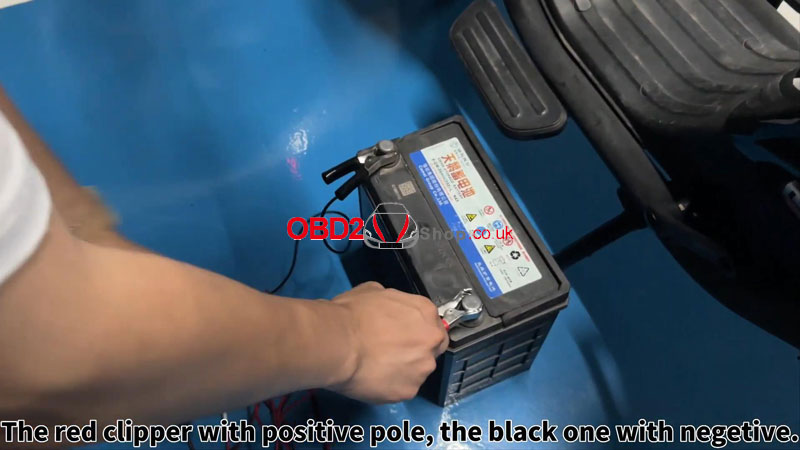 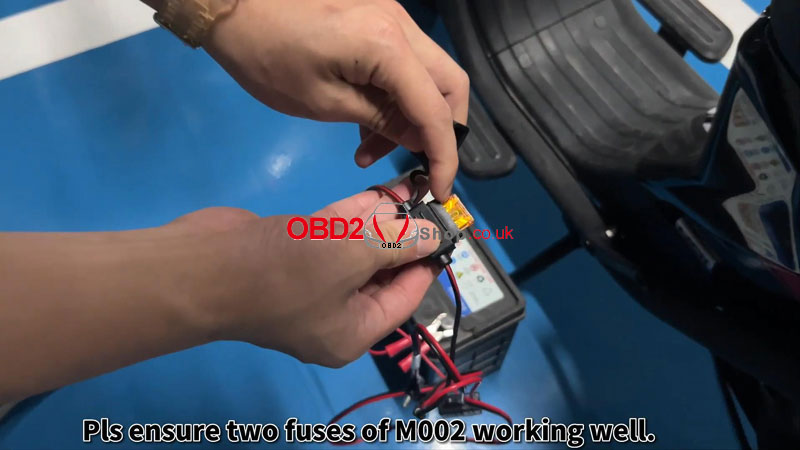 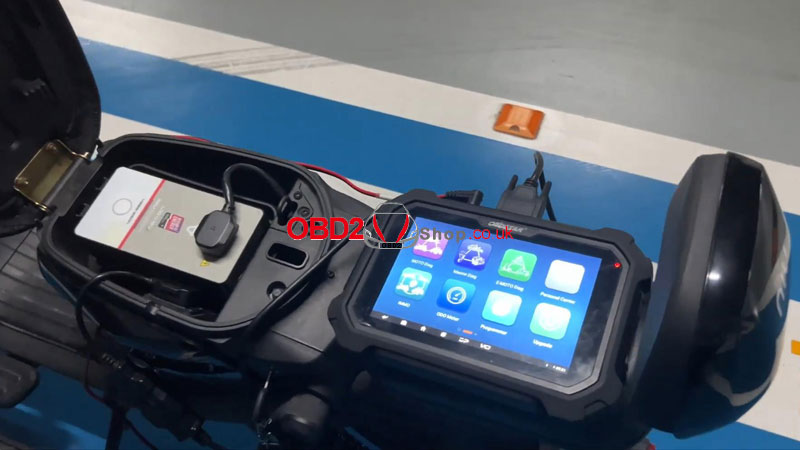 E-MOTO Diag >> NIU >> NIU V30.00 >> Select from system >> BMS info/ DB info 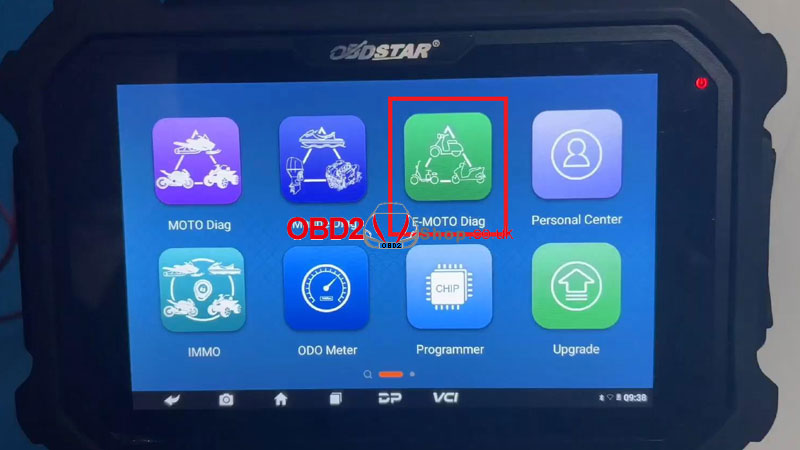 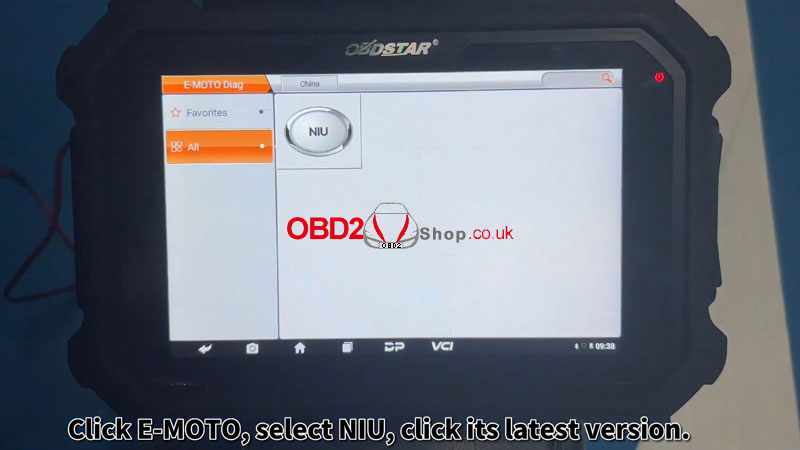 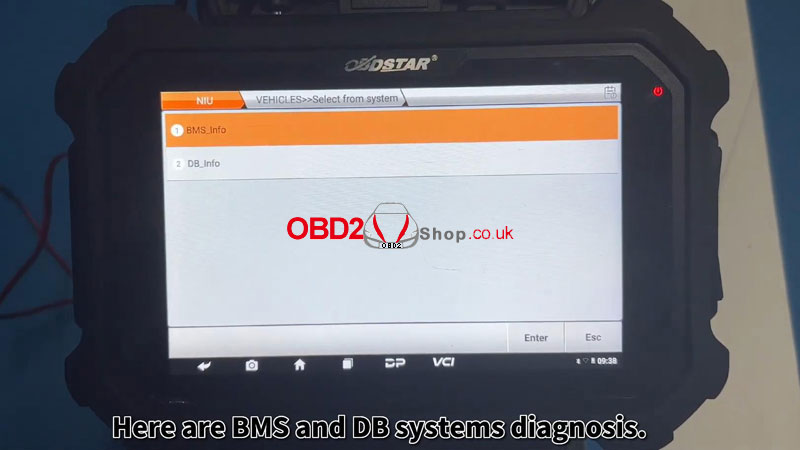 BMS Info Make sure the power is turned off for more than 10s. You can also connect diagnostic device to battery pack directly. The left half of the screen shows battery information. Including state-of-charge(SOC), voltage, charge current, discharge current, values of each temperature sensor... The other half shows battery quantities & voltage of each battery. The voltage of each small battery is around 3.65V, which is very average, indicating that the battery is in good condition. 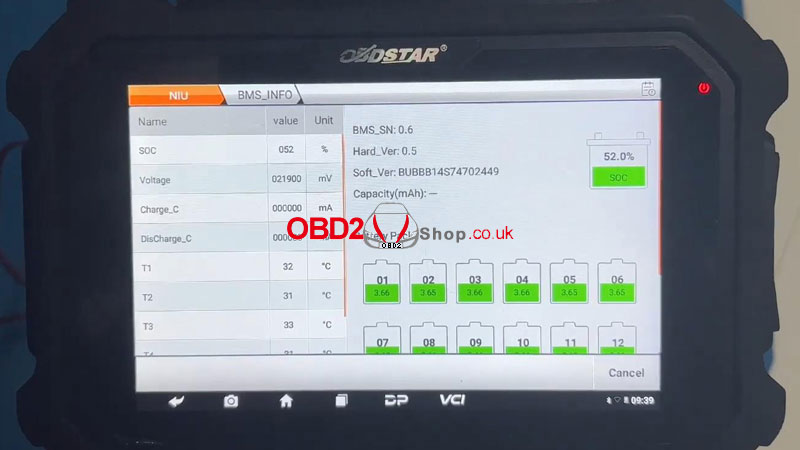 DB Info Make sure the power is turned off for more than 10s. Turn the power ON. We can see its dashboard software version here. 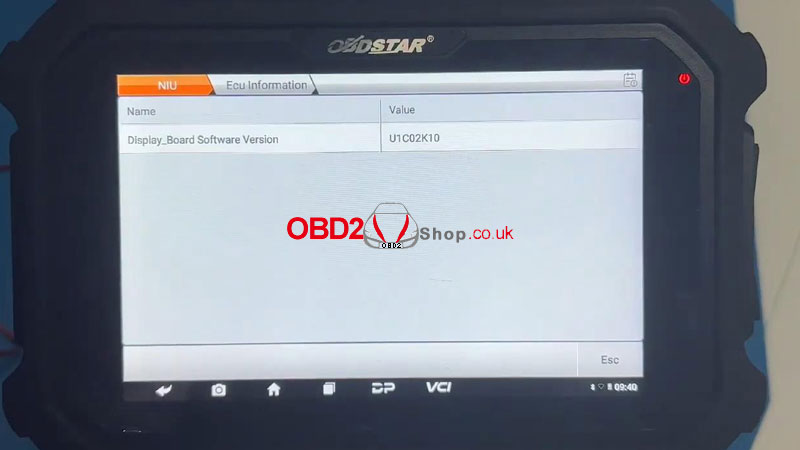
This is a solution to fix Fetrotech Tool crash & taskbar disappear problem when running software. At present, the problem can only be solved by replacing to Windows 11 Pro 64bit system. Here we provide Win11 system installation free download.
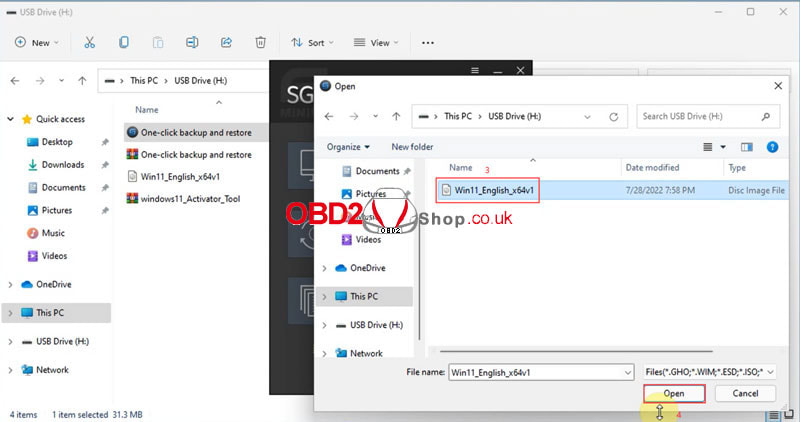
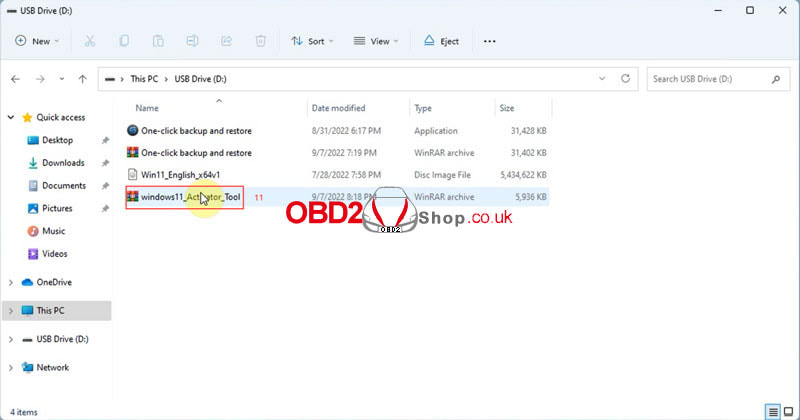
1. Download Windows 11 Pro 64bit English system package, one-click backup & restore tool, and system activation tool. Win11 Pro 64bit English system package free download: https://mega.nz/file/rIBRELxS#6Maa1nV-oRfUsEns38jWbc_Pu3MQufd2ygvABxk65Wc Size: 5.18GB One-click backup & restore tool free download: https://mega.nz/file/GUBQSYSI#cueWd9pgIi6U7Nk9f8deH9qHAr4umTOSFsZ7e5wt4fU Size: 30.7MB Win11 system activation tool free download: https://mega.nz/file/OFYRxBDD#iPAFckU6B3efqBn6OxKueLIxbCfU08Q5cYjQCgsbzxs Size: 5.8MB Video guides:
Note:
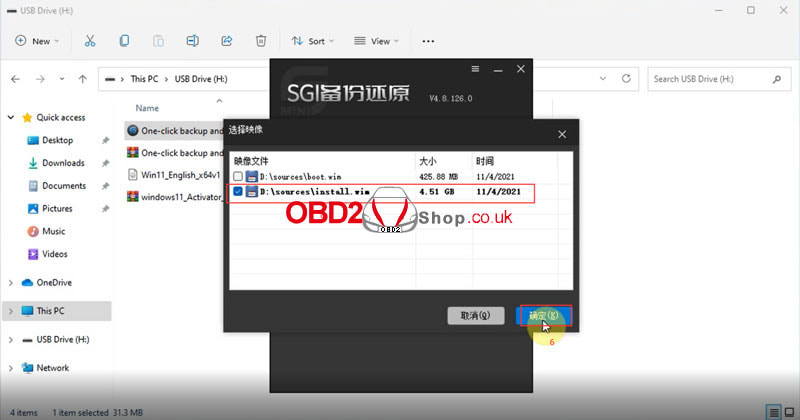
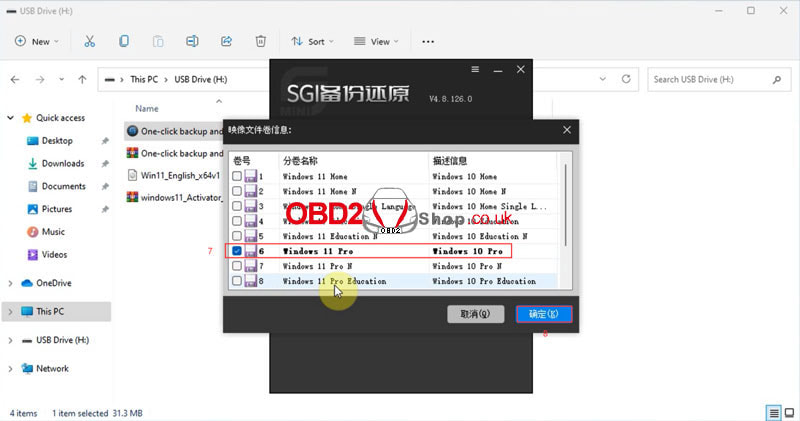
1)Please close all anti-virus software before reinstalling the system. Otherwise, the installation will fail. 2)Please backup all important files on the C drive before operation(The c drive will be formatted after the system is reinstalled). 2.Open One-click backup & restore tool >> Select one-key reinstall system >> Open Win11 64bit system package 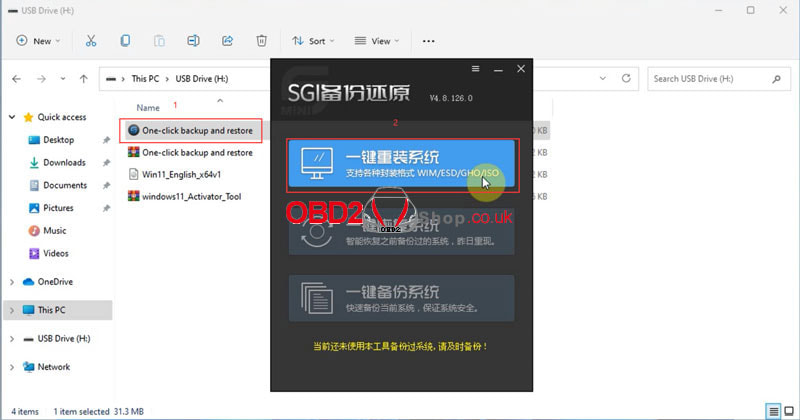
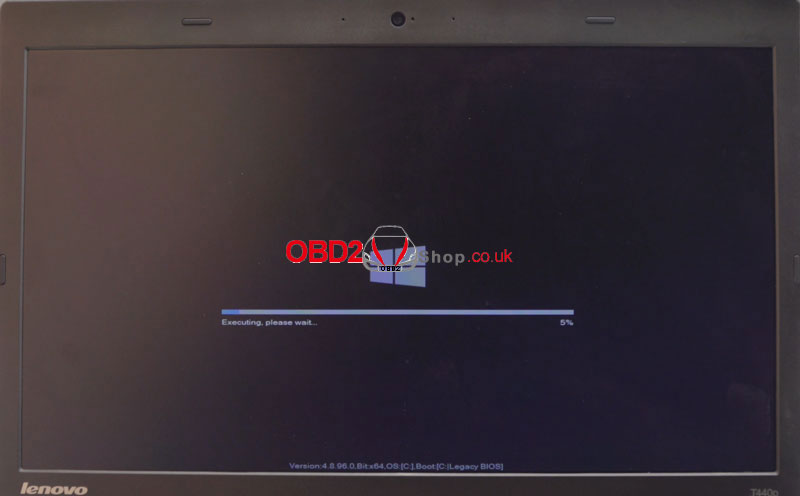
3. Restart the computer to install the system automatically.
* Plug in the computer, and do not operate it during the installation process. Wait about 10-25mins. 
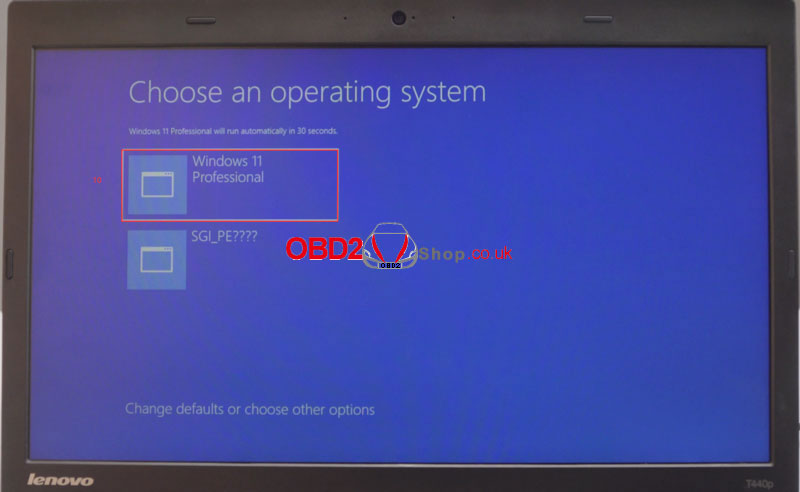
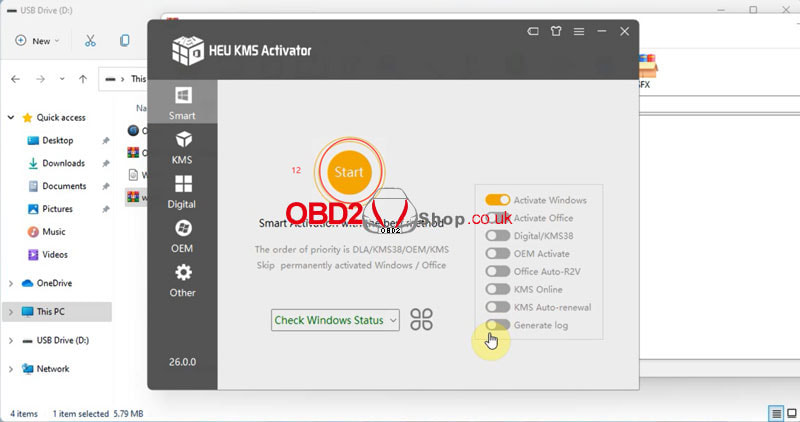
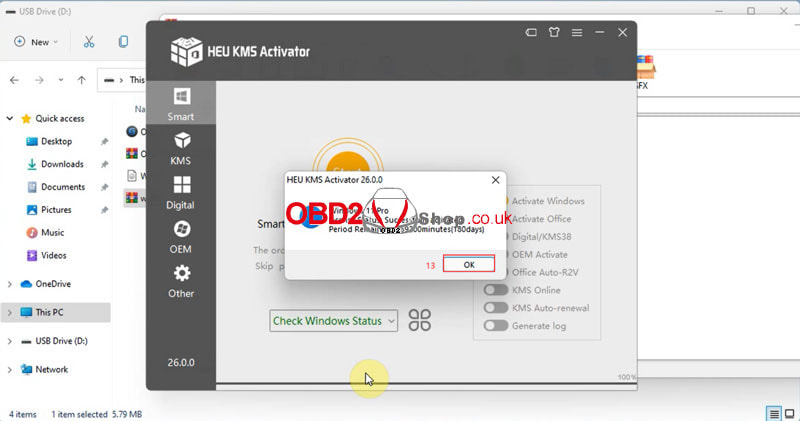
4. Activate the Win11 system after installation.
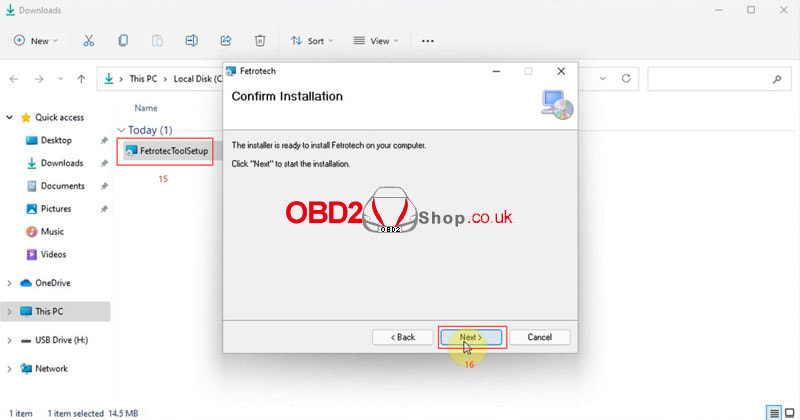
5. Download & install Fetrotech ECU Programmer on www.tuner-box.com
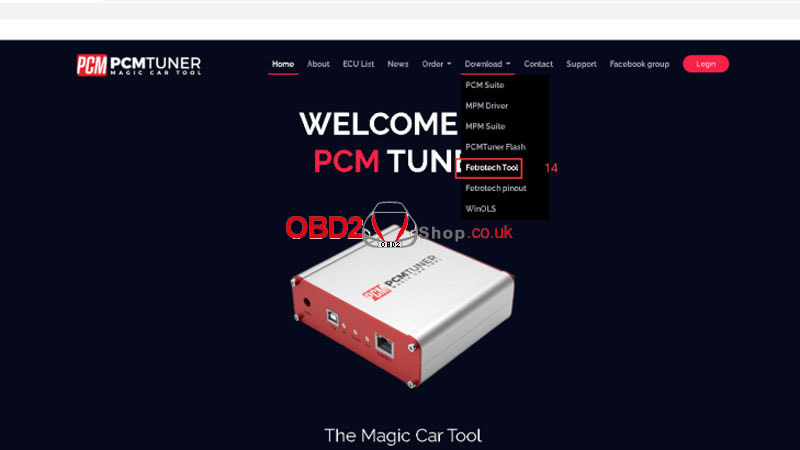
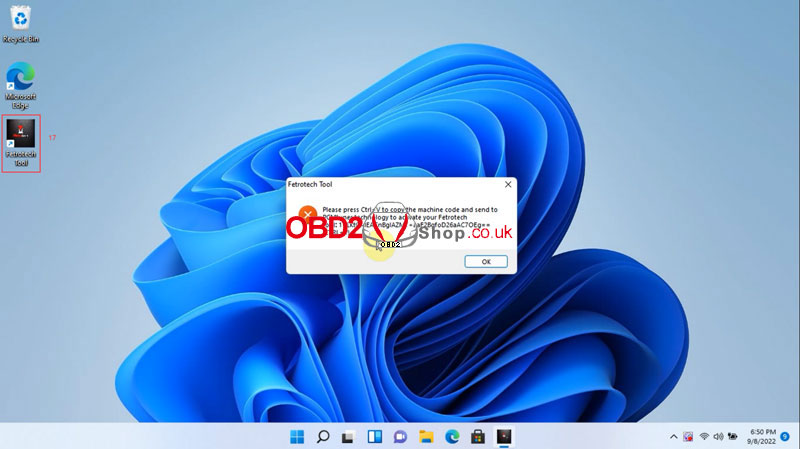
6. Copy the ID & serial number of the Fetrotech device according to to prompt, and send to the seller for activation.
7. Move the 2 activation files to the corresponding directory.
8. Connect the Fetrotech device to open software.
* If an error occurs, please reinstall the software. 
Read also:
Fetrotech Tool Installation, Activation & Package Problem Solution Technical support www.obd2shop.co.uk Autel EVDiag Box is compatible with the MaxiSys Ultra, MaxiSys Ultra ADAS, MaxiSys MS919, and MaxiSys MS909. It can be connected to the MaxiFlash VCMI or MaxiFlash VCI using the same connection steps. The following operations use the connection of EVDiag Box with a MaxiFlash VCMI as an example. Step 1. Connect the main cable V2.0 to the vehicle data connector on the VCMI and tighten the thumb screws. 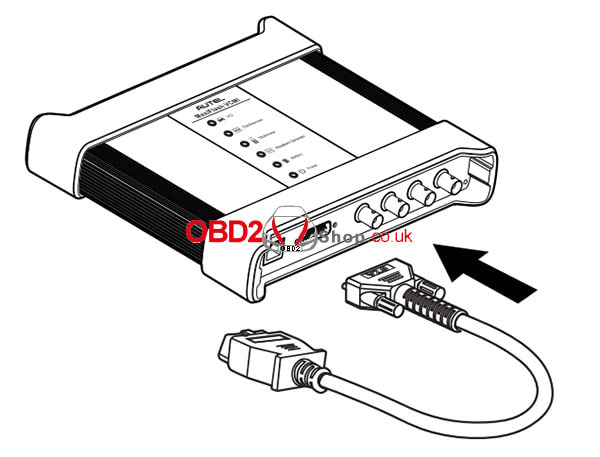 Step 2. Connect the cable's 16-pin adapter to the OBDII connector of the EVDiag Box. 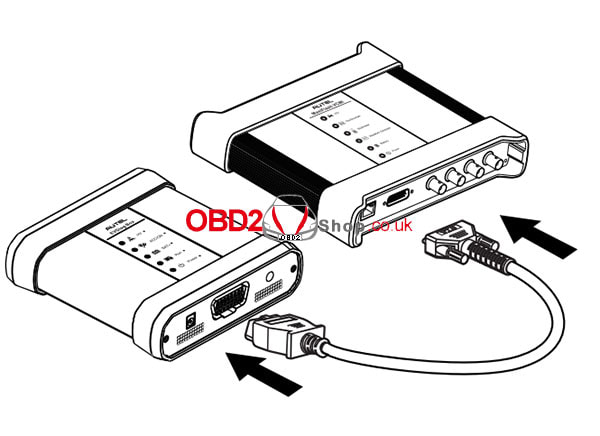 Step 3. Power up the tablet. Ensure that the tablet battery is charged or that it is connected to the supplied DC power supply. 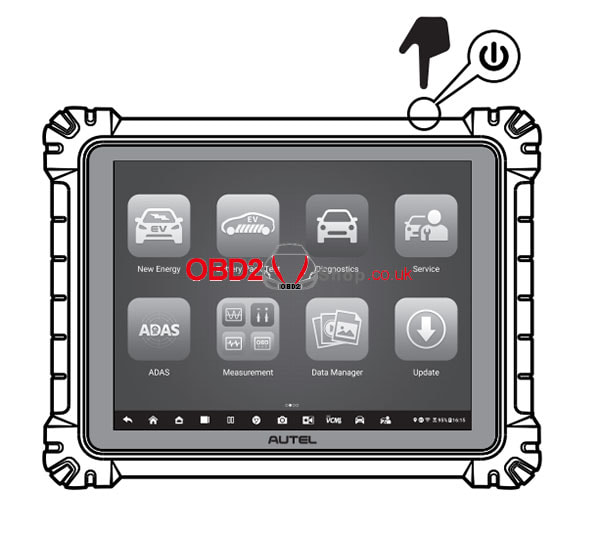 Step 4. Select from Bluetooth, Wi-Fi, or USB cable V2 to connect the tablet with the VCMI and establish a communication link. Use only the USB cable connection when programming. 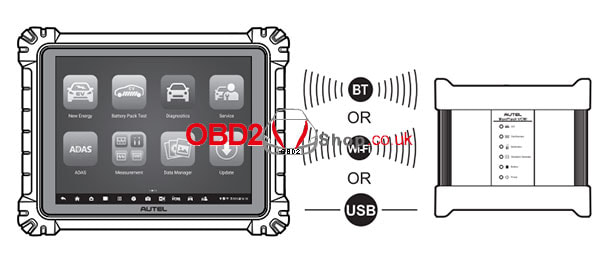 Step 5. Tap Battery Pack Test on the MaxiSys Job Menu. Follow the onscreen instructions to confirm the relevant technical certifications and complete preparation.  Step 6. Follow the onscreen instructions to select the test vehicle, including its make, area, model, capacity, etc. 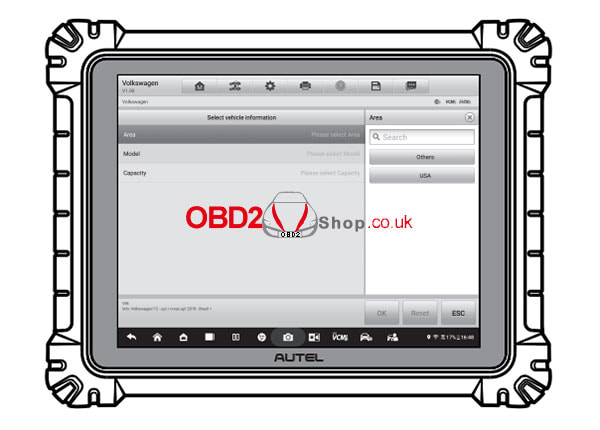 Note: The required adapter or breakout leads may vary by vehicle. Please make the correct connection according to your actual situation. 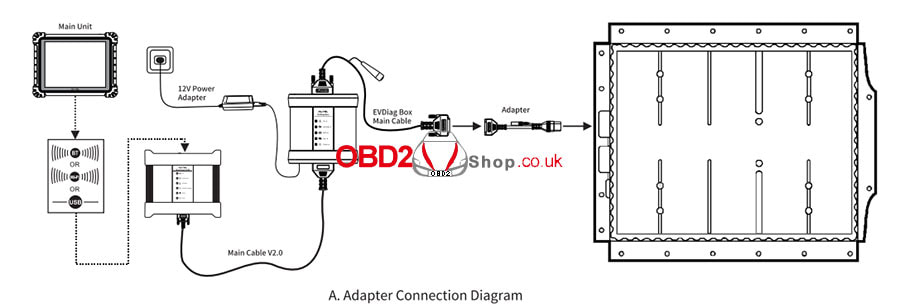 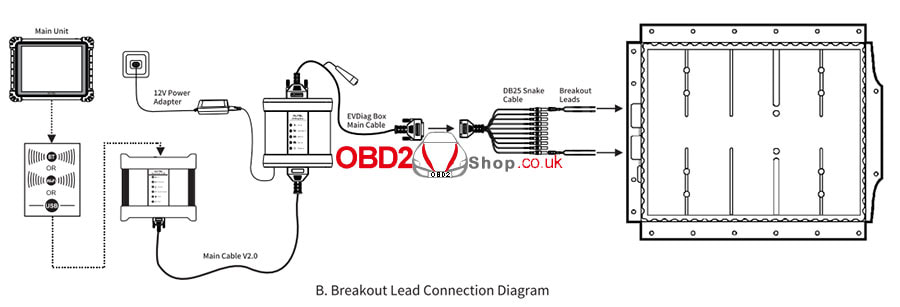 Step 7. Power up the EVDiag Box. Ensure the EVDiag Box is connected to the DC power supply. Tap the OK button on the tablet's connection Diagram screen to connect the tablet with the EVDiag Box and establish a communication link. The main menu screen will appear once the link has been established. 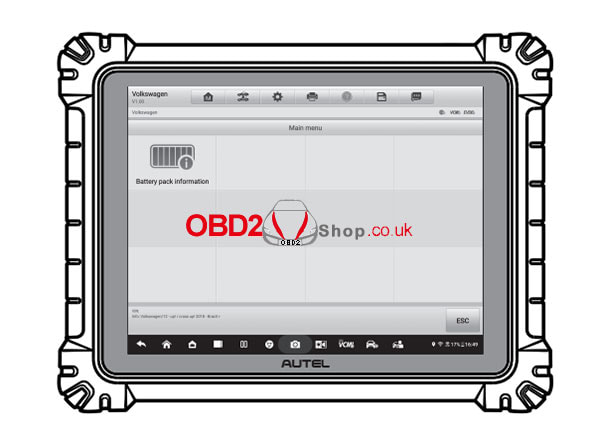 Step 8. Tap Battery Pack Information on the Main Menu screen. The screen will display the data obtained from the battery pack, including the SOC, voltage, current, pack voltage delta, and temperature. 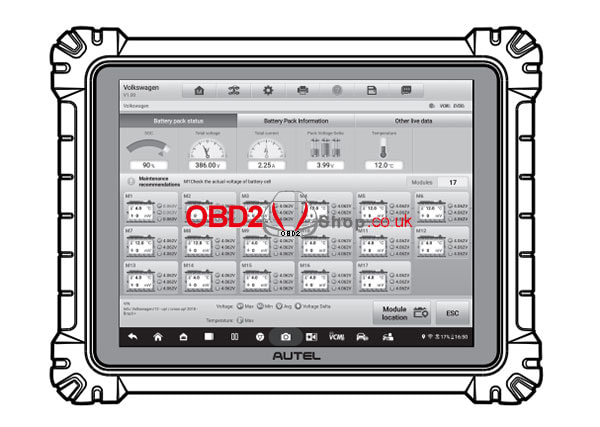 For more information on EVDiag Box, please refer to
https://www.obd2shop.co.uk/wholesale/autel-ev-diagnostic-update-kit.html
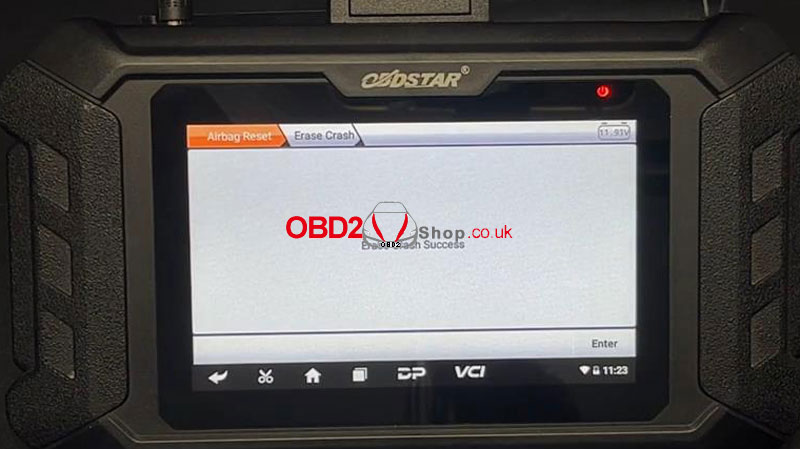
It's a cost-effective way to do airbag reset for vehicles with OBDSTAR P50. Following I'm gonna reset Tesla Model 3 airbag on the bench as an example.
Check full operations on Youtube:
Tools Required:
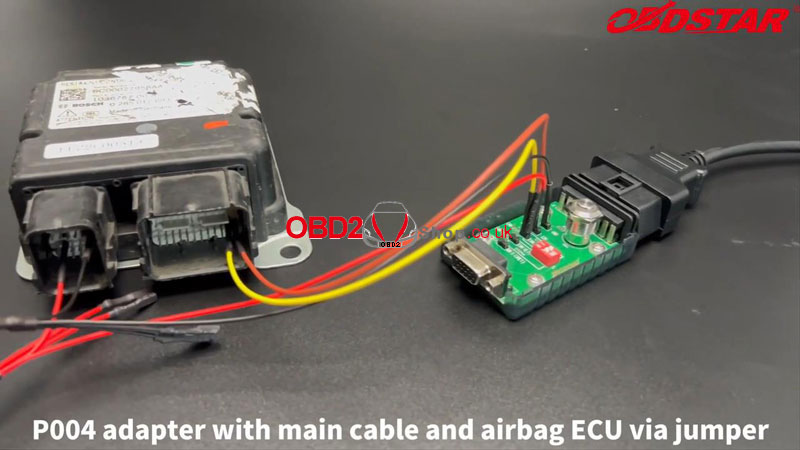
OBDSTAR P50 Main cable P004 adapter P004 jumper Tesla Model 3 Airbag ECU 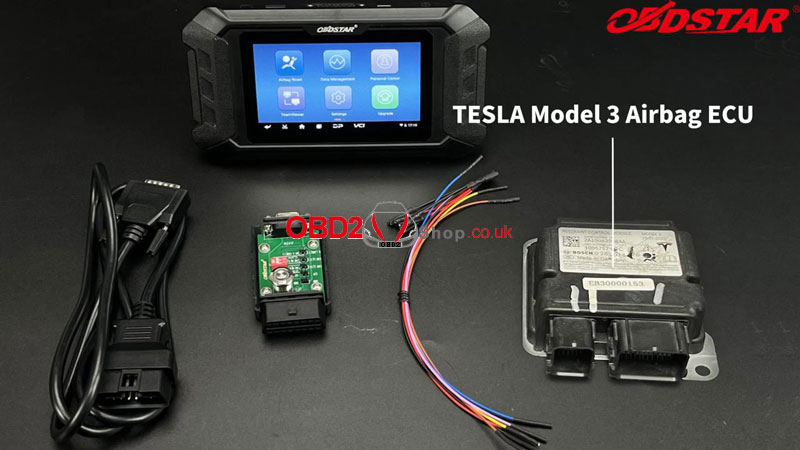
Tip: Please keep OBDSTAR P50 in charging & communication in the whole process.
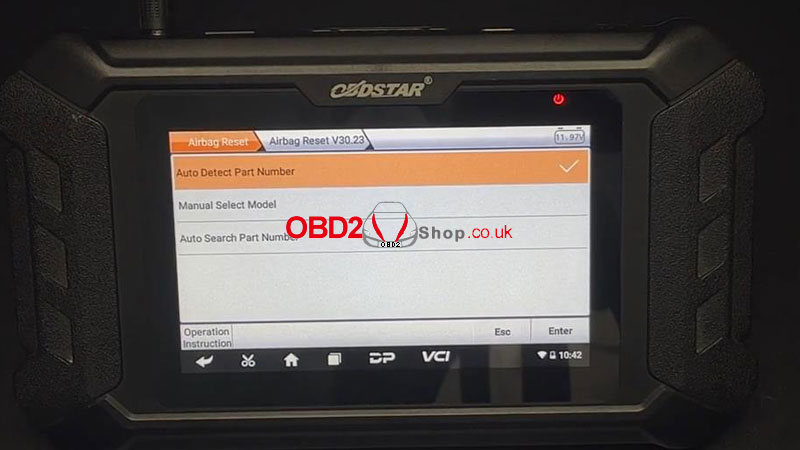
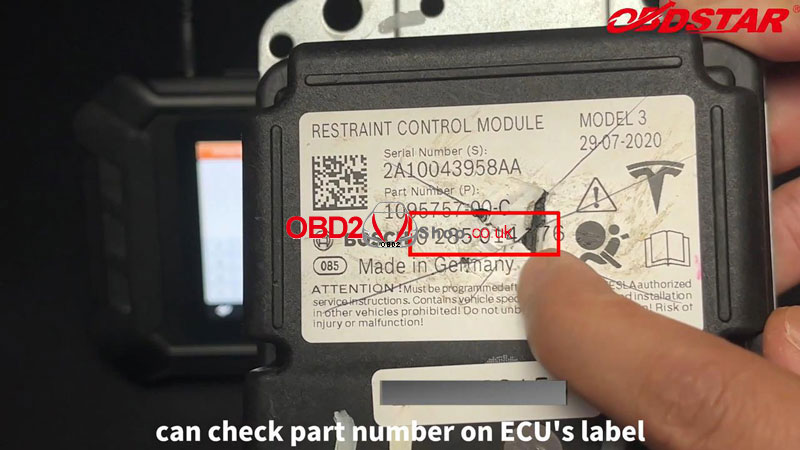
Airbag reset >> All >> Airbag reset latest version >> Auto search part number This function is available by connecting the server, please ensure the Internet connection is normal. Press "Enter". Please input the part number (which can be checked on ECU's label). * Case insensitive, support fuzzy search. 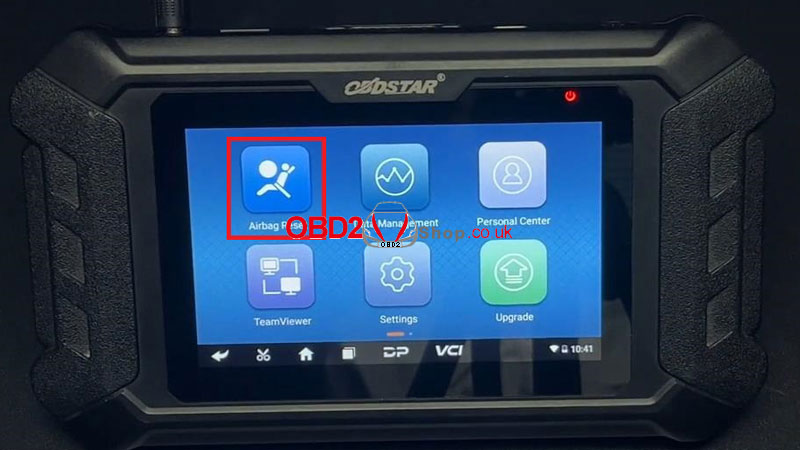
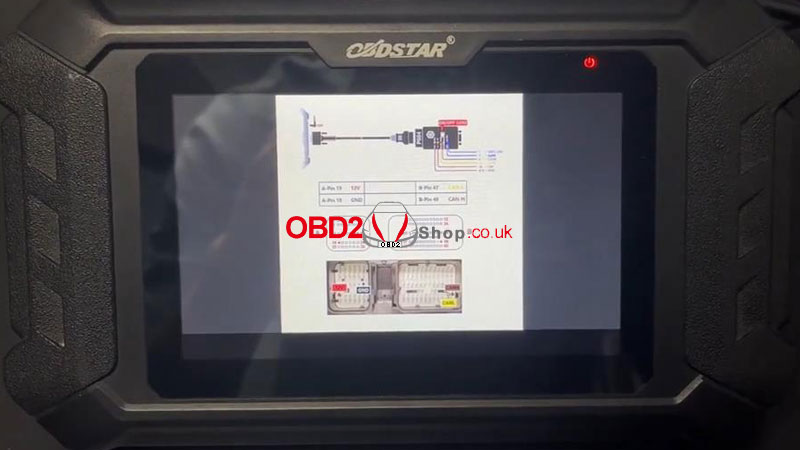
Please refer to Diagram at the bottom left to connect cables:
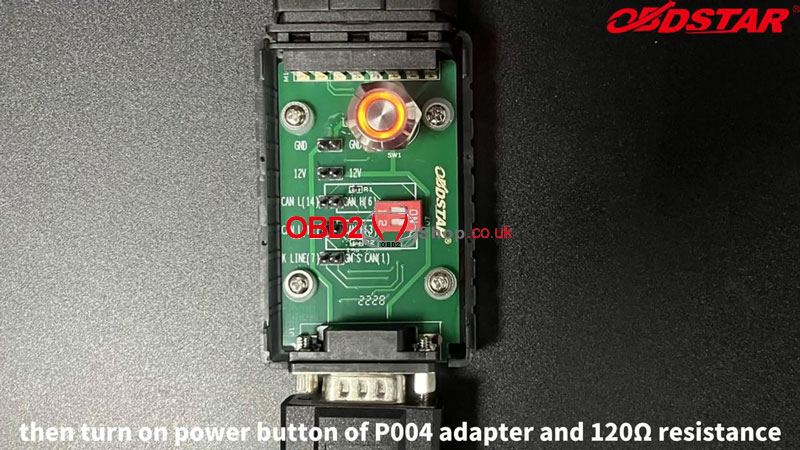
1. Connect P50 with the main cable. 2. Connect the P004 adapter with the main cable & airbag ECU via jumper. 3. Turn on the power button of the P004 adapter & 120Ω resistance. 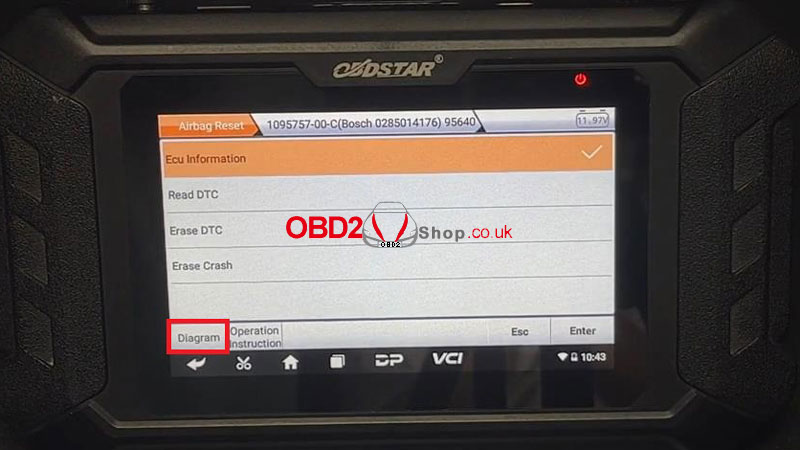
Press "Read DTC".
There's a crash fault code: crash event storage full and lock. Erase Crash >> Enter Erase crash success. Go back to read DTC again. Crash fault code has gone! Airbag reset done. 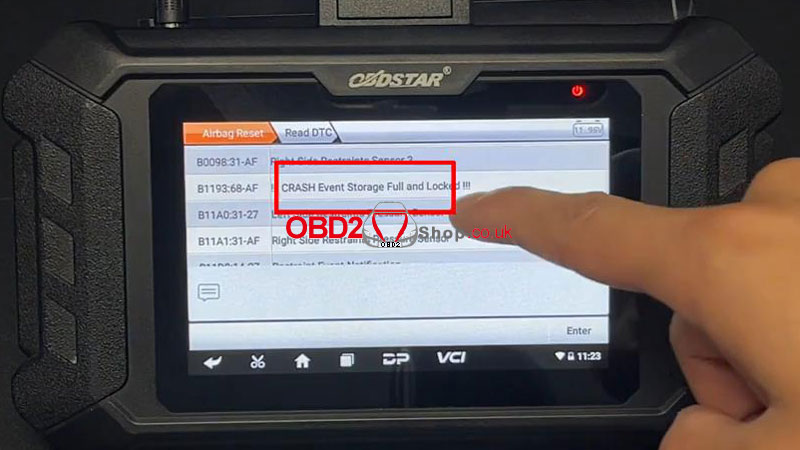
Yanhua Mini ACDP Module 27 is supported to read/write ISN & clone BMW E/F chassis MSV80, MSD80, MSD81, MSD85, MSD87, MSV90 DME. Must work with Mini ACDP basic module on a smart phone. Compatible with Android & iOS systems. Features 1. Fast reading/writing ISN & clone DME on the bench without having to open the shell or program DME. 2. Special interface board is more convenient than a wire connection, easier and safer, more efficient and reliable. Support DME type: Continental, SIEMENS Mini ACDP APP Operation Steps Step1. Connect Step2. Read/write data Step3. Disconnect Yanhua ACDP BMW allows to backup & write data, read & write MAPS, INT/EXT EEPROM, and modify ISN data. 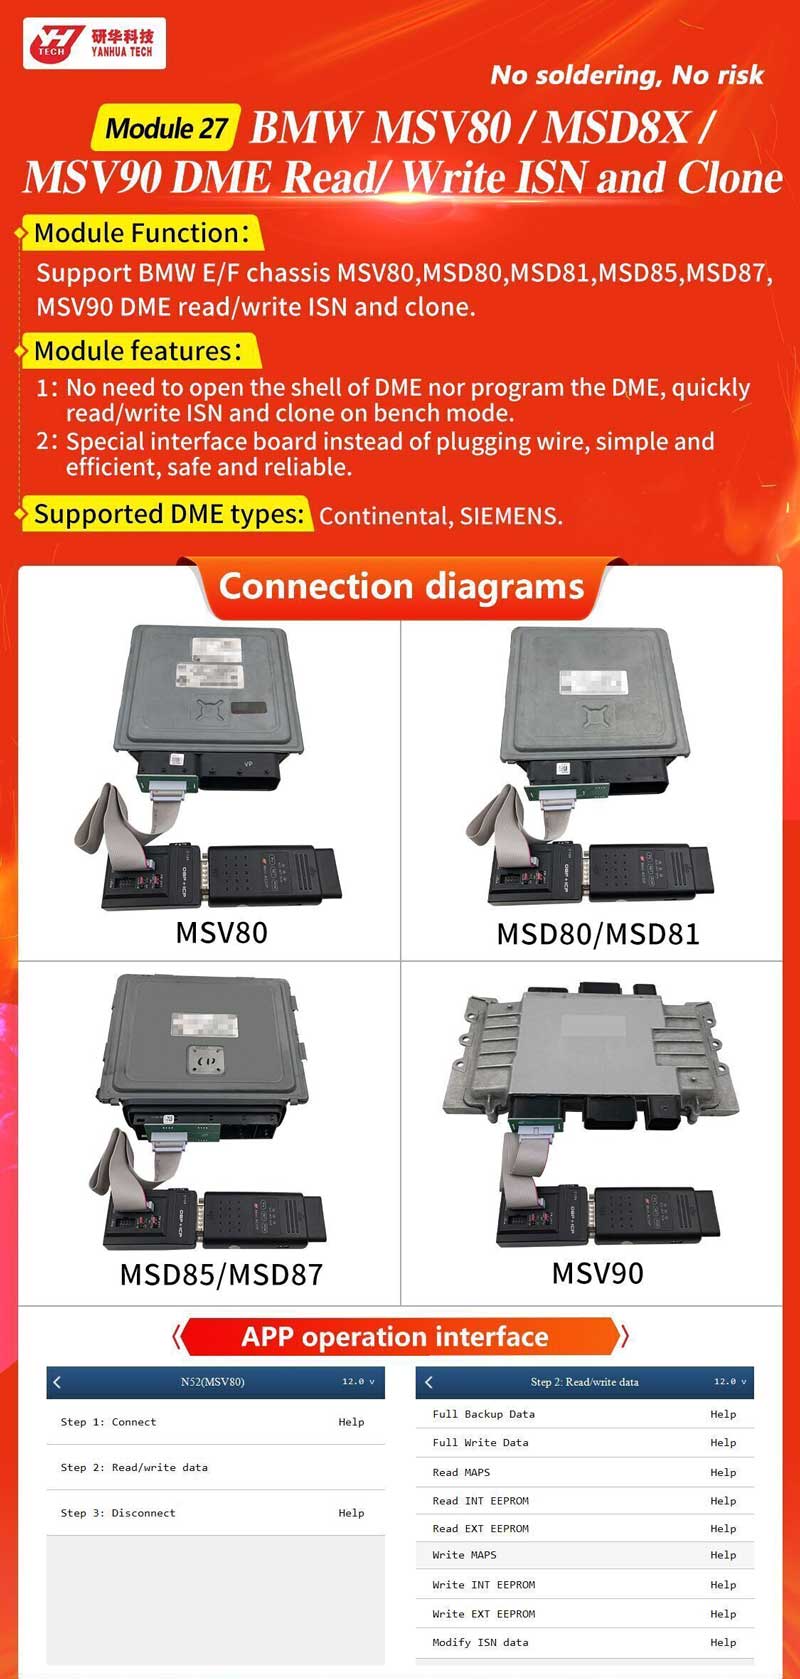 How to connect Module 27? 1. Prepare ACDP, OBP+ICP adapter, interface board & BMW DME. 2. Connect the interface board correctly to the DME interface as shown. 3. Short the CAN resistor on the OBP + ICP adapter to the "CAN-R Join". 4. Connect all together. BMW MSV80 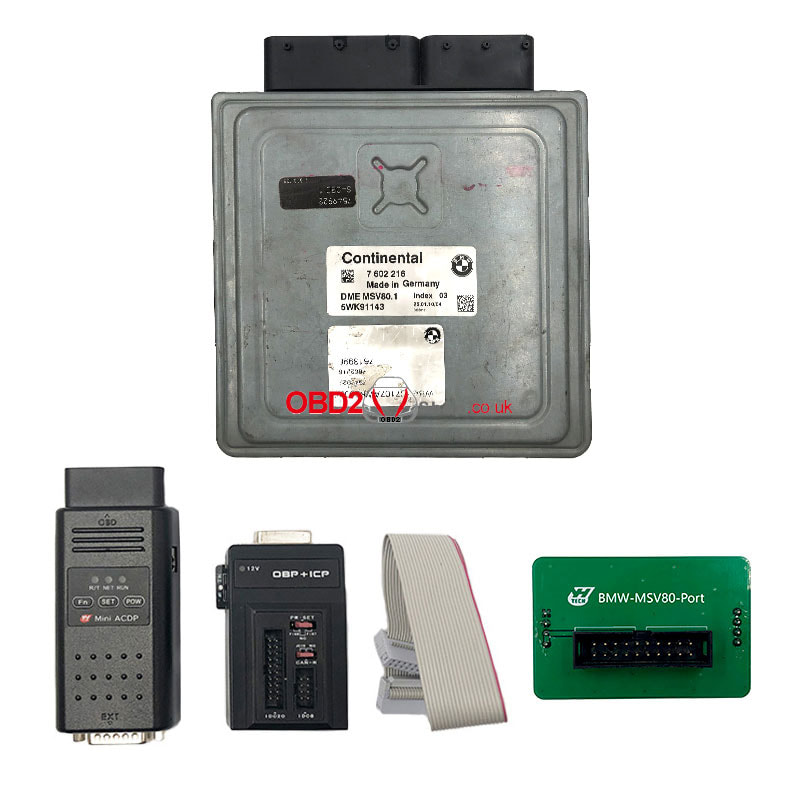 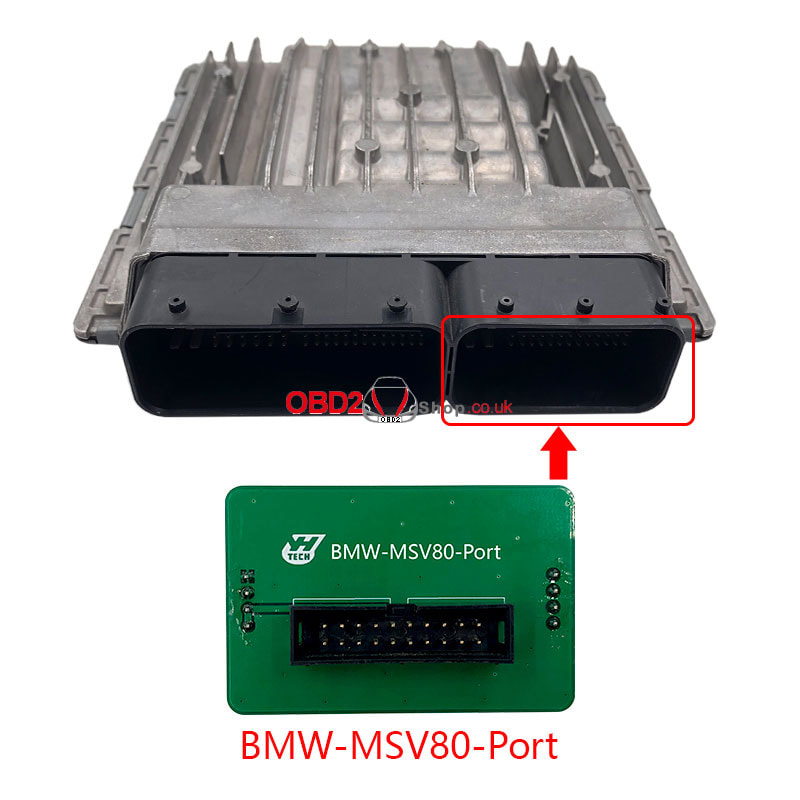 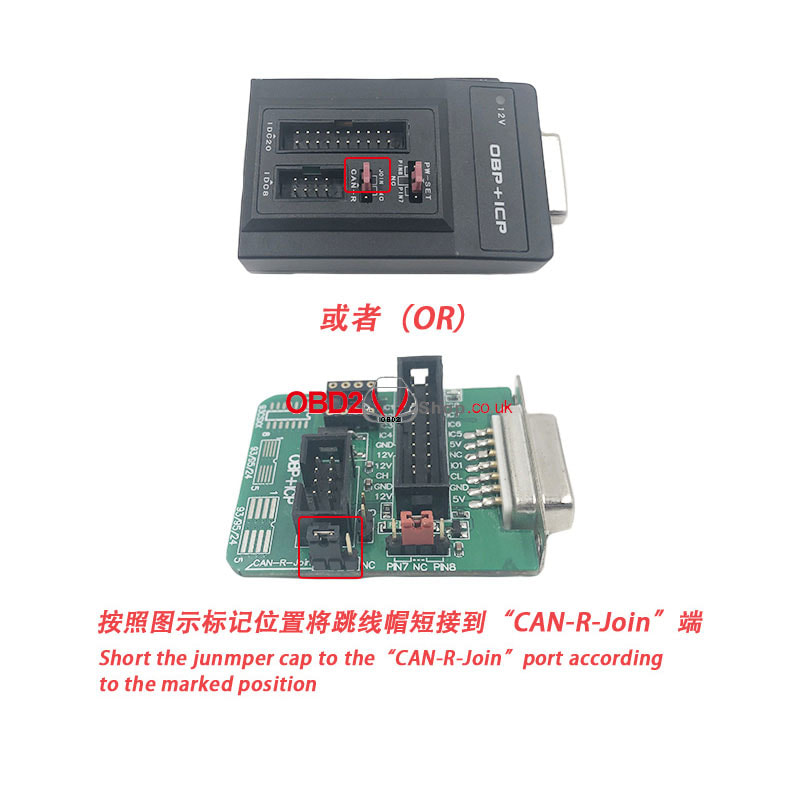 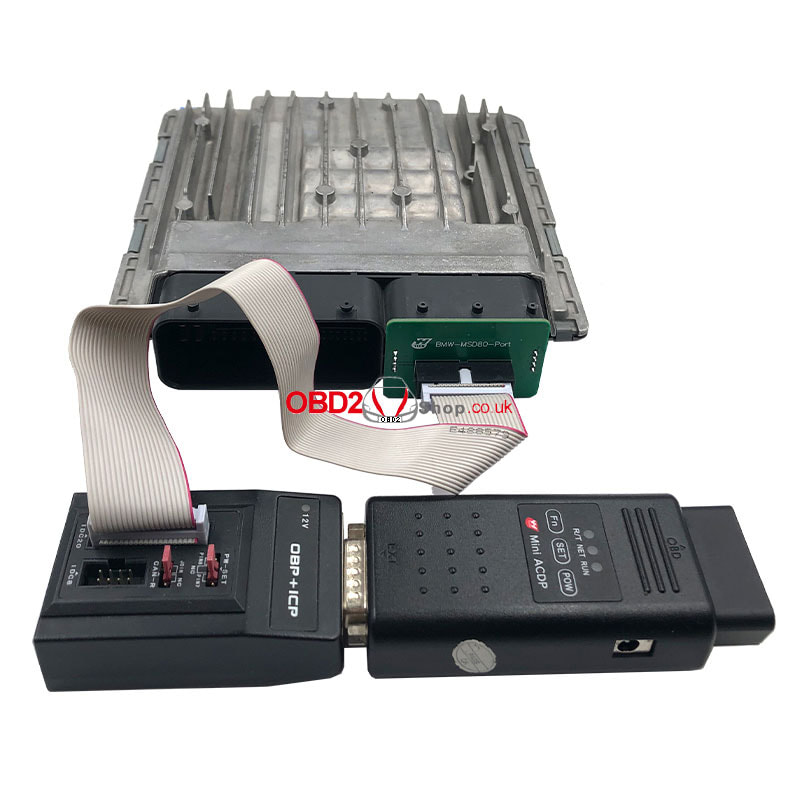 BMW MSD80/MSD81 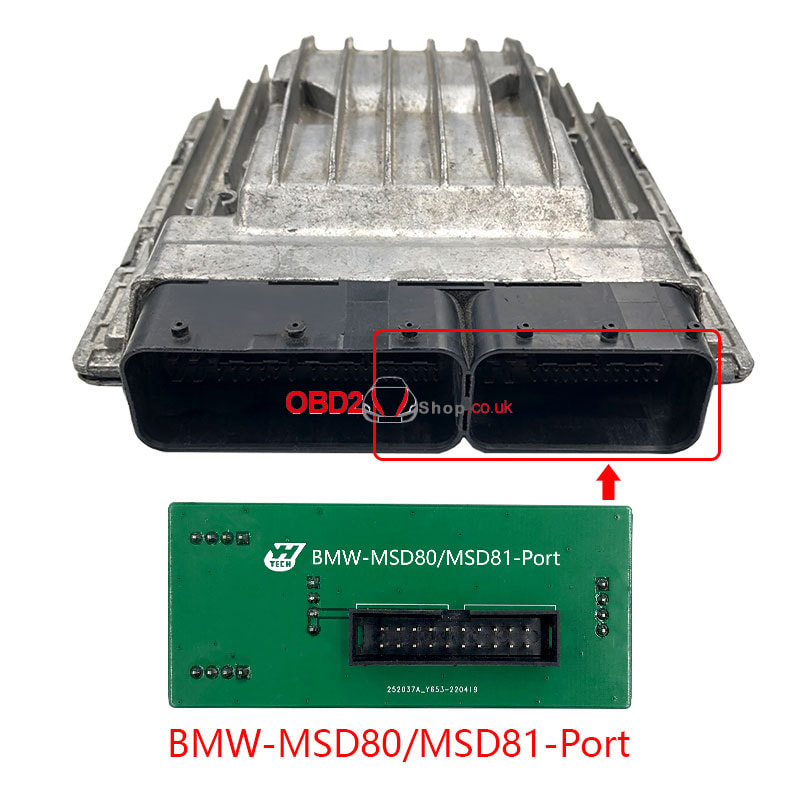 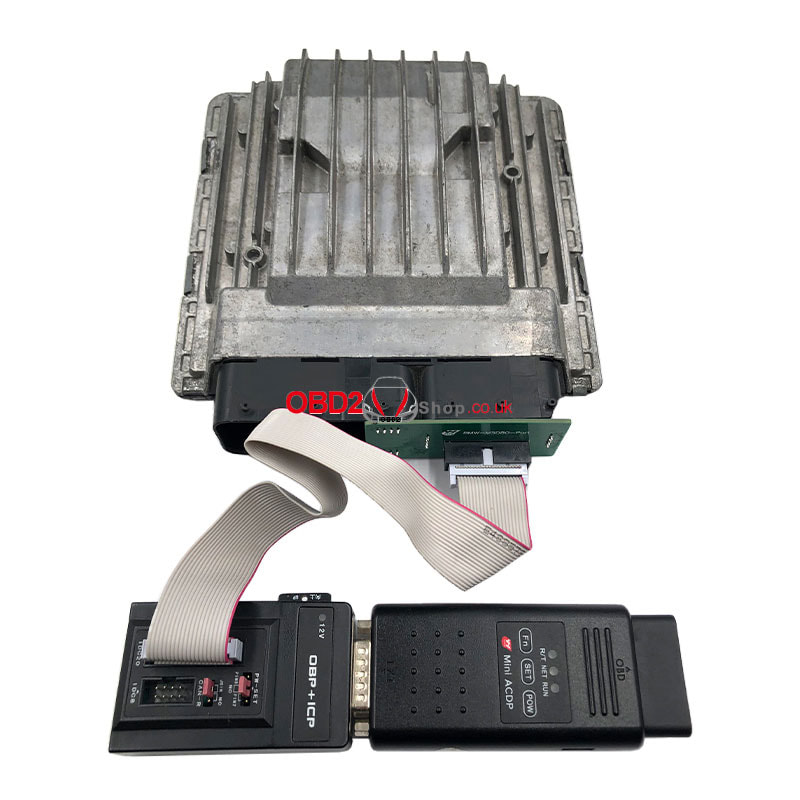 BMW MSD85/MSD87  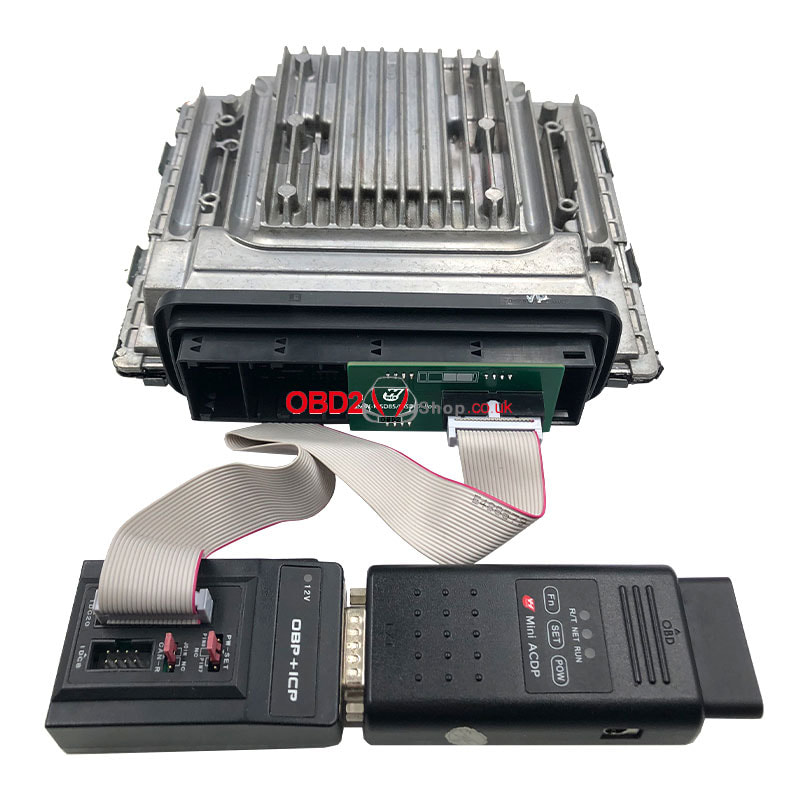 BMW MSV90 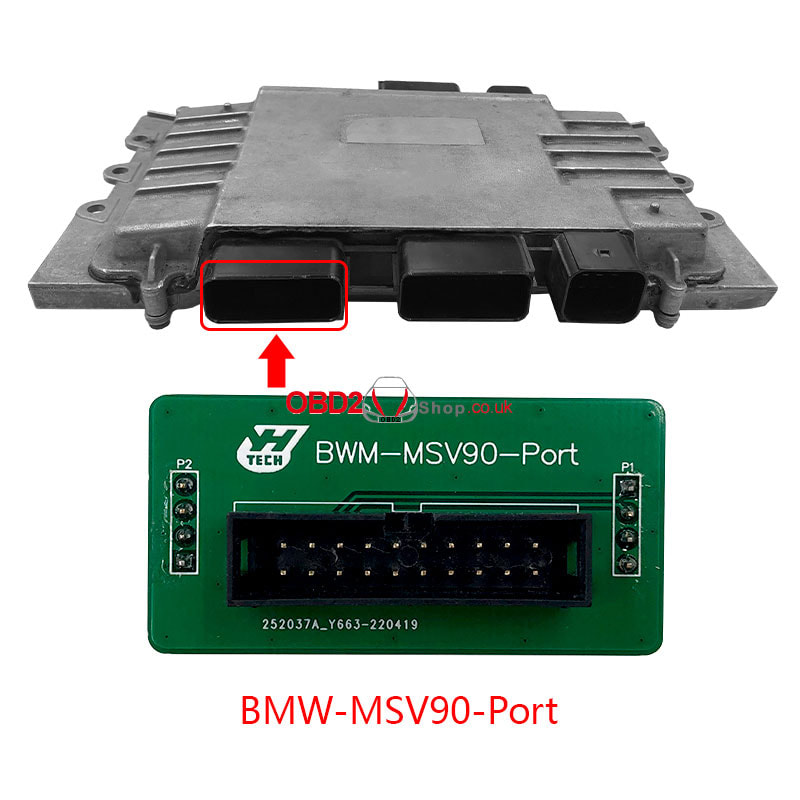 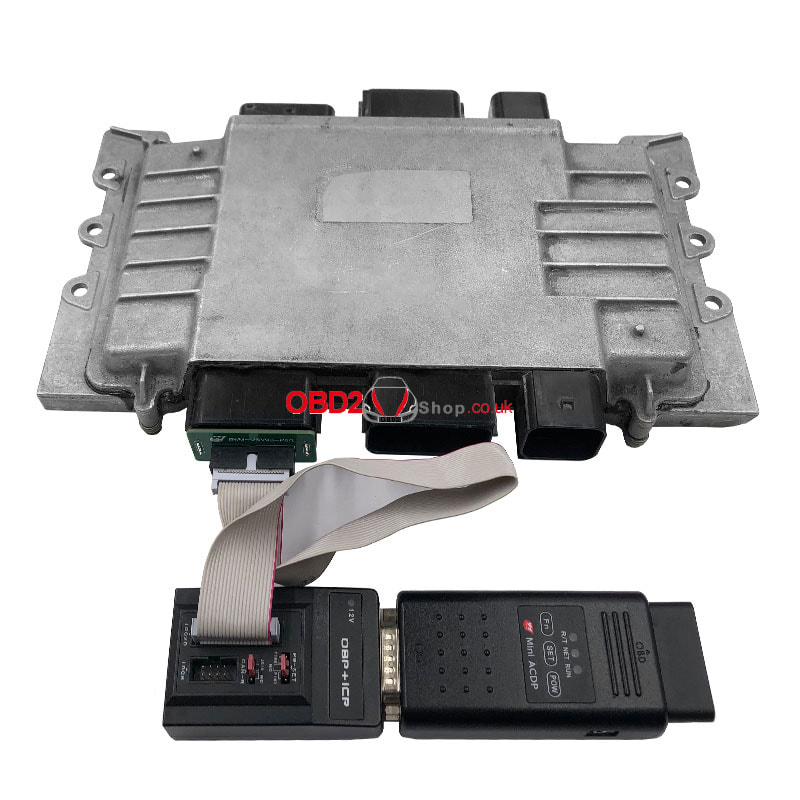 |
