|
This post will introduce you to how to copy an access card using Lonsdor K518 Pro.
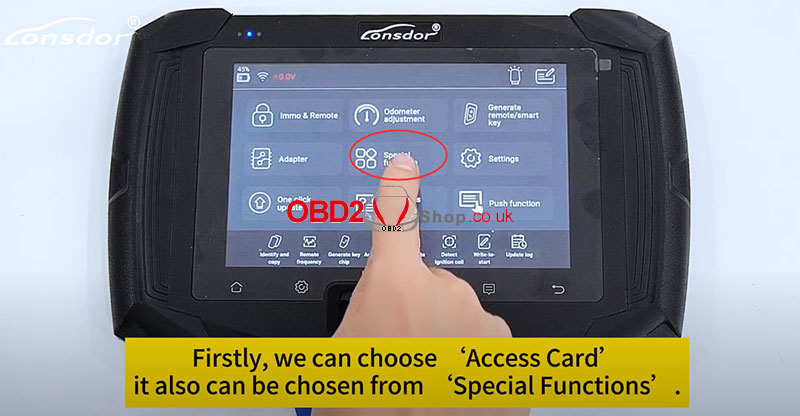
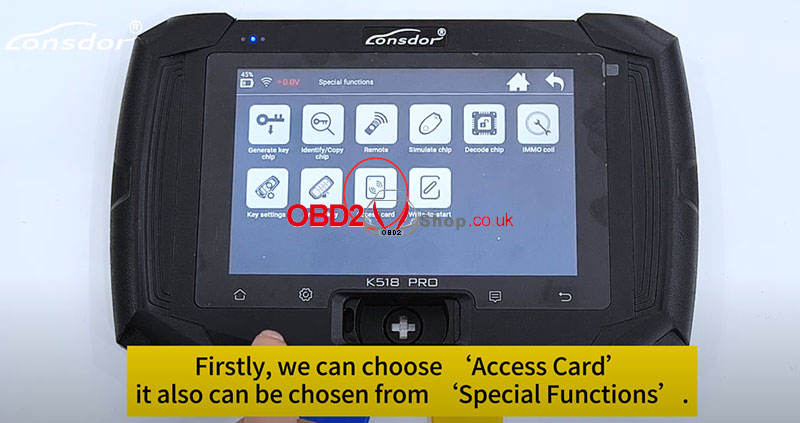
Firstly, we can choose [Access Card], it also can be chosen from [Special Functions]. Then select [Copy Access Card]>>[IC/ID Card]. 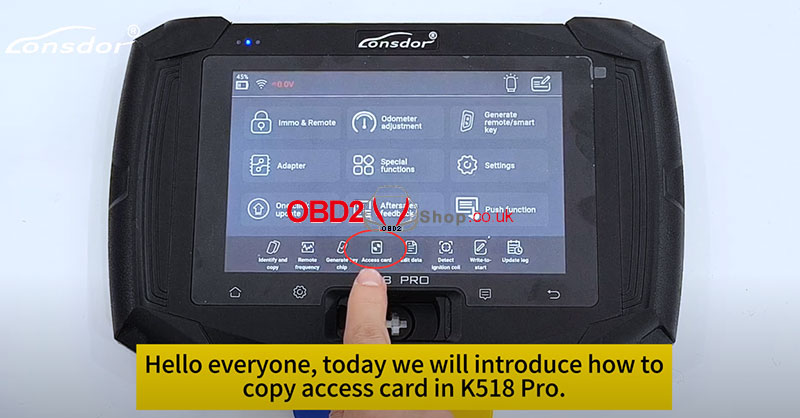
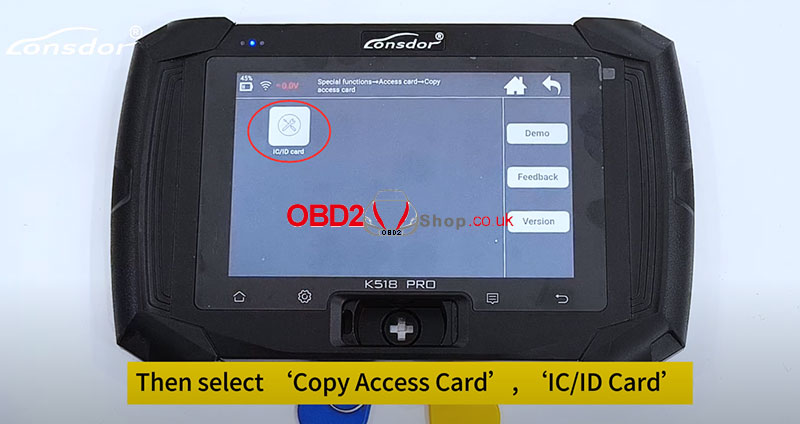
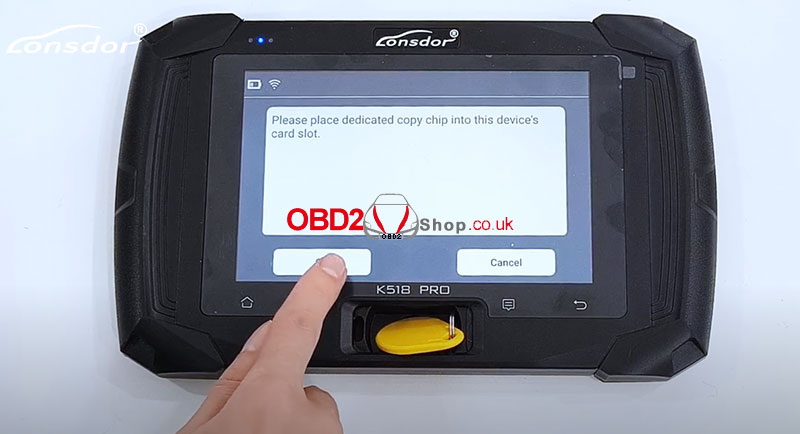
Put the access control card in the card slot and click OK.
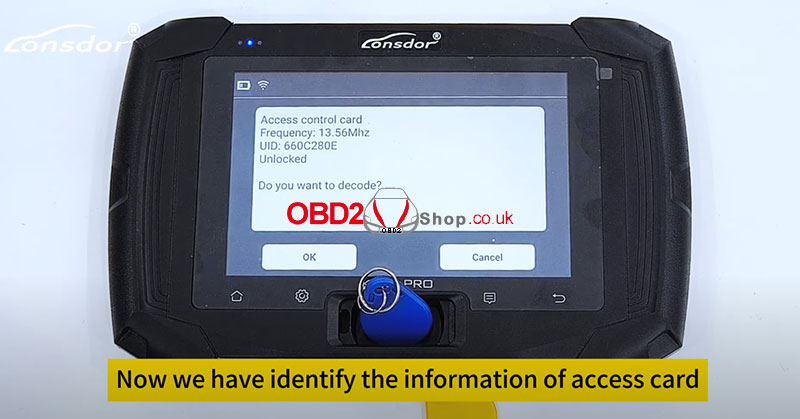
Please wait... Now we have identified the information of the access card, click "OK" to continue. 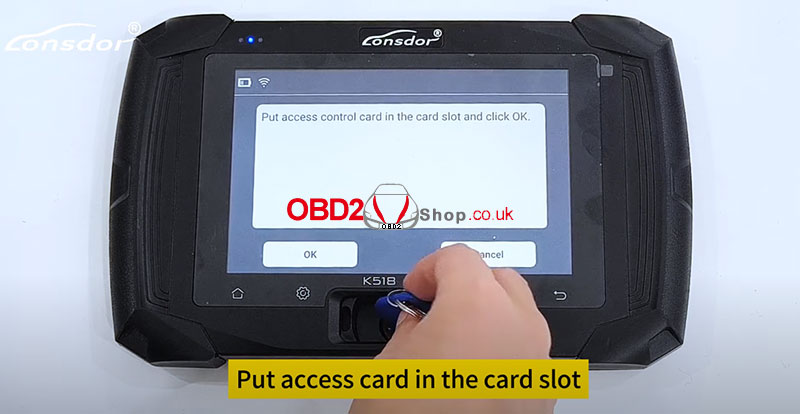
Decoding...
You can take away the key now. Decryption is successful. 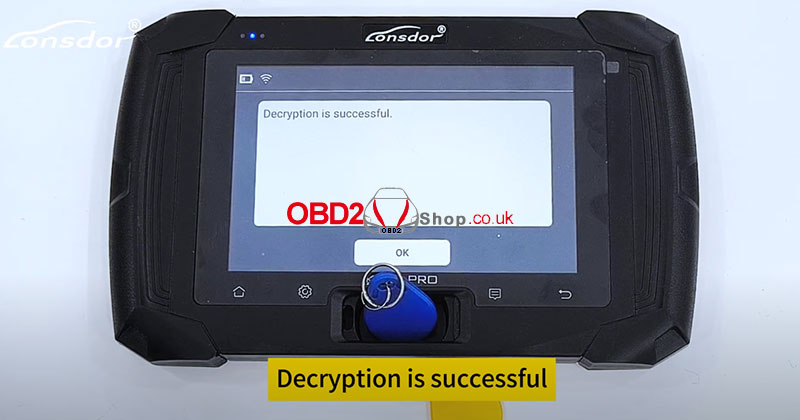
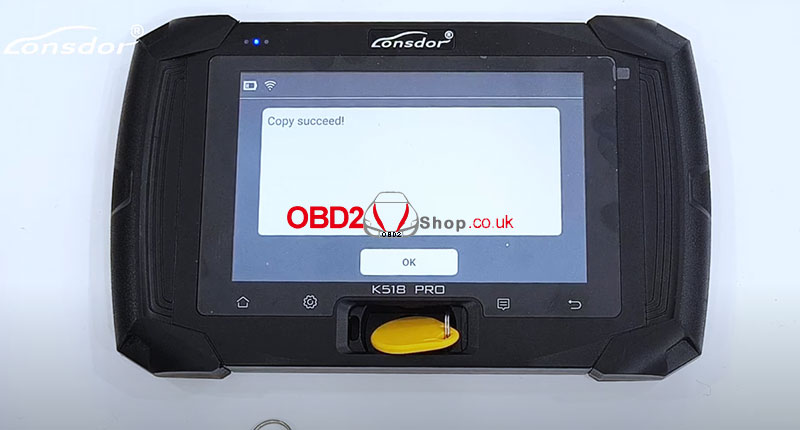
Then we choose [Copy] and put the new chip into the card slot.
Please wait... Copy scucceed! 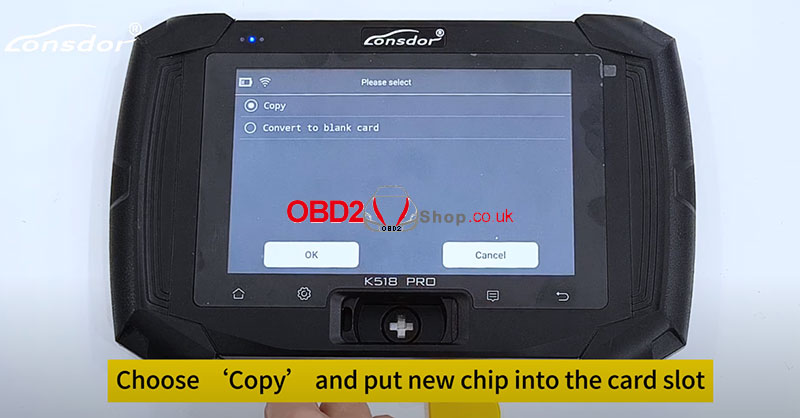
The above is the whole process of using the Lonsdor K518 Pro copy access card. Stay tuned for more technical services.
http://blog.obd2shop.co.uk/ Video guides:
0 Comments
New product release! OBDSTAR X300 Classic G3 is the new generation intelligent programming tool, which has wide coverage and various functions for automobiles. This time it also adds the programming functions for E-car, motorcycle, marine(jet-ski), etc. Destined to be the locksmith of choice.  Hardware Comparison Key Master G3 vs. X300 DP PLUS, What's Different? Function
Programming IMMO(keys) Remote test Read/write transponder Make dealer keys Make start keys Renew key IMMO off Read/write EEPROM/MCU Unlock ECU ECU advanced OBD II ... Advanced Functions MOTO Key Programming(No Need Pincode) HARLEY, SUZUKI, APRILIA, GUZZI TRIUMPH, YAMAHA, PIAGGIO, PEUGEOT DUCATI, BRP, VESPA, ITAJET KAWASAKI, INDIAN, DERBY HONDA, DAYANG, GIRELLA Marine Key Programming BRP, KAWASAKI, YAMAHA E-Car Key Programming LI, LEAPMOTOR, SERES, AITO, NETA Unlock ECU ALFA ROMEO, CHRYSLER, DODGE, JEEP, FIAT Programming solutions for vehicles that have lost all keys and all functions have been disabled. BENZ SMART 453 RENAULT CITY K-ZE, SANDERO, TWINGO, DUSTER PH3 KEID, TRAFIC, LODGY A pincode reading function that has lost all keys(No risk, and will not turn your car into a brick). Renault post-2015 ESPACE, KOLEOS, SCENIC, Samsung QM6/SM6 KADJAR, MEGAN, TALISMAN FAQ Q: Can the X300 CLASSIC G3 be equipped with Airbag Reset, Cluster Recalibration, ECU Flasher, test platform, and other functions? A: Yes, please contact our sales for details. Q: I would like to have the list of supported models & features of this tool, where can I get it? A: Please contact our sales or visit the product page to download: https://www.obd2shop.co.uk/wholesale/obdstar-x300-g3-programming-tool.html Q: Is X300 CLASSIC G3 compatible with all the functions of Key Master DP Plus? A: No, X300 CLASSIC G3 is mainly targeted at automotive electronics repairers or professional locksmiths, so it does not include the diagnostic and maintenance functions of Key Master DP Plus(except for Manual Service Lamp Reset), but it adds a lot of new special functions. Q: Can I use the accessories of an old product I have previously purchased? A: Yes, in order to save locksmith costs, X300 CLASSIC G3 is compatible with the following adapters or cables that have been purchased by previous users: 1. P002 adapter, P003 adapter, Key Sim adapter; 2. CAN DIRECT KIT, TOYOTA-24/27/30 CABLE; 3. NISSAN-40 BCM CABLE, NISSAN/RENAULT 16+32 CABLE; 4. FCA 12+8 CABLE; 5. TOYOTA 8A cable, FORD all key lost cable. Q: What is the ECU Unlock function of X300 CLASSIC G3? A: The ECU Unlock function is developed so that used ECU modules can be used in other identical vehicles. If you install a used ECU into another vehicle without unlocking it, it will report a fault and cannot be used normally. Contact Info Email: [email protected] WhatsApp: +86 13983755934 Telephone: +86 13983755934 WeChat: +86 13983755934 Skype: OBD2tool.co.uk
This post will guide you on how to install the MQB lock fastening (MQB-87) interface board from Yanhua ACDP Module 33.
Here comes the procedure: 1. Push the lock fastening of the interface board to the unlock position. Find the interface board installation area on the instrument according to the visual positioning mark on the interface board. 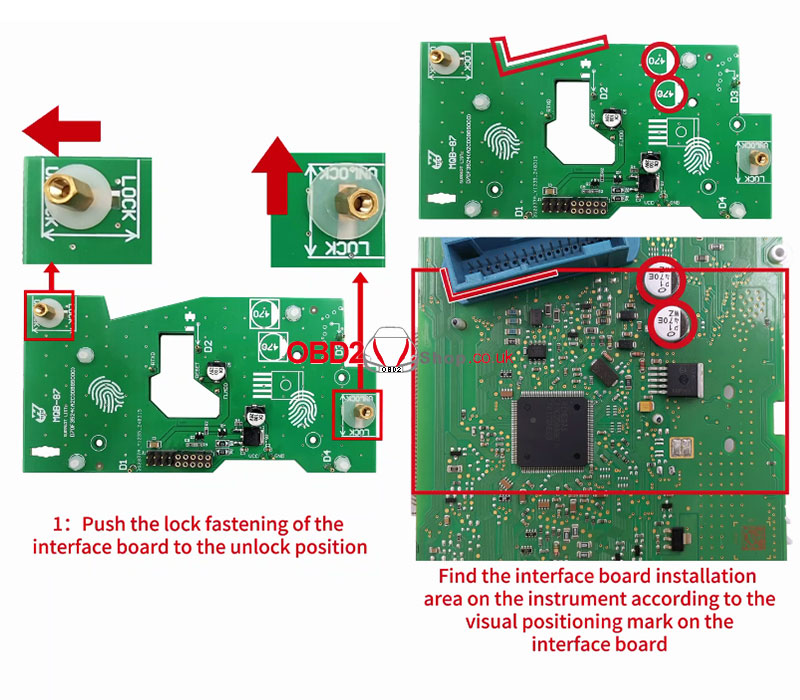
2. Place the interface board against the instrument socket and align the pins with the D1 and D4 positioning holes.
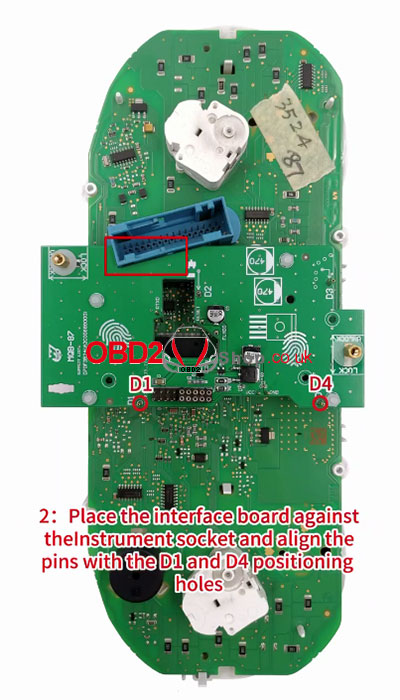
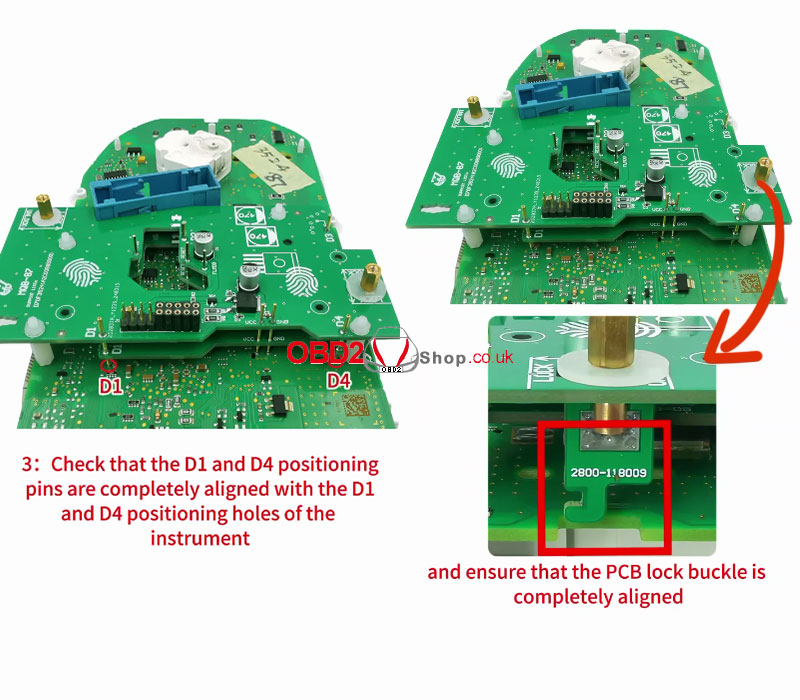
3. Check that the D1 and D4 positioning pins are completely aligned with the D1 and D4 positioning holes of the instrument and ensure that the PCB lock buckle is completely aligned.
4. Place your finger on the fingerprint position of the interface board press down on the interface board, and push the PCB lock buckle to the locked position to lock the interface board.
The installation is done. 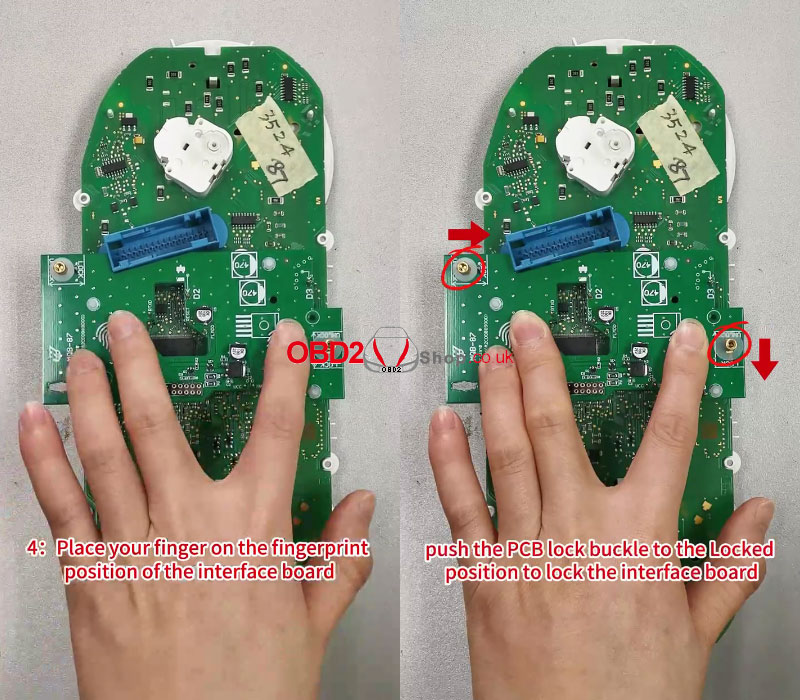
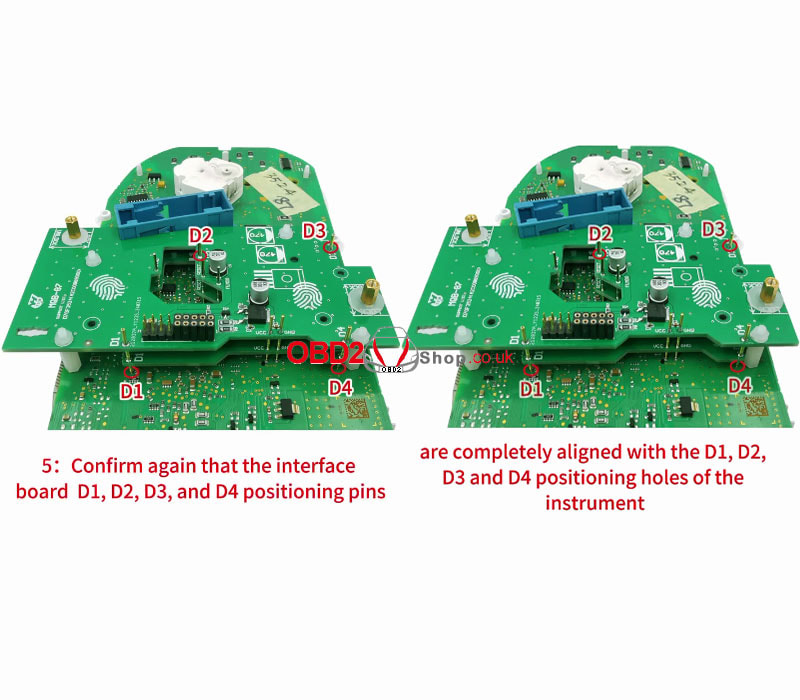
5. Confirm again that the interface board D1, D2, D3, and D4 positioning pins are completely alignined with the D1, D2, D3, and D4 positioning holes of the instrument.
Video Guide:
What's different between OBDSTAR MS80, MS70, MS50, MK70 motorcycle diagnostic tool? Which tool is better? Here we've listed all details including hardware configuration, software function, and smart diagnosis for comparison. This should help you. 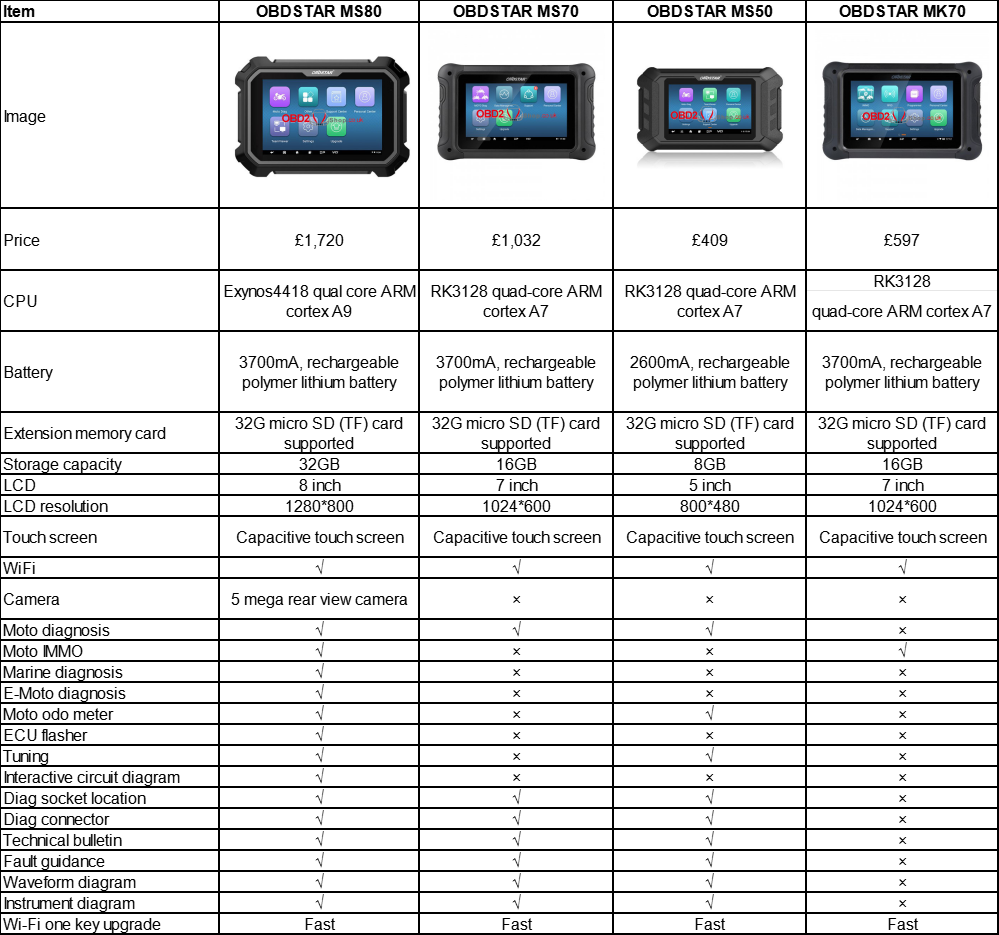 Difference
1. Price OBDSTAR MS50 < MK70 < MS70 < MS80 Judging from the price, the MS50 is the cheapest while the MS80 is the most expensive. 2. Hardware OBDSTAR MS50 < MK70 = MS70 < MS80 MS80 is featured with the highest hardware configuration while MK70 & MS70 are the same. 3. Software OBDSTAR MK70 < MS70 < MS50 < MS80 Only MS80 supports all functions like Moto diagnosis, Moto IMMO, Marine diagnosis, E-Moto diagnosis, Moto odo meter, ECU flasher, and tuning. 4. Smart Diagnosis OBDSTAR MK70 < MS70 = MS50 < MS80 MKS70 does not support the function, MS80 supports all. Conclusion OBDSTAR MS80 is a comprehensive motorcycle diagnostic tool that is recommended for high-end repair shops. OBDSTAR MS70 is recommended for mid-high-end repair shops while MS50 is major in small displacement motorcycles. As for MK70, it's focused on immo programming, which is more suitable for locksmiths. www.obd2shop.co.uk
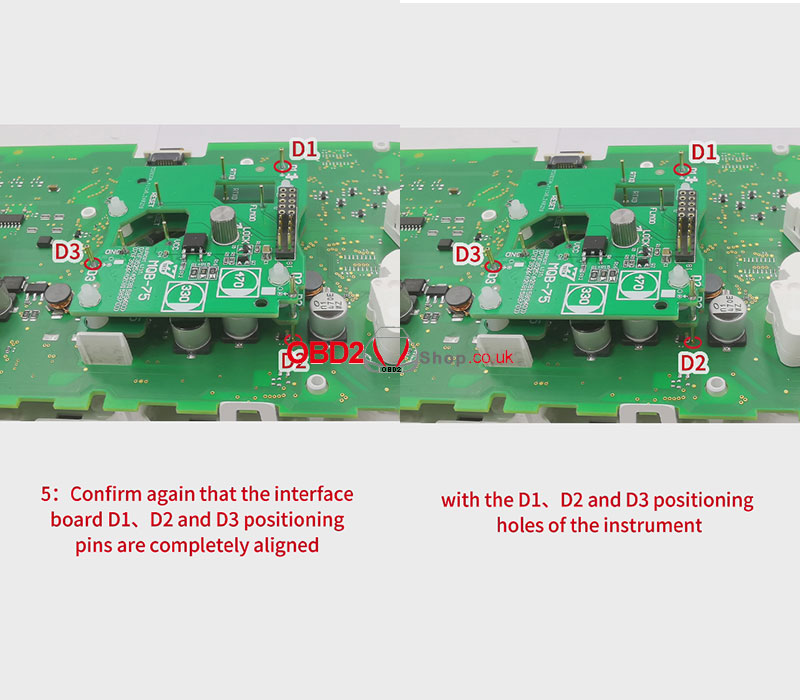
This post will guide you on how to install the MQB thumb screw-fastened (MQB-75) interface board from Yanhua ACDP Module 33.
Here comes the procedure: 1. Find the interface board installation area on the instrument according to the visual positioning mark on the interface board. 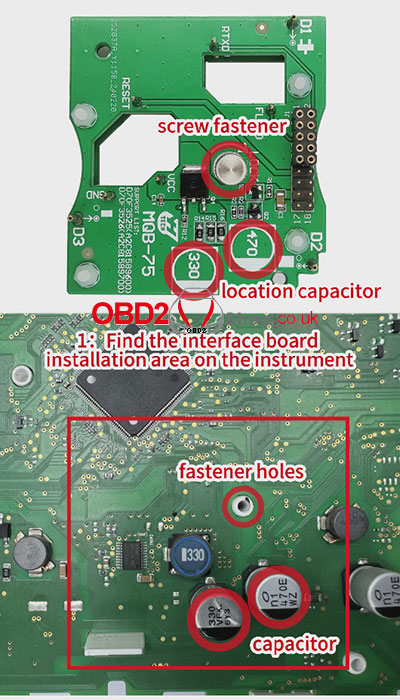
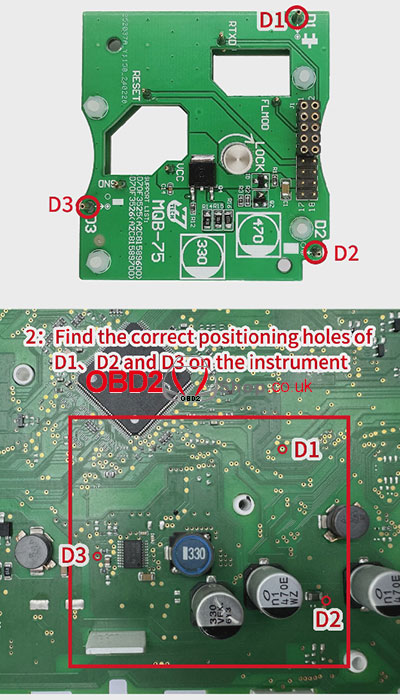
2. Find the correct positioning holes of D1, D2, and D3 on the instrument.
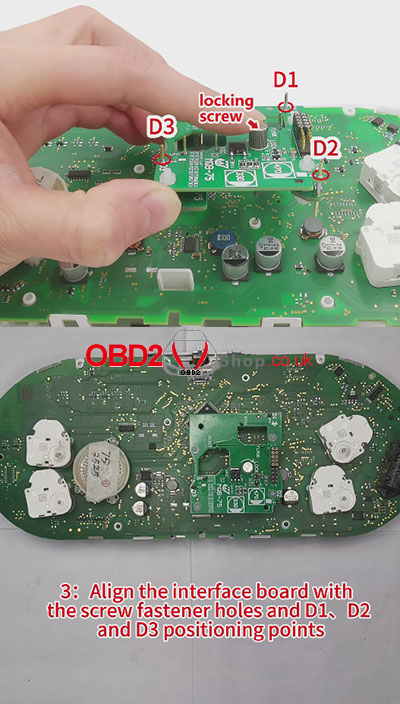
3. Align the interface board with the screw fastener holes and D1, D2, and D3 positioning points.
4. Press the interface board down with your left hand, tighten the locking screw with your right hand.
The installation is done. 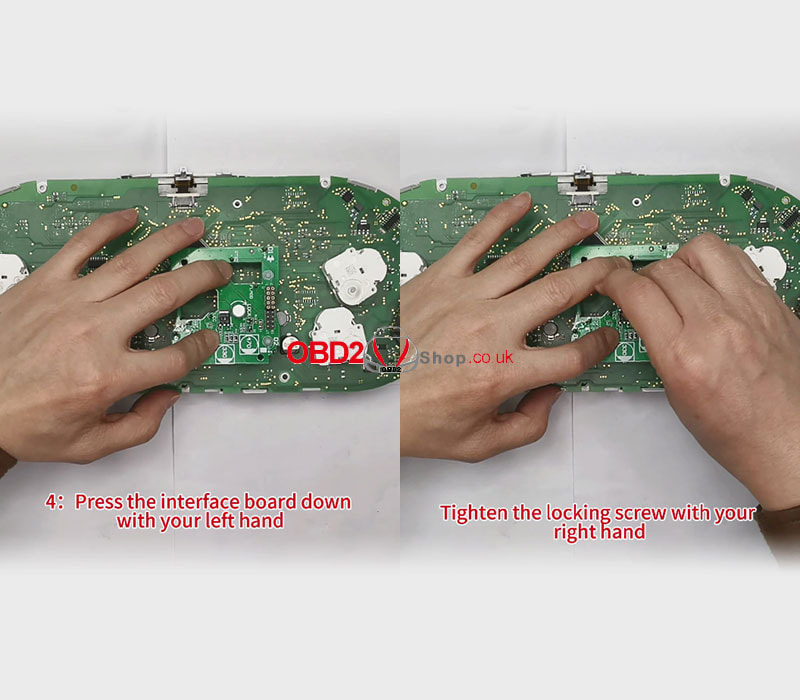
5. Confirm again that the interface board D1, D2 and D3 positioning pins are completely aligned with the D1, D2 and D3 positioning holes of the instrument.
Video guides:
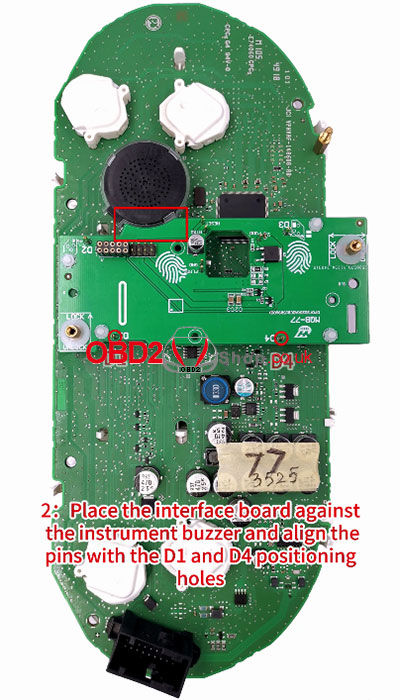
This post will guide you on how to install the MQB lock fastening (MQB-77) interface board from Yanhua ACDP Module 33.
Here comes the procedure: 1. Push the lock fastening of the interface board to the unlock position. Find the interface board installation area on the instrument according to the visual positioning mark on the interface board. 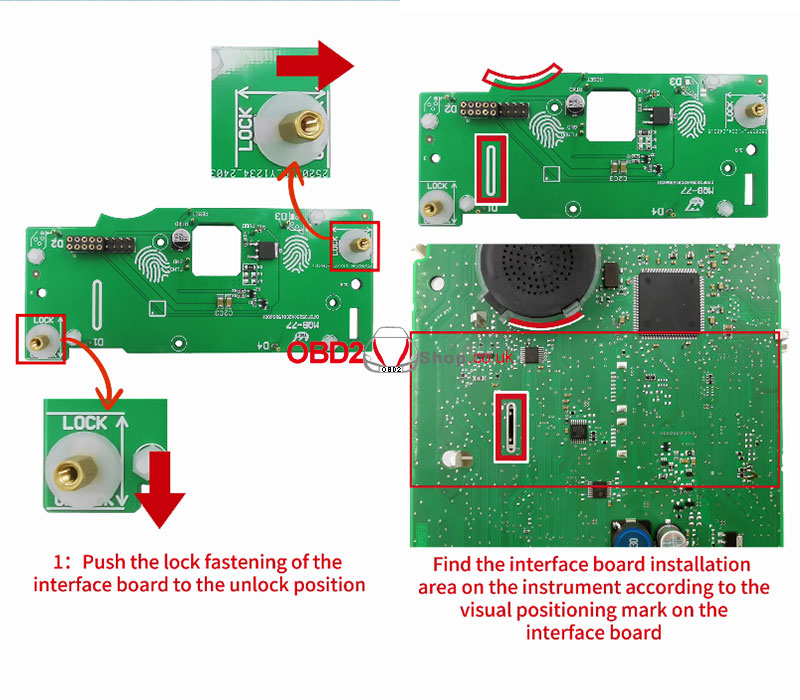
2. Place the interface board against the instrument buzzer and align the pins with the D1 and D4 positioning holes.
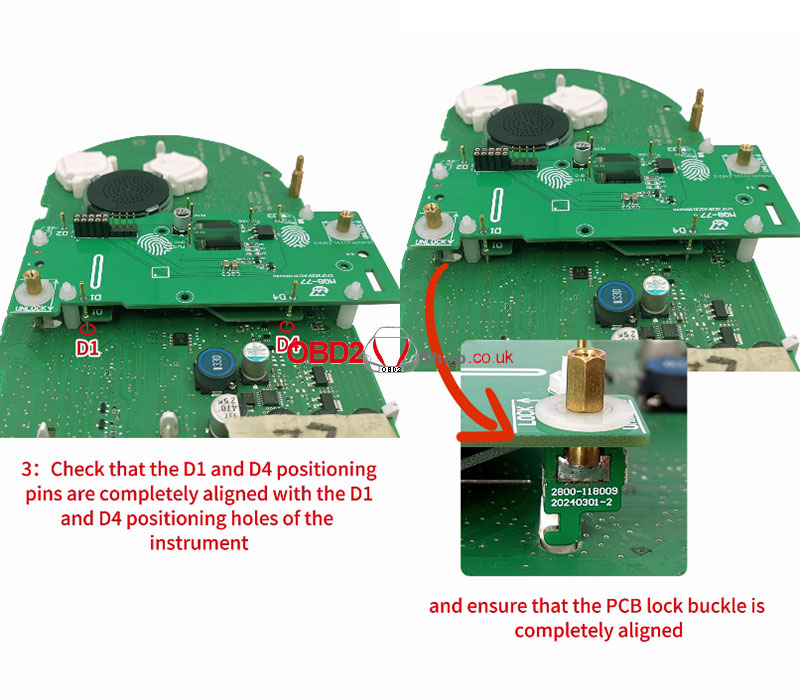
3. Check that the D1 and D4 positioning pins are completely aligned with the D1 and D4 positioning holes of the instrument and ensure that the PCB lock buckle is completely aligned.
4. Place your finger on the fingerprint position of the interface board
Press down on the interface board. Push the PCB lock buckle to the Locked position to lock the interface board. The installation is done. 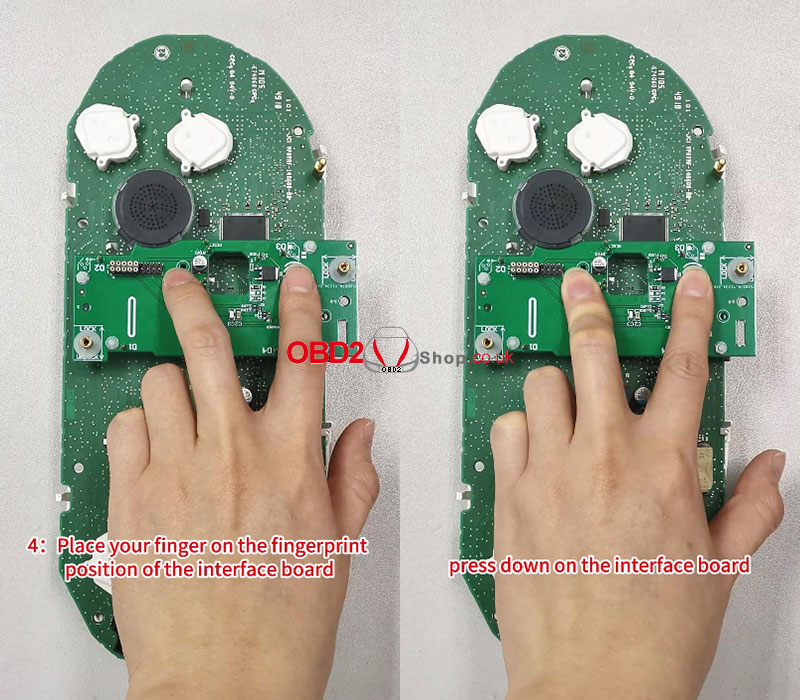
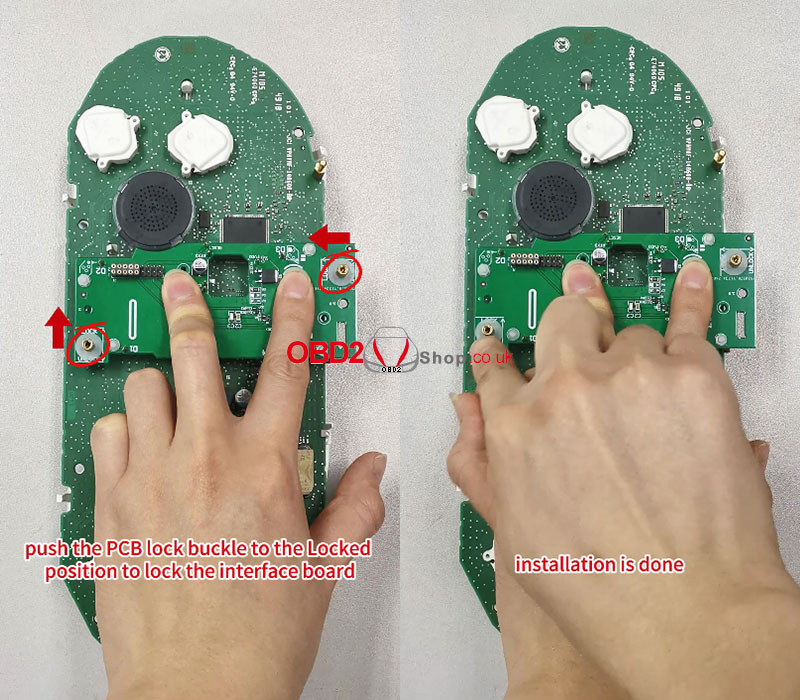
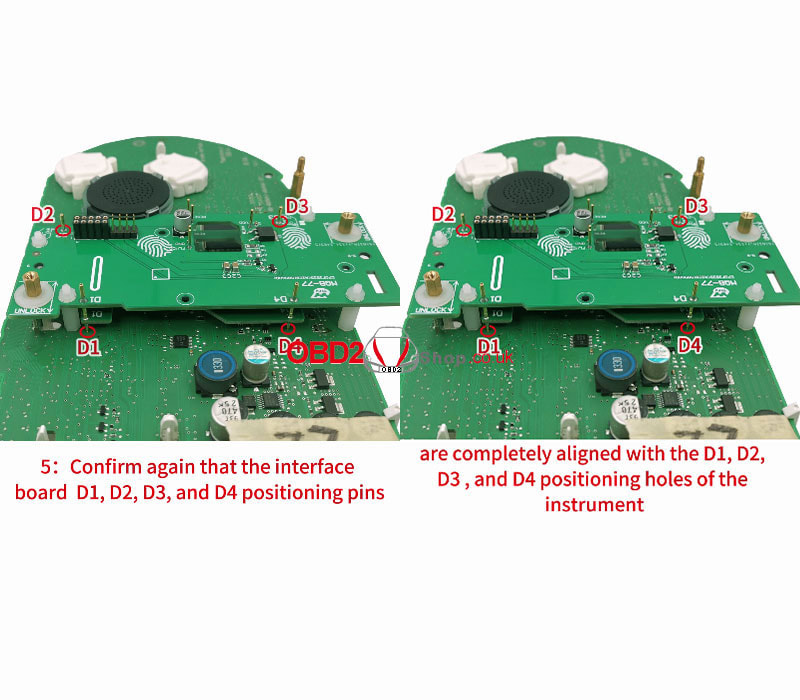
5. Confirm again that the interface board D1, D2, D3, and D4 positioning pins are completely aligned with the D1, D2, D3, and D4 positioning holes of the instrument.
Video guides:
The 2024 New Lonsdor KW100 Accessory pre-order is available now. Supports quick identify Toyota/Lexus smart key in key adding or all keys lost situations. Quick generation for Lonsdor LT20 Smart Keys. 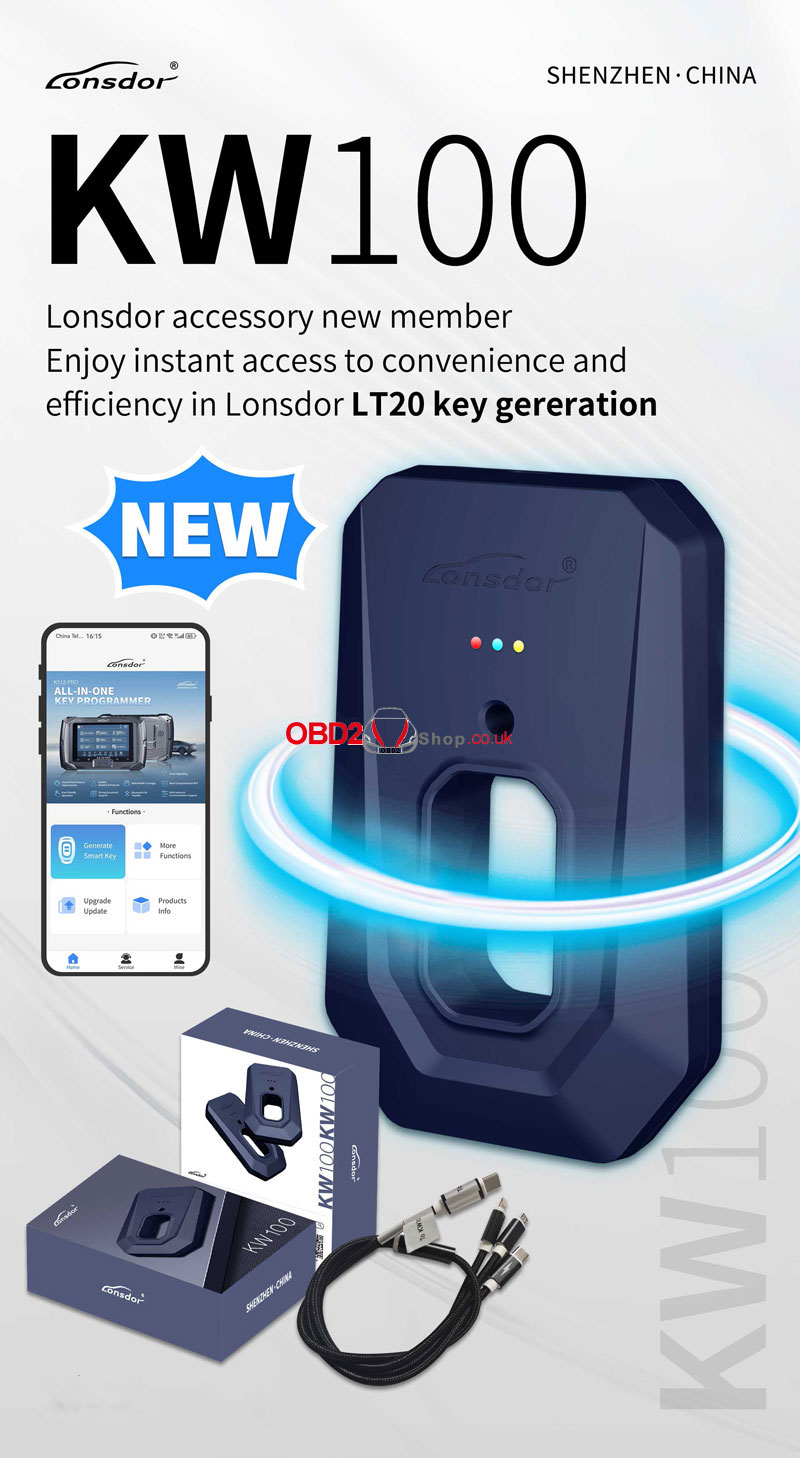 Functions Generate smart key Detect remote frequency Detect frequency sequence Modify frequency Get version info Unlock key Read button function Modify button type Upgrade key Identify chip Modify remote count value Parameters Product dimension 120*70*20mm Carton size17*13.5*4, Carton size22*14.5*8.5mm Communication method Bluetooth 5.0 Application 1. Included a standard cable for power supply. 2. On one end connect to a smartphone or DC5V output, and connect to the KW100 on the other end. 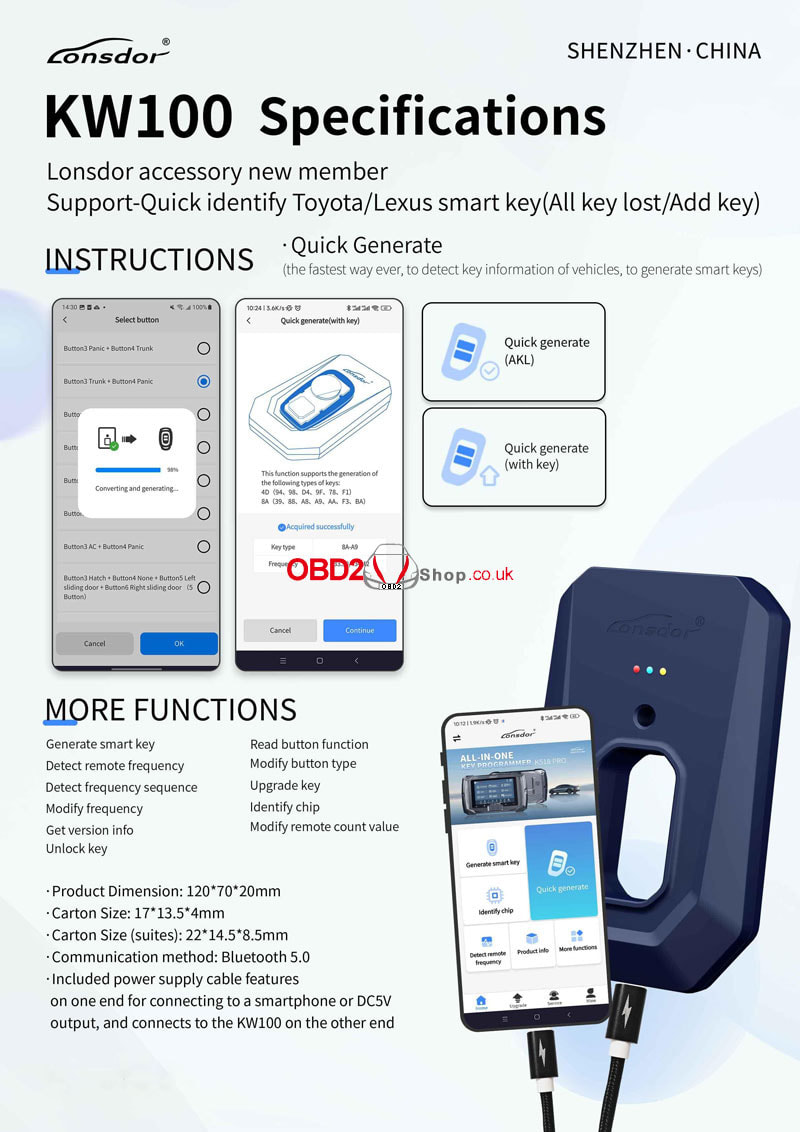  How to use Lonsdor KW100? Here's using Lonsdor KW100 to quickly generate the 2016 Toyota Crown smart key in key adding/AKL situation for example. Key Adding Situation Here we have an original key and a new LT20 smart key. Connect KW100 & smartphone, and open the Lonsdor app: KW100 >> Quick generation >> Quick generate(with key) >> Start If the key cannot be identified, please slowly take it 15-20 cm away from the identification area, the detection will take time, so please wait... Acquired successfully. It shows the key type and frequency. Put an LT20 smart key(with battery) into the KW100 card slot. Continue >> Select button >> Start to generate >> OK Wait KW100 processed until 100%... Generation successful.  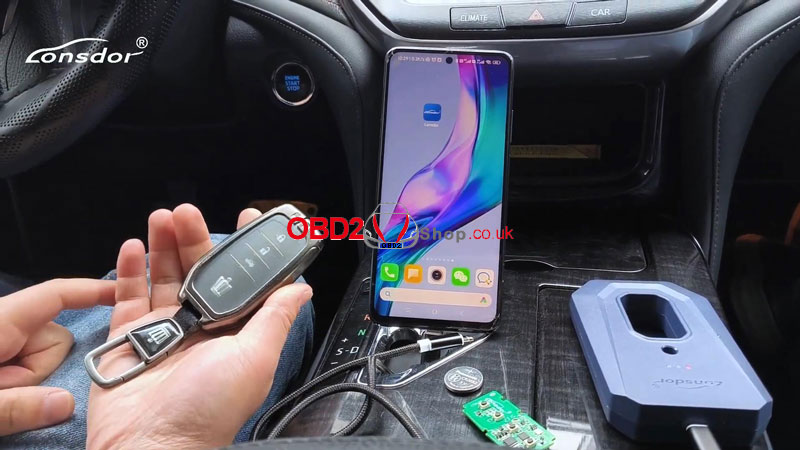 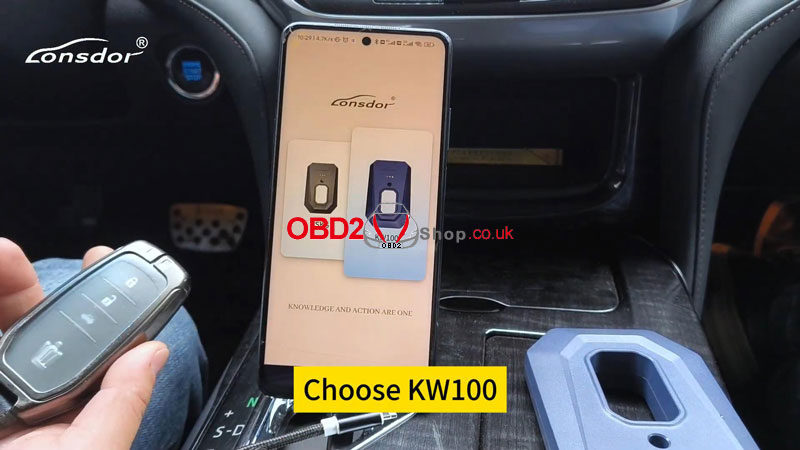 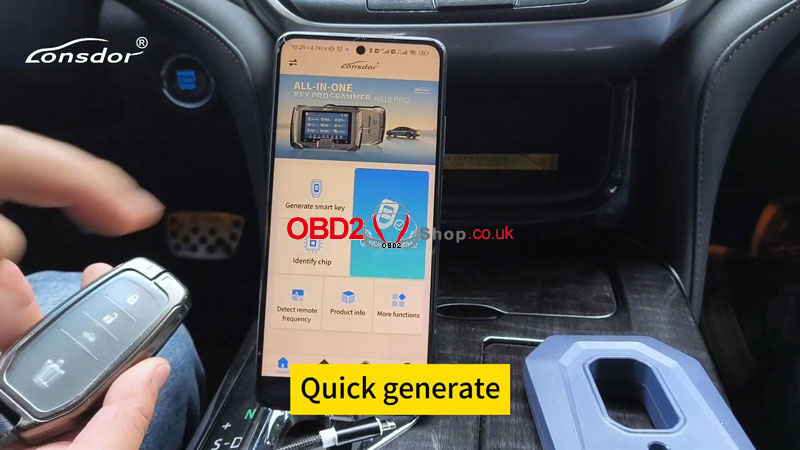 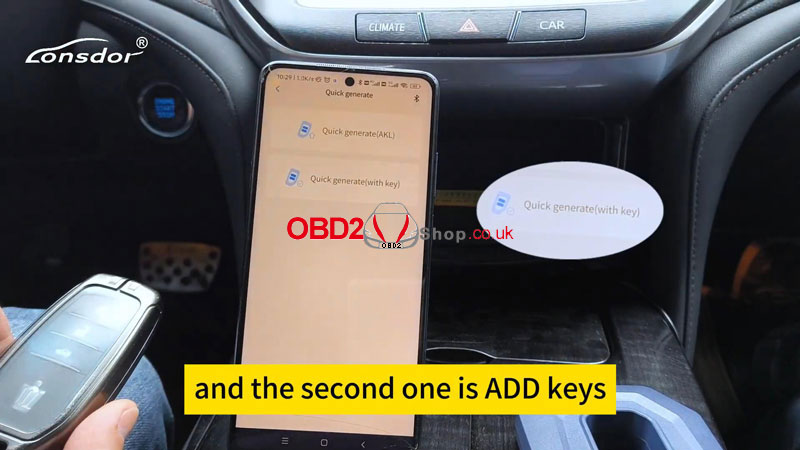  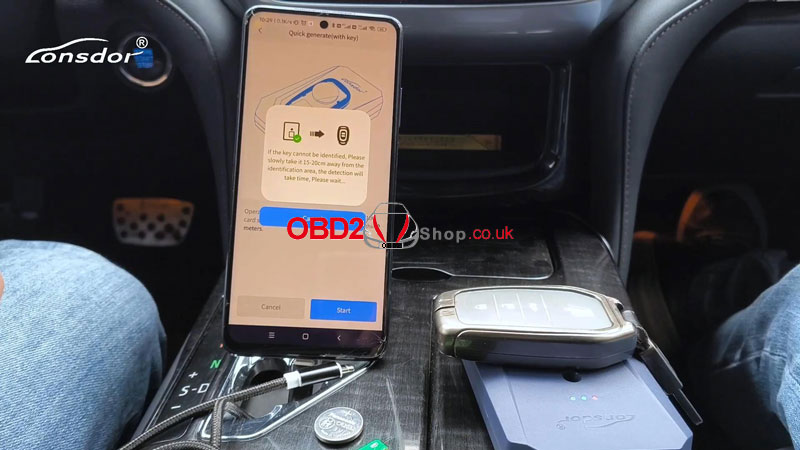 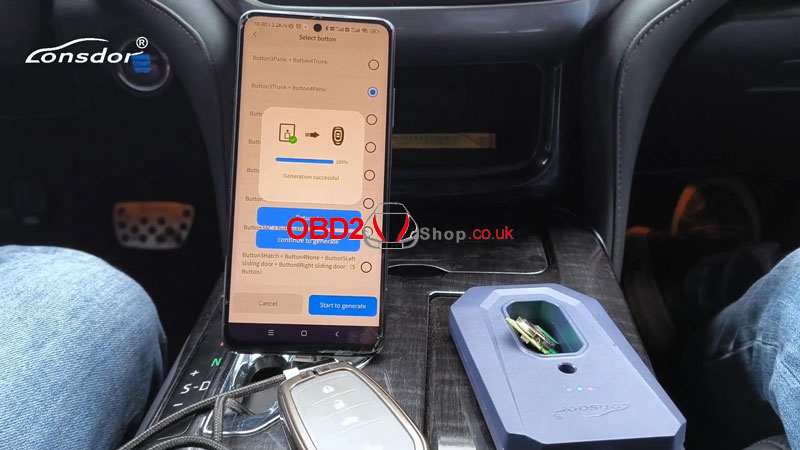 All Keys Lost Situation The car is locked and the original key is out of the car. Open the door to start. KW100 >> Quick generation >> Quick generate(AKL) >> Start Please step on the brake, and press Start button every 5s. This function will take about 1-3 mins, Please wait properly... Acquired successfully. We can see the key type and frequency already. Put an LT20 smart key(with battery) into the KW100 card slot. Continue >> Select button >> Start to generate >> OK Wait KW100 processed until 100%... Generation successful. Then we can use Lonsdor K518 PRO to finish the key programming. 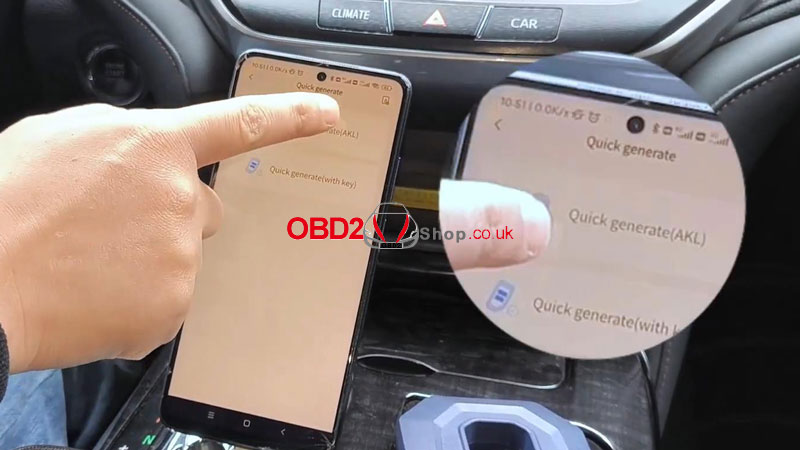 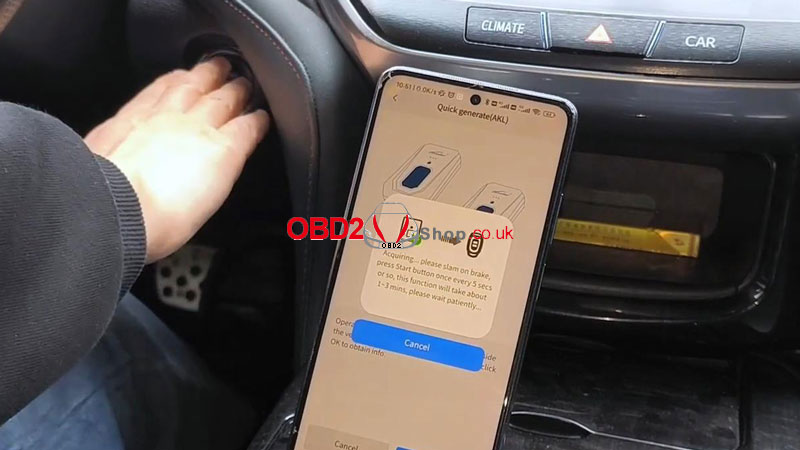 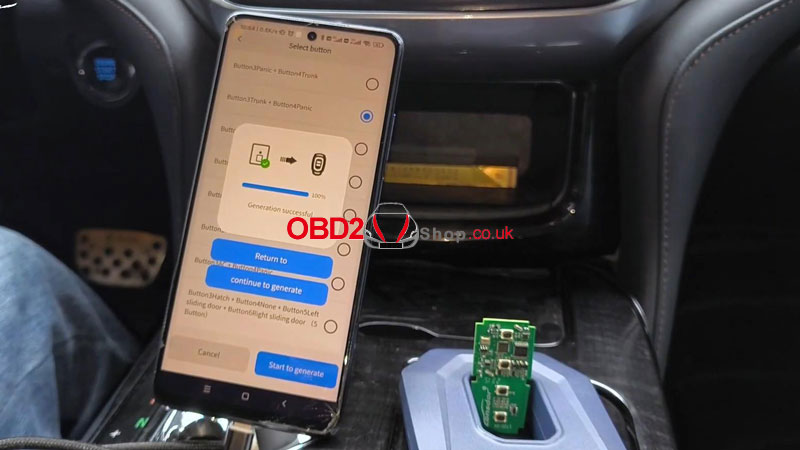 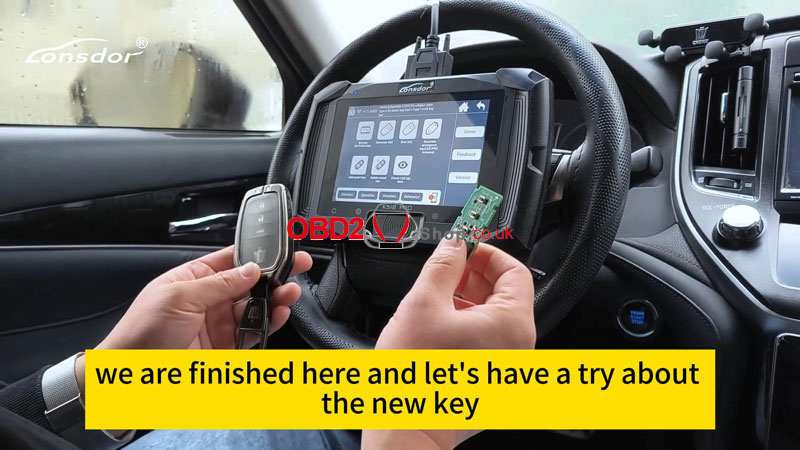 Lonsdor quick generate is the fastest way ever, to detect key information of vehicles and generate smart keys. Pre-order now to enjoy instant access to convenience and efficiency in the Lonsdor LT20 key generation.
https://www.obd2shop.co.uk/wholesale/lonsdor-kw100.html Contact info: Email: [email protected] Whatsapp: +86 13983755934 Telephone: +86 13983755934 WeChat: +86 13983755934 Skype: OBD2tool.co.uk One customer wants to know if Yanhua Digimaster 3 can support the 2012 model Nissan Note 24C16 chip mileage adjustment. And he cannot find the path on the device. Here Obd2shop.co.uk Engineer Replies: The answer is Yes, Yanhua D3 can support it. Please follow the path to read 24C16 chip data for odometer correction: Programmer >> IC Read >> 24C16 Then download the data and send it to us, we will ask the technician to modify it manually. Please indicate the number of original kilometers and the number of kilometers that need to be changed. 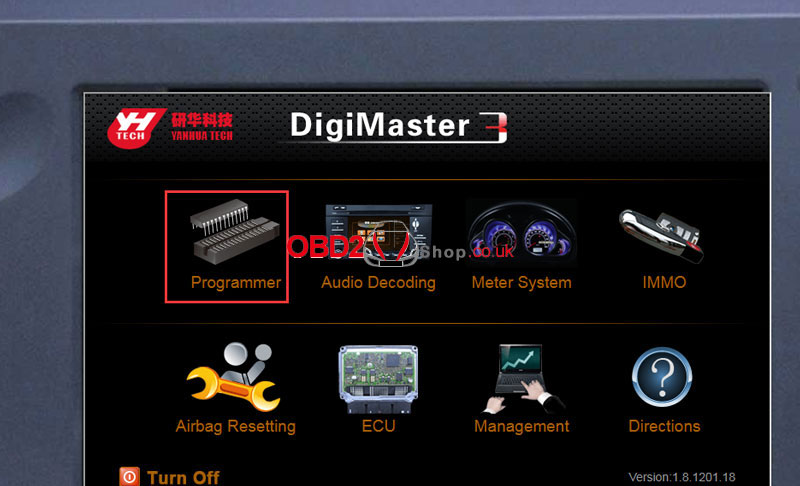 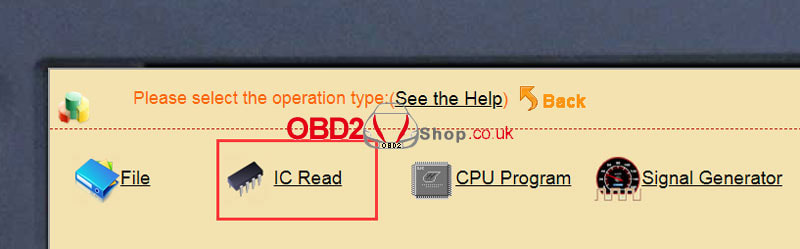 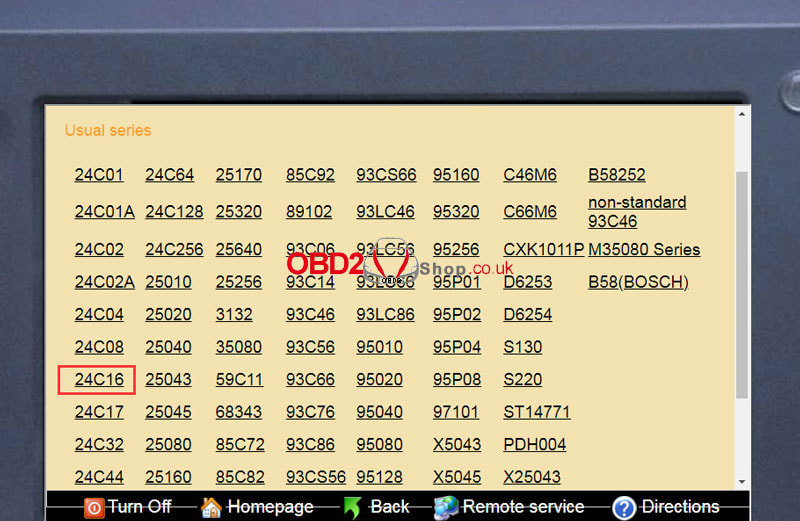 Technical Support
Email: [email protected] Wechat: +86-139 8375 5934 Whatsapp: +86-139 8375 5934 Skype: OBD2tool.co.uk www.obd2shop.co.uk
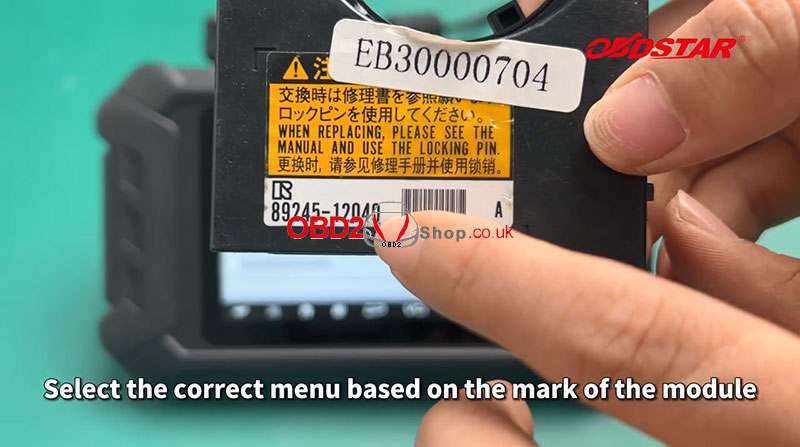
This post will guide you on how to use the OBDSTAR P50 Airbag Reset Tool to do a Toyota steering angle sensor repair by bench.
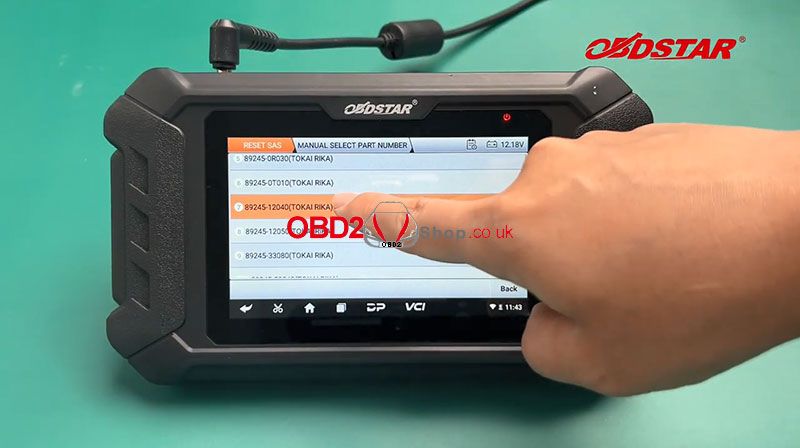
Tools we need: OBDSTAR P50 Main Cable P004 Jumper P004 Adapter Toyota Steering Angle 89245-12040 
Procedure:
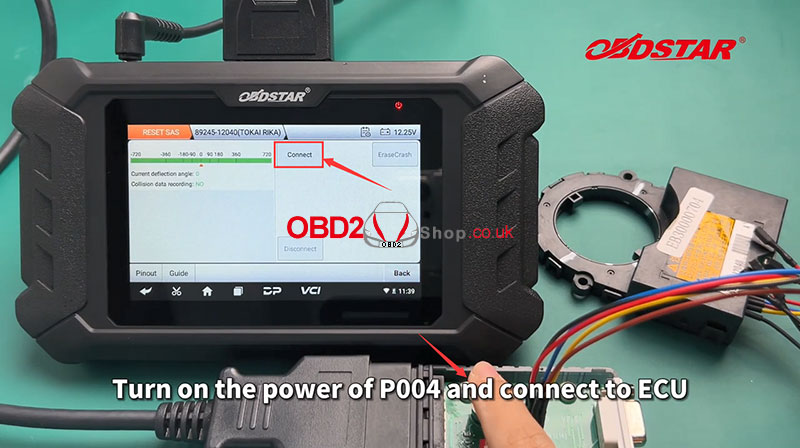
Tap [Airbag Reset] Select the correct menu based on the mark of the module. Click [Guide] at the bottom left to check the best connection method. 
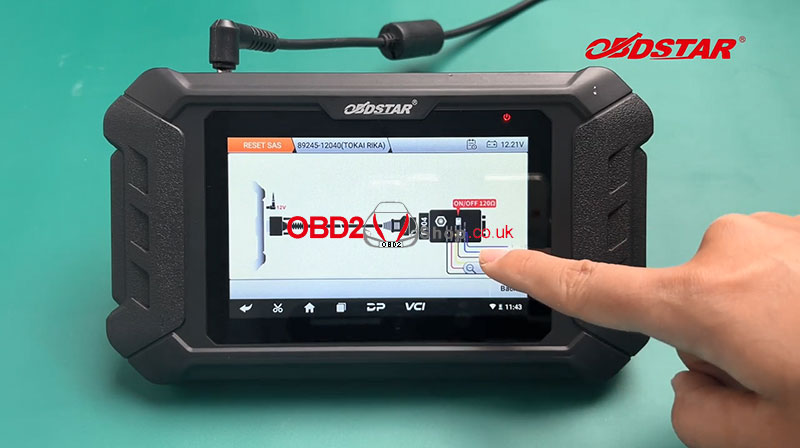
Click [Back] at the bottom right, then click [Pinout] at the bottom left to check the diagram.
Then we connect the harness according to the wiring diagram. Turn on the power of P004 and connect to ECU. 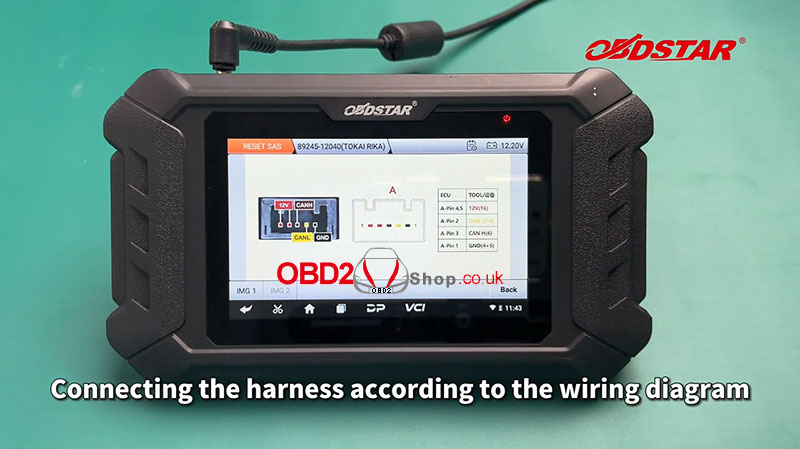
After the connection is successful, you can find that there are collision data records in the module data.
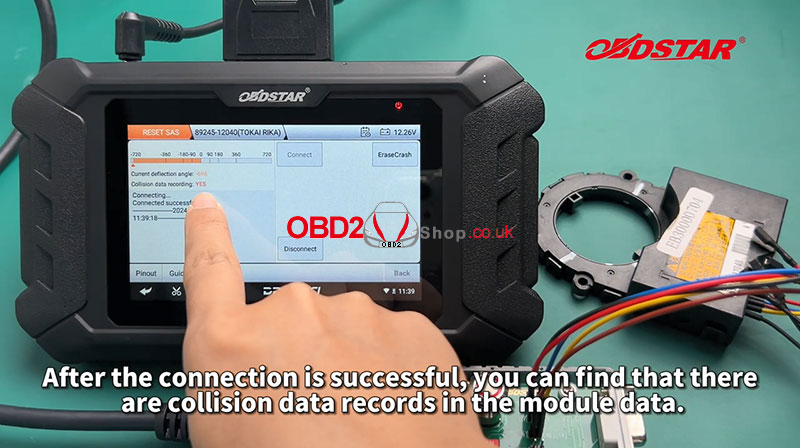
Click the [Erase Crash] button, now you need to calibrate the angle back to zero degrees.


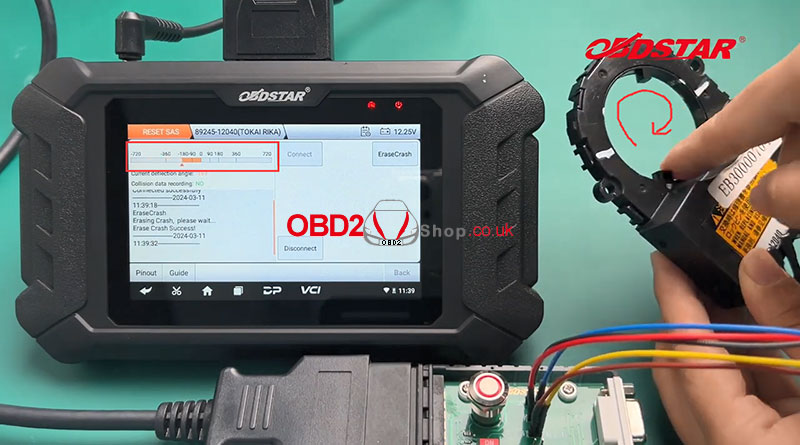
At zero degrees, it will show a green.

Once the calibration is complete, we can fix it with a tie to prevent deviation.
When loading, make sure that the steering wheel is centered and key off before installing the angle sensor. For more details, please refer to the video below: Customer Problem: My IM608 II, VCI keeps displaying the "Unable to connect" message. There is no problem with USB, but Bluetooth can't connect normally. What should I do? 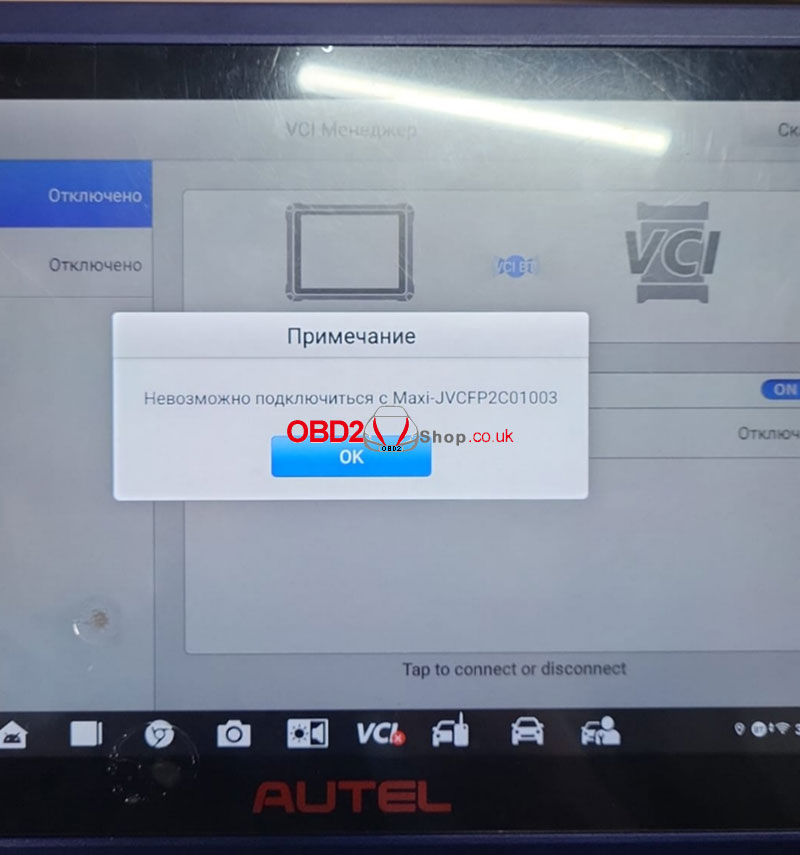 Solution: Try to update the JVCI+ OS version. Step 1. Download the PC suites from the Autel website with the following link: https://download1.auteltech.net/Download/PCSuite/MaxiPCSuit/V1.40/MaxiPCSuite_V1.40.zip Please note that the PC suites are just for the JVCI+ driver, install the PC suites. For the PC can recognize the JVCI+. Step 2. Download the following zip file then unzip it. The link to the zipped file of VICupdate: https://we.tl/t-veC39XRaBW Run the following device upgrade exe file.  Step 3. Select the JVCI+ and click on "确定"(confirm), after that, click on the bottom left button"检测设备"(detect device), then click on "开始升级" to start the upgrade of the OS of JVCI+. 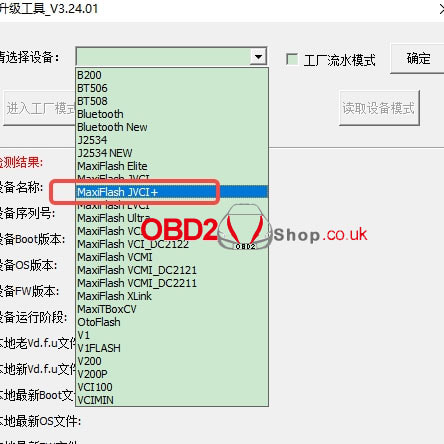 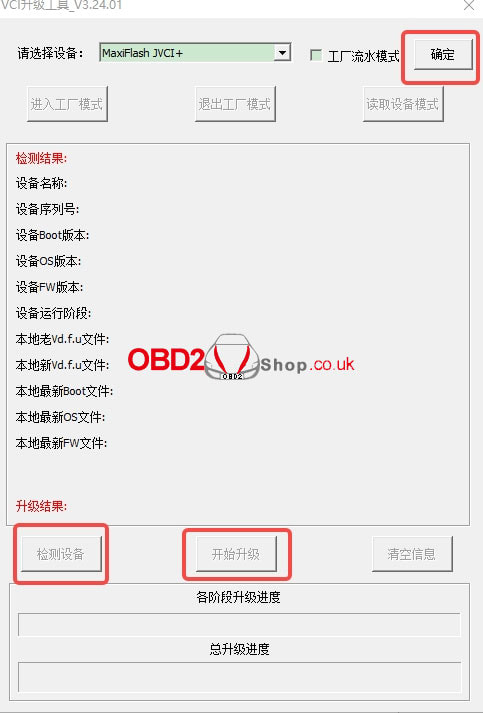 After JVCI+ has been upgraded, then test the tablet again with Bluetooth to see if the Bluetooth connection is back to normal again.
For more technical services please follow: www.obd2shop.co.uk |
