|
Godiag Full Protocol Obd2 Jumper is quite convenient to cooperate with ECU programmers & key tools via OBD in various scenes: 1. Work as EIS/ELV test line for Mercedes with CGDI or VVDI MB; 2. Work with key tools to program immo keys, like VVDI Key Tool Plus; 3. Work as tricore cable for ECU programmers to read data, such as MPPS, KESS V2, MPM, etc. 4. Provide power supply for ECU; 5. Convert vehicle power supply to 12V. 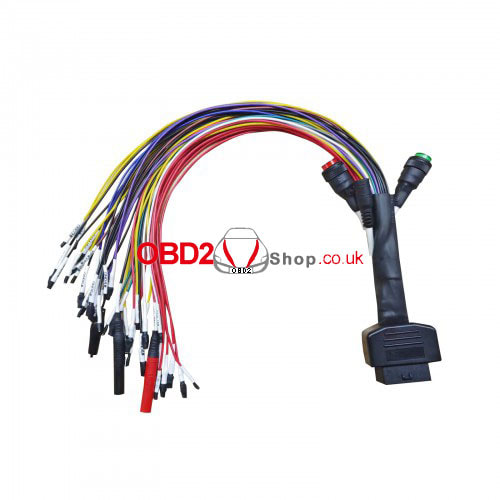 Features 1. Clear identification on each wire. 2. Equipped with a simulative ignition. 3. External 12V power supply connector. 4. Can connect to lock, ECU & BCM module. 5. Helpful for car repair & maintenance. How to connect Godiag Obd2 Jumper? 1. Check ECU model: it's Cadillac E67. 2. Connect Godiag Obd2 Jumper according to ECU interface definition diagram, confirm all terminals are correctly connected. 3. Connect 120ohm CAN protocol resistor again. 4. Connect ECU dedicated regulated power supply & Godiag GT105. 5. Turn on the analog ignition switch to check whether the ECU can send CAN protocol communication. 6. Connect MPM ECU programmer to computer. (Godiag obd2 cable supports to use alone, GT105 in the case is for checking protocols communication status. When GT105 indicators are flashing that means communication is normal.) 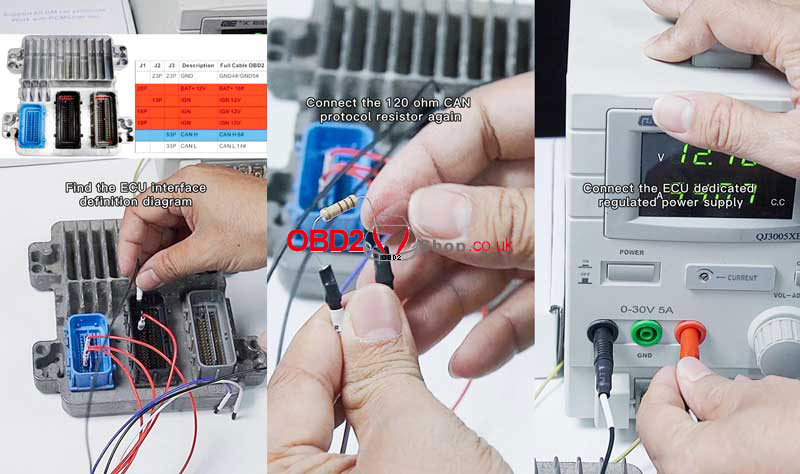 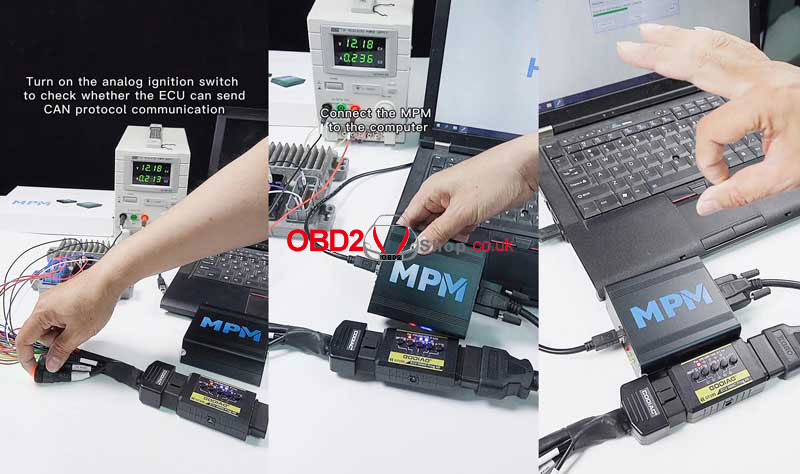 Application: Clone Cadillac E67 with PCMtuner MPM + GT105 OK. 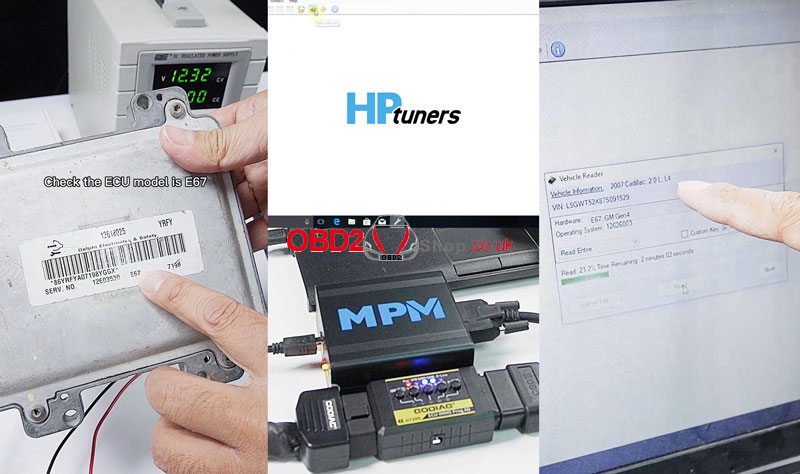 Read 2008 Chevrolet Avalanche E38 GM Gen4 ECM with MPM OK. 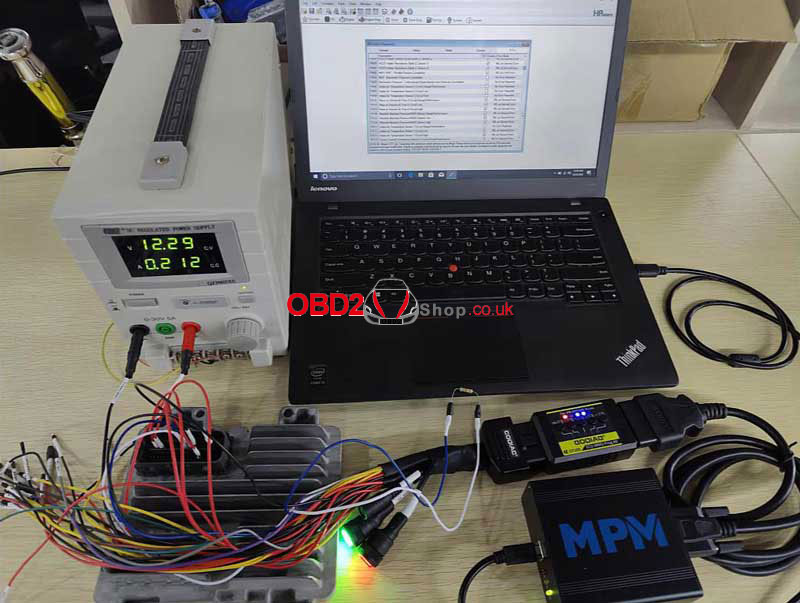 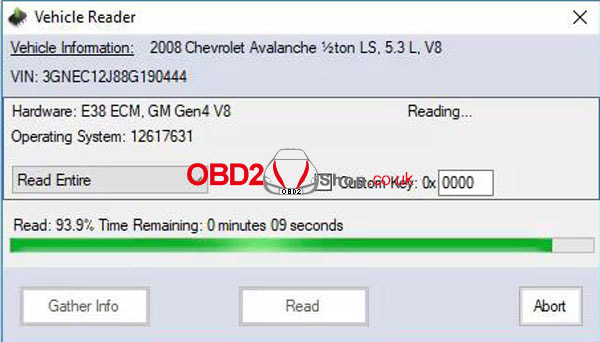 Program Benz W221 All Key Lost with VVDI MB Tool OK. 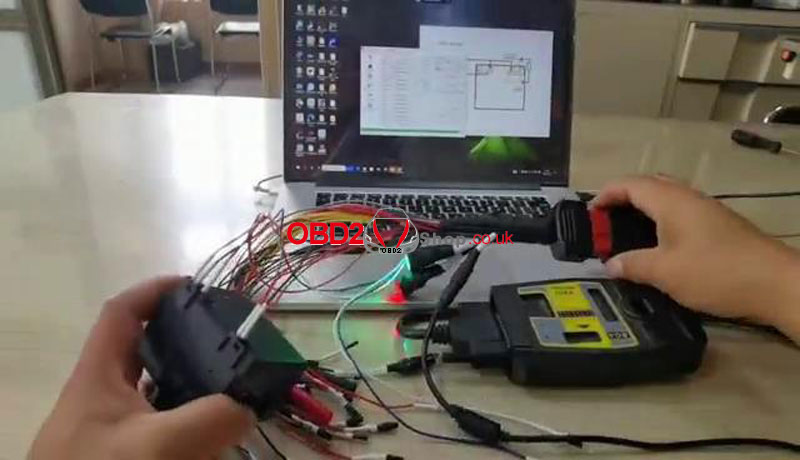 Read Audi A6 Simos 6.2/6.3 ECU data & password with VVDI2 OK. 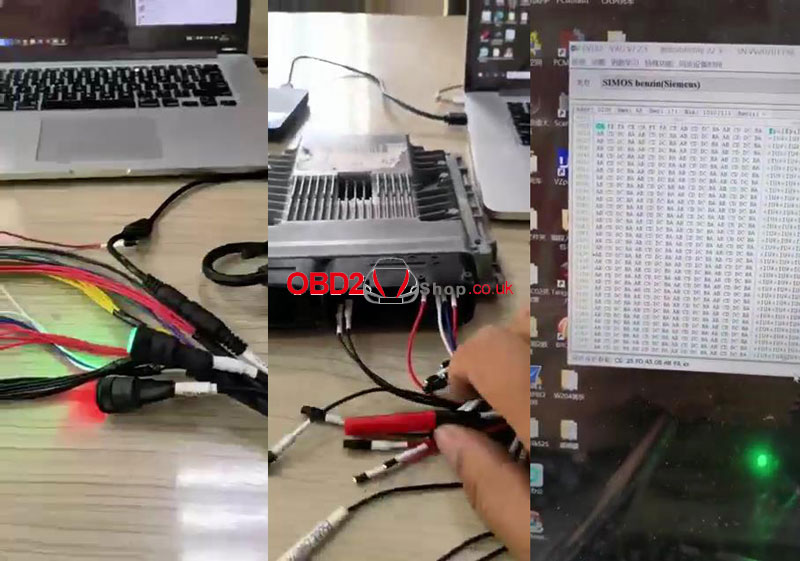 Test ECU Status with Godiag GT101 PIRT Power Probe. 
0 Comments
This post will go to perform key adjustments using the Autel Maxiim KM100 key tool, the key tool makes it easy to adjust the buttons on your key so that the transponder works the way you want it to. Sometimes when you generate a new key, the transponder buttons are out of order, the lock button unlocks the door, the lock button opens the trunk, and so on. This Autel KM100 key tool can correct this aberration quickly. In this post, the lock button is in the unlocked position and the unlock band is in the lock position. How to adjust? Read on to find out. Tap Special Function, place a blank key in the key slot, then tap Key Adjustment. The system should automatically read the values, if it doesn't, tap read the current value. 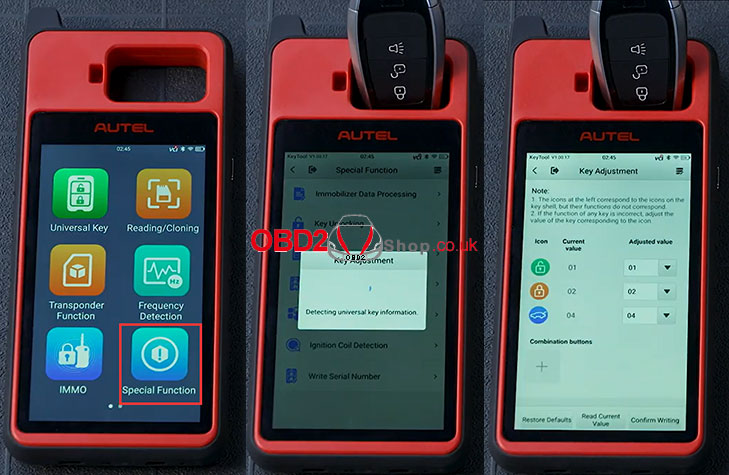 If you want to change the location, tap the arrow on the right, here I want to change the location of the lock and unlock buttons. The keys order works top to bottom, so we can see that the unlock button is in position 1, and the lock icon is in position 2. Set the unlock button to position 2 by selecting the drop-down arrow. 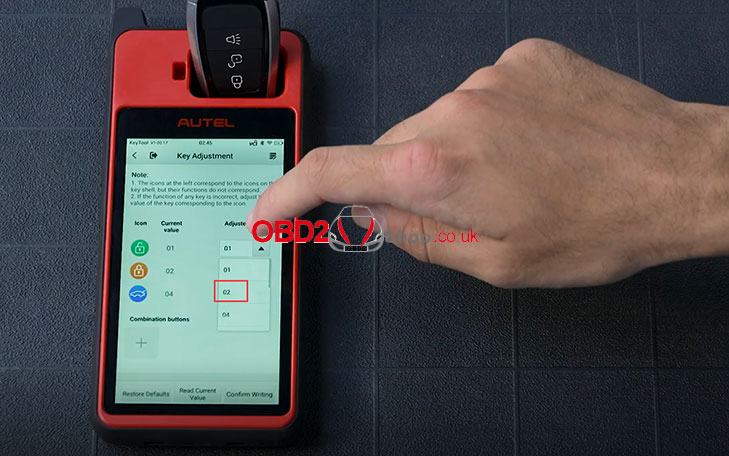 Change the lock button's position to 1 by selecting 1. 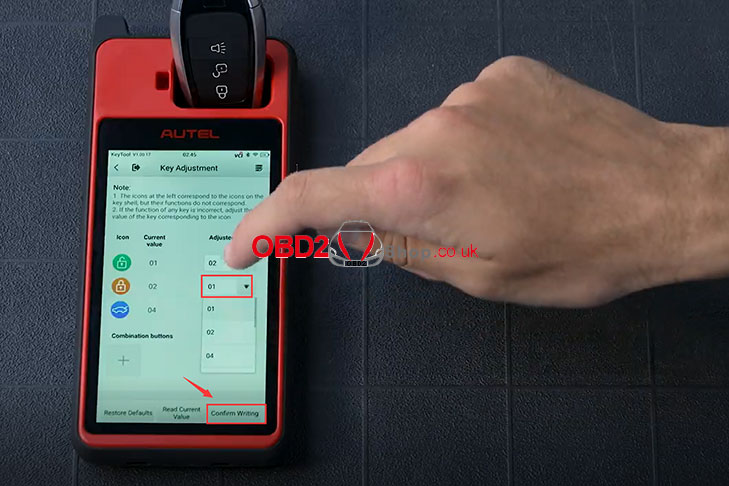 Since that's all, I want to do I will tap confirm writing to complete the adjustment.
Tap read current value again. Now the unlock button unlocks the door and the lock button locks the door. For more details about Autel KM100 key tool , please check https://www.obd2shop.co.uk/wholesale/autel-maxim-km100-key-programmer.html Here's collected the most frequently asked questions and answers for PCMtuner V1.26 ECU Programmer. Read this post to learn solutions when having same operation issues.  Q: Why my PCMtuner cannot connect to PC? Computer is not responding. A: Attention please PCMtuner has 2 power supply: USB communication cable & PCB power supply cable. Many users tend to just plug the USB cable but not main cable, that's the reason why computer failed to connection. Q: Why PCMtuner can identify ECU successfully, but failed to find device when click "Read"? A: In this case, simply plug & unplug the power supply cable once. Q: Why my PCMtuner account displays "unactivated"? A: Account will be activated 24 hours after the application is submitted, please wait patiently. Q: Why the device cannot find PCM Dongle or PCMtuner? A: Please plug main power supply cable, USB cable & PCM dongle for connection. Q: Where to log in my user account? A: We'll generate 2 user accounts: VZ performance & Tunerbox. VZ performance: Log in at https://support.vz-performance.com for VR files & damaos. Tunerbox: Log in at https://www.tuner-box.com for technical assistance. Q: Wiring connection is all correct, but PCMtuner cannot read? A: Make sure you have selected the right mode(OBD/Bench/Boot). If connect without opening shell, please select No.71 protocol. Users should select correctly according to corresponding MCU (Can be found in wiring diagram). 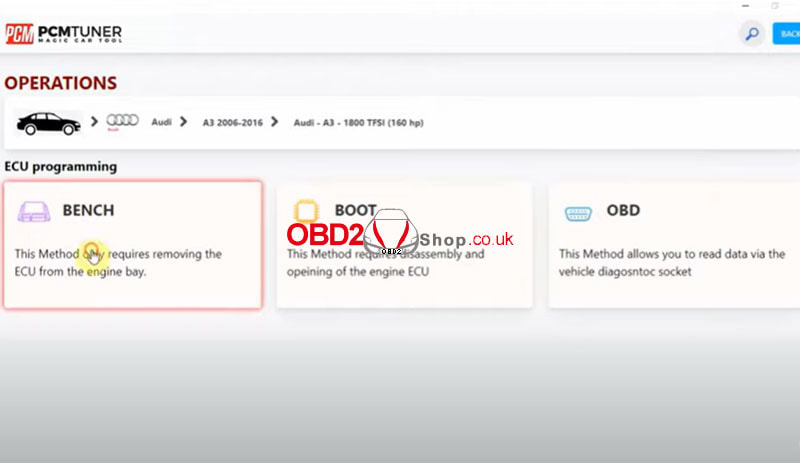 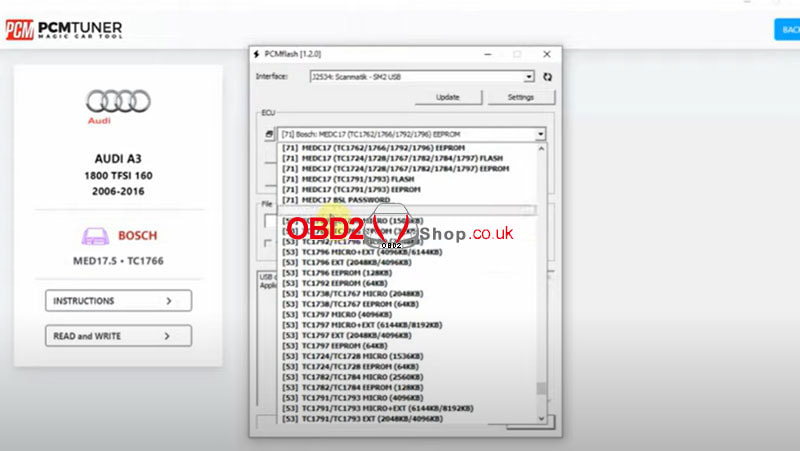 Q: What cars support virtual files?
A: Toyota, VW, Audi, Honda can support virtual files. Q: How to select virtual files? Steps: Identify ID >> Search ID/ SW software no./ part no. >> Download corresponding files Read also Solution: PCMtuner device not found?" Error http://blog.obd2shop.co.uk/solution-pcmtuner-device-not-found-error/ Solved: PCMflash "Unable to use selected interface" Issue http://blog.obd2shop.co.uk/solved-pcmflash-unable-to-use-selected-interface-issue/ Solution: PCMtuner account Can't login "User already exist!!" http://blog.obd2shop.co.uk/solution-pcmtuner-account-cant-login-user-already-exist/ Here obd2shop.co.uk provides 2022 latest free download Thinkcar ThinkDiag app for Android smart phone. Workable on Android 10 or 11 version system. ThinkDiag APP Free Download Link: http://apkdown.mythinkcar.cn/apk/index.php?mod=down&code=index&pid=12&id=668 Question I've used ThinkDiag to test on BMW X5 2006, Vauxhall Astra 2010, Vauxhall Corsa 2008, VW Golf 2008/2015, Mercedes V250D 2017... But it always gave a note "Diagnostic service failure, please start it again". What's the problem? 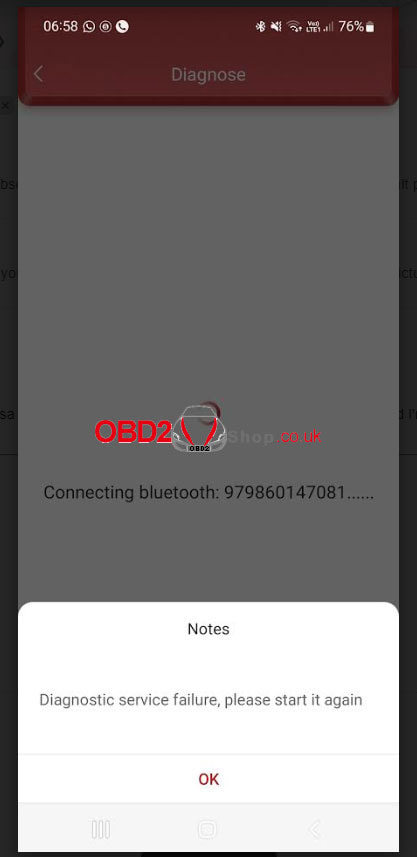 Solution
ThinkDiag APP for Android 12 system is being developed now, please attention to normally work on a below system for the moment. This post will show you how to clone a key by calculating 46 passwords using the Autel MaxiIM KM100 key tool, now I will guide you step by step. First, tap "Reading/Cloning" on the key tool, then tap clone, next tap "46 password calculation" at the top. 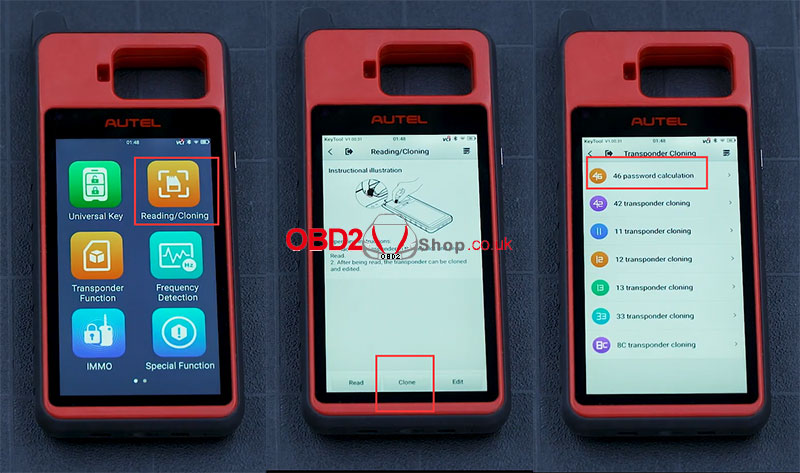 On this page, place your key in the key slot at the top Press "start" to recognize the key 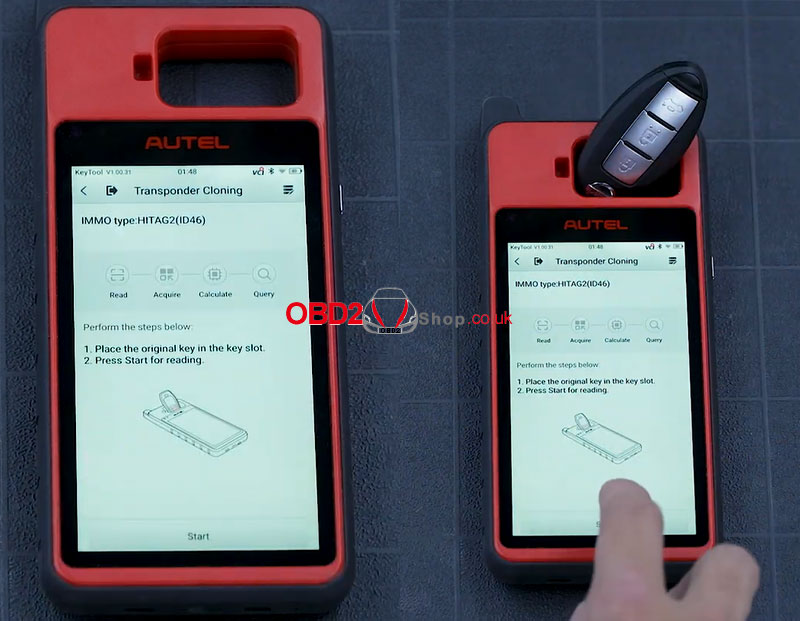 Next, we need to take it apart so that the key battery doesn't interfere with the password calculation process. 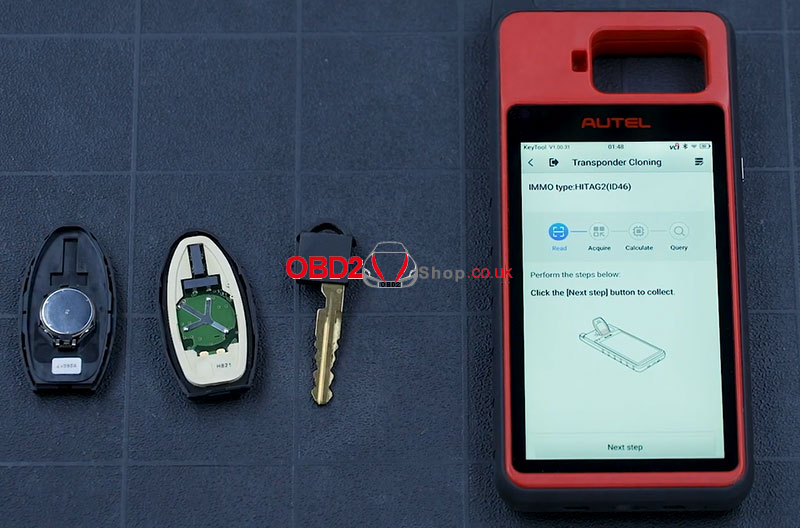 Place the key component and the transponder head close to the start button, then turn the engine on. You may need to press the start button two or three times for it to successfully read the password. 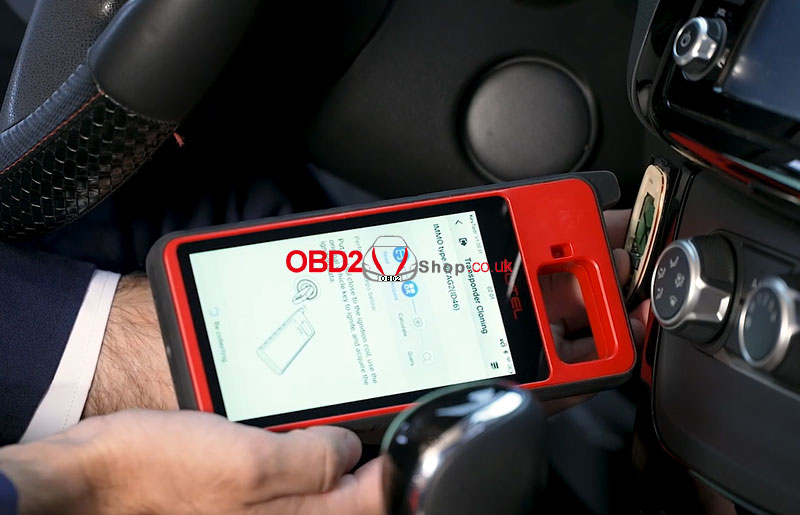 Once you reach this stage it may take up to 3 minutes for the password to be calculated. 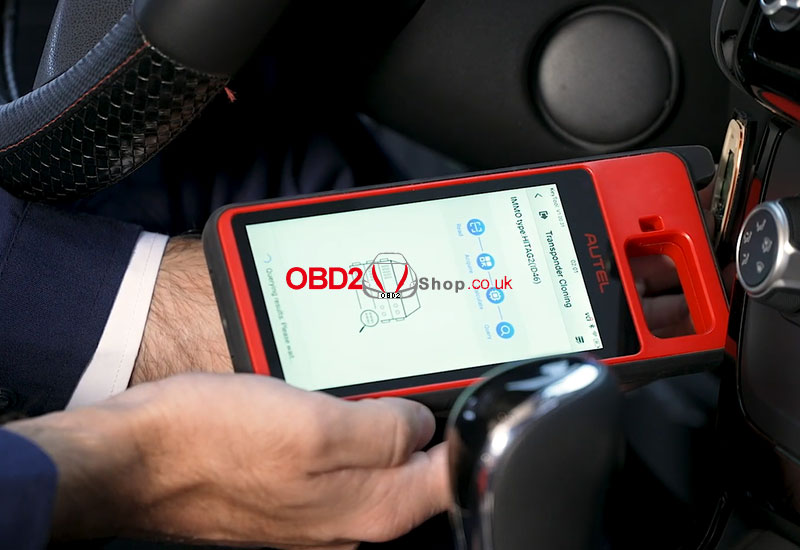 Take a picture of the password once it appears as you will need it if you are performing a simulation.
If you have any questions about Autel MaxiIM KM100, please feel free to contact us. www.obd2shop.co.uk This is a tutorial on how to add Jaguar/ Land Rover 2018+ smart key with Yanhua Mini ACDP & Module 24. The procedure requires a working key, read the post below to learn how it works. Step1. Replace RFA Module/ RFA Chip You can replace a new RFA module according to vehicle RFA model. Also you can replace the RFA main chip. 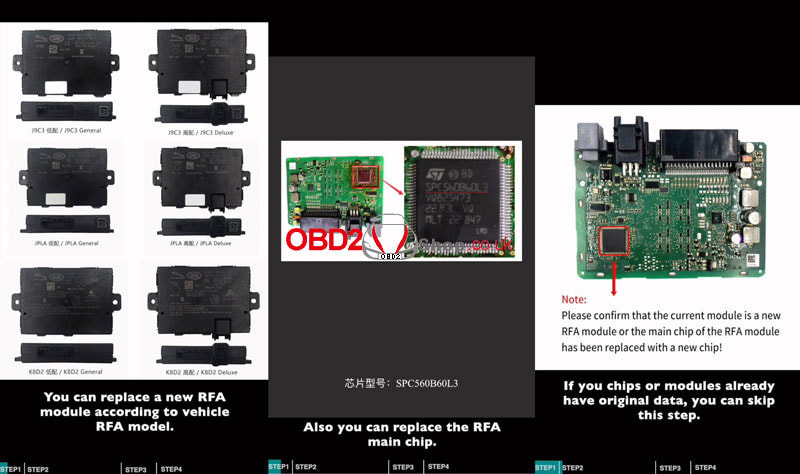 Step2. Write Initial Data * If your chips or modules already have original data, you can skip this step. Otherwise, the initial data needs to be written. Note: Please confirm the current module is a new RFA module or the the RFA main chip has been replaced with a new chip! Tools Required: Module 24 RFA module 20PIN cable OBP+ICP adapter ACDP programmer Connect ACDP host, OBP+ICP adapter, interface clip & RFA module. Mini ACDP >> Jaguar/ LandRover >> Program smart key(2018-) >> RFA write initial data >> SPC560B60L3 >> Write initial data >> JPLA(select the option according to RFA module) To check connection diagram, press "Help". Please connect ACDP with RFA module, don't cut the power or pull out the device during the programming! Pin detection passed. If fails, please adjust the clip position to re-test. Prepare to download data from the server, please keep the network stable during the download! Prepare to write data, please do not power off or unplug the device & adapter during data writing! Writing CFLASH data, please wait... Writing chip data finished. Save data file success. 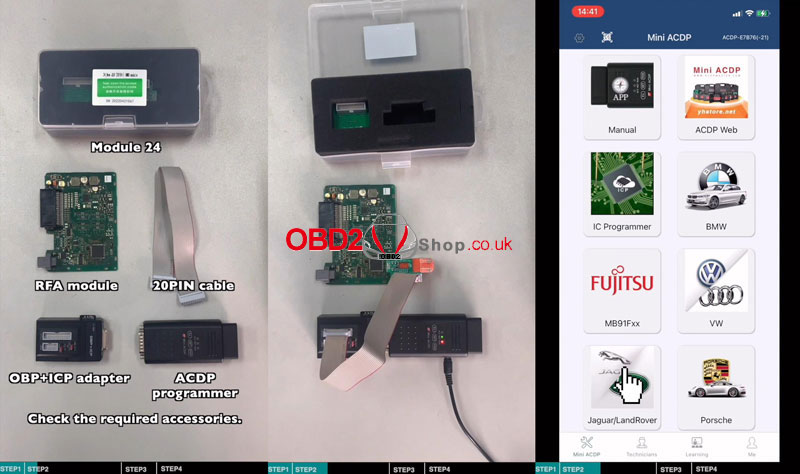 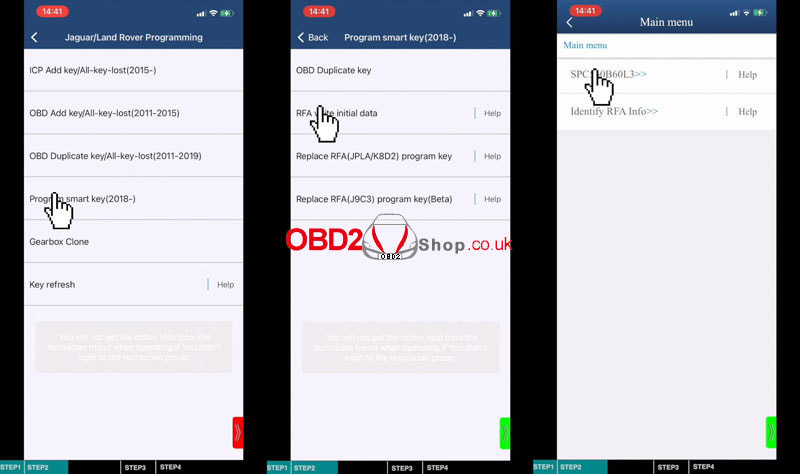 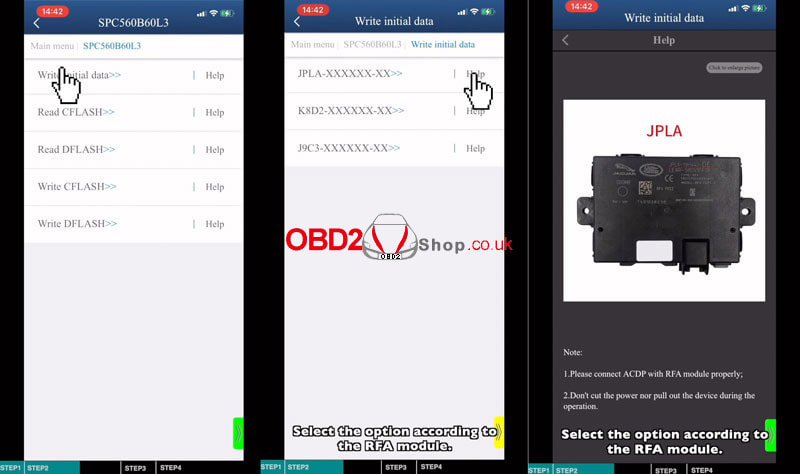 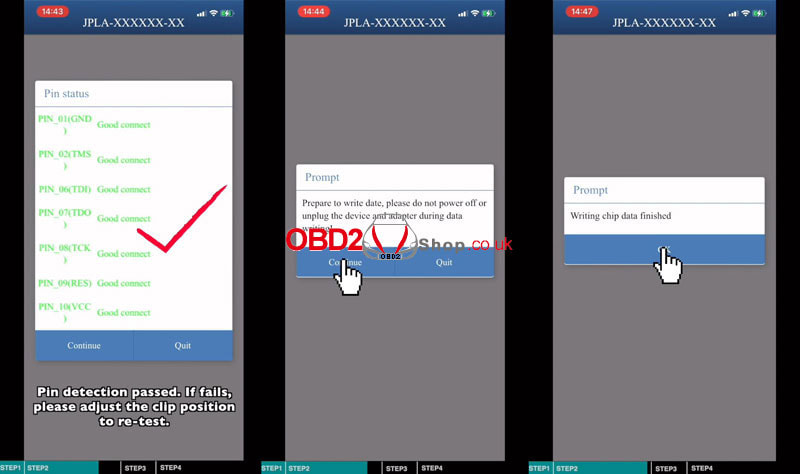 Step3. Identify RFA Information Remove the clip and install the interface board. Identify RFA Info >> Continue Check the system information, make sure the RFA module is unlocked. Read system info finished. Save info file success. 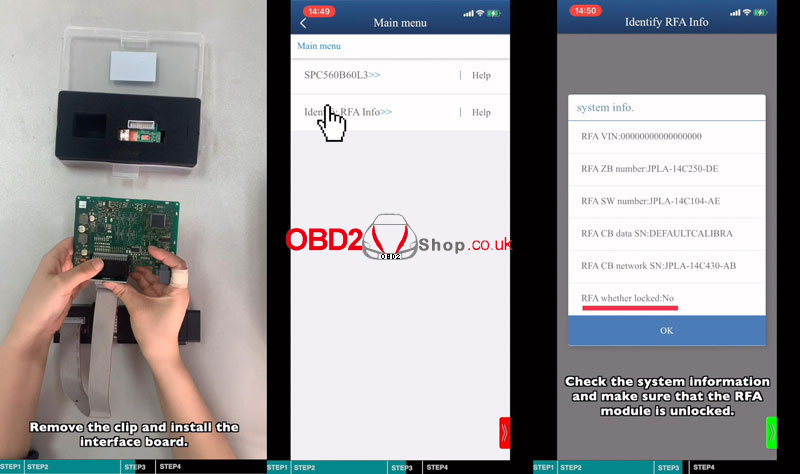 Step4. Program Key via OBD Load the RFA module, connect ACDP programmer to the vehicle via OBD. Prepare 2 smart keys that can be programmed(working key is acceptable). Replace RFA(JPLA/K8D2) program key >> Add smart key(auto mode) Connect ACDP to the vehicle OBDII port. Confirm the system information, Continue >> OK Prepare to program, please make sure the stable power supply and DO NOT pull out the device during the programming! Confirm the current vehicle ignition is off, the program will automatically open the ignition! 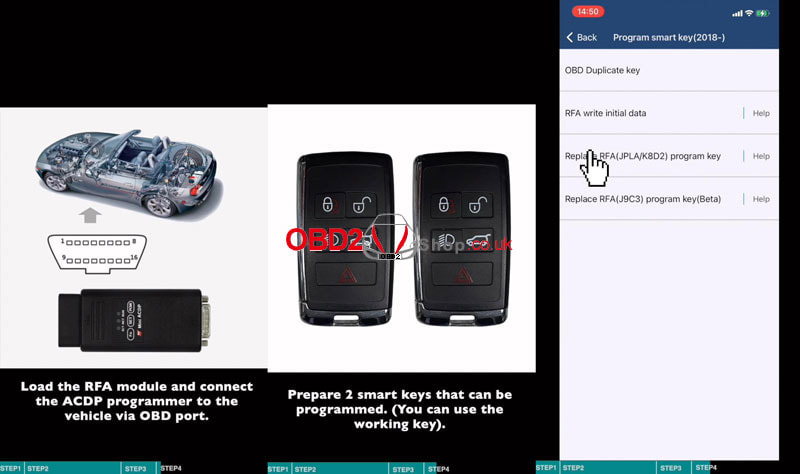 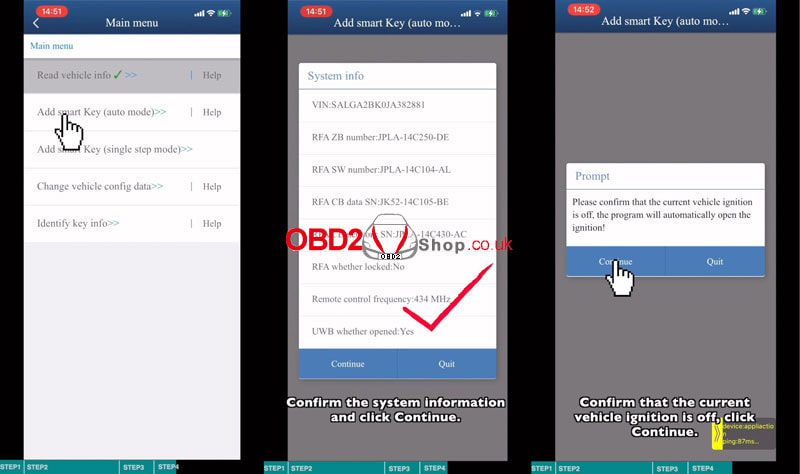 Programming RFA module is complete, the smart key program process is about to begin. Press "Continue". Confirm the current vehicle ignition is off, the program will automatically open the ignition! Please prepare at least 2 new keys and put them in the car. Press the unlock key during key learning process. Press "OK", follow the prompts to start program keys. Please complete all the key learning operation within 30s. Please hold the smart key that need to program in your hand. Press the unlock button hard for 4s, and the car horn will sound twice to indicate that the current key has been programmed successfully. The first smart key has been programmed. Please prepare the second smart key to be programmed! Just repeat same operations as before... Key programming successful. To add more keys, press "Yes". Otherwise, press "No". Please confirm the key information, press "OK". Done. 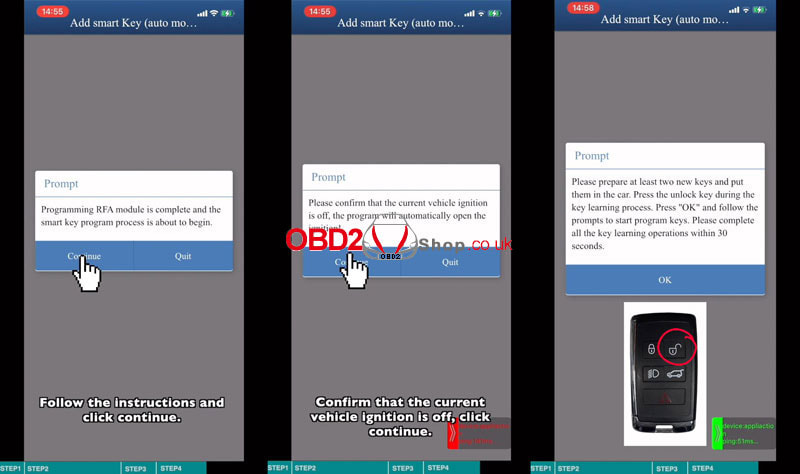 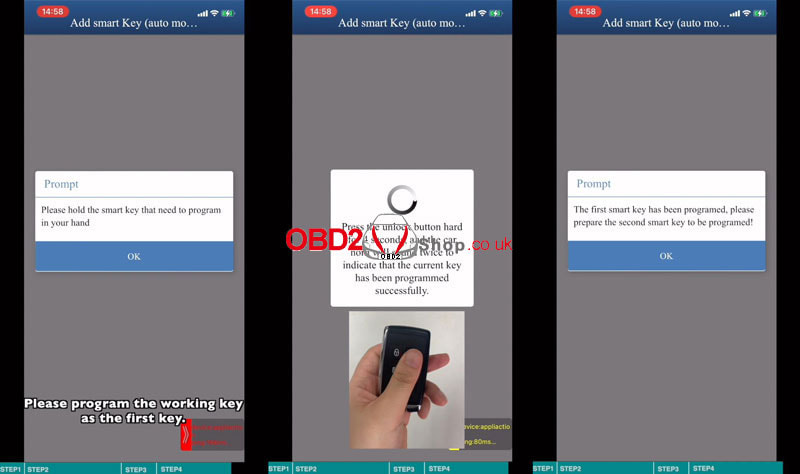 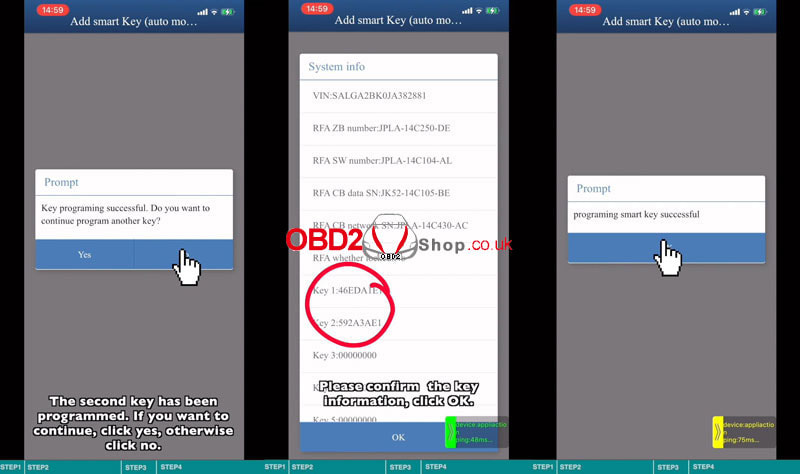 Latest Yanhua Mini ACDP Module 25 was released, supported to adjust VW/ Audi DQ380(0DE), DQ381(0DE), DQ500(0DE) gearbox mileage. Much safer without soldering. Should work together with Mini ACDP Programming Master. 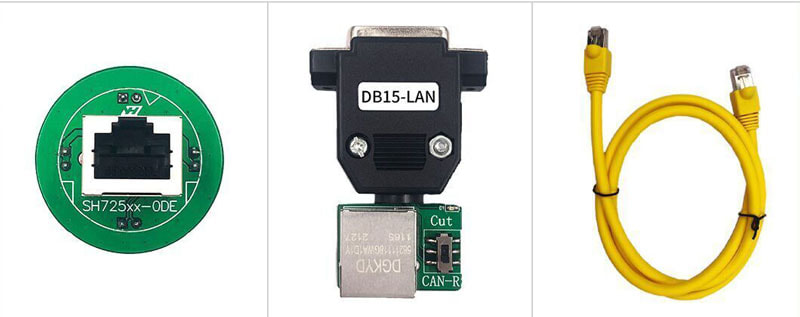 Supported Car Model: Audi: A3, Q2, Q3, etc. Volkswagen: Magotan, Passat(B8), Lamando, Golf GTI, Tiguan L, Teramont, new Skoda, etc. Functions: 1. Identify gearbox model by OBD quickly. 2. No need to remove TCM, plug and play to correct mileage with special interface board. Path in Mini ACDP APP: VW >> Gearbox mileage correction >> VW/Audi >> DQ380(0DE)/DQ381(0DE)/DQ500(0DE) Here's allowed to do identify, mileage correction(auto mode/ single step mode), time correction(auto mode/ single step mode), read & write EEPROM. 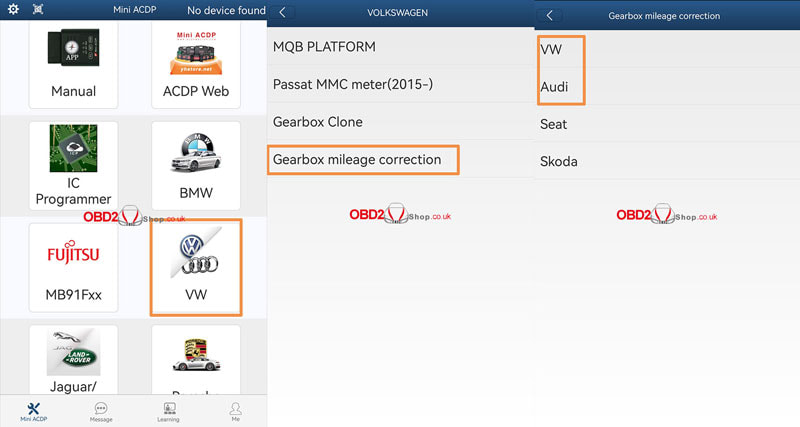 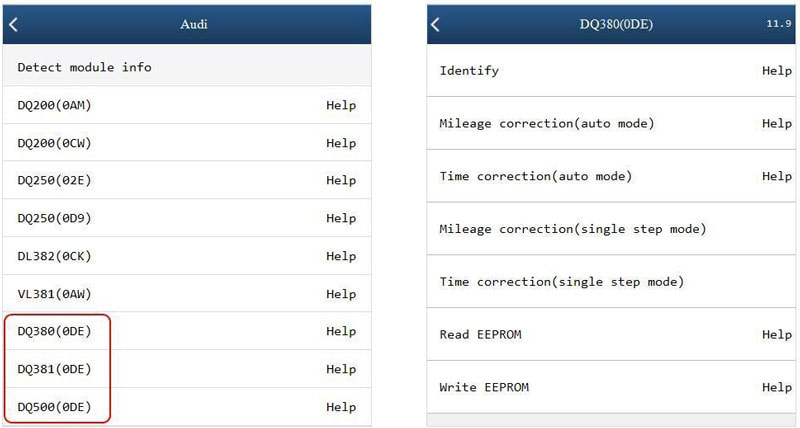 How to connect ACDP Module 25? Tools required: SH725xx-0DE interface board DB15-LAN adapter TCU cable Mini ACDP Basic module VW/ Audi gearbox 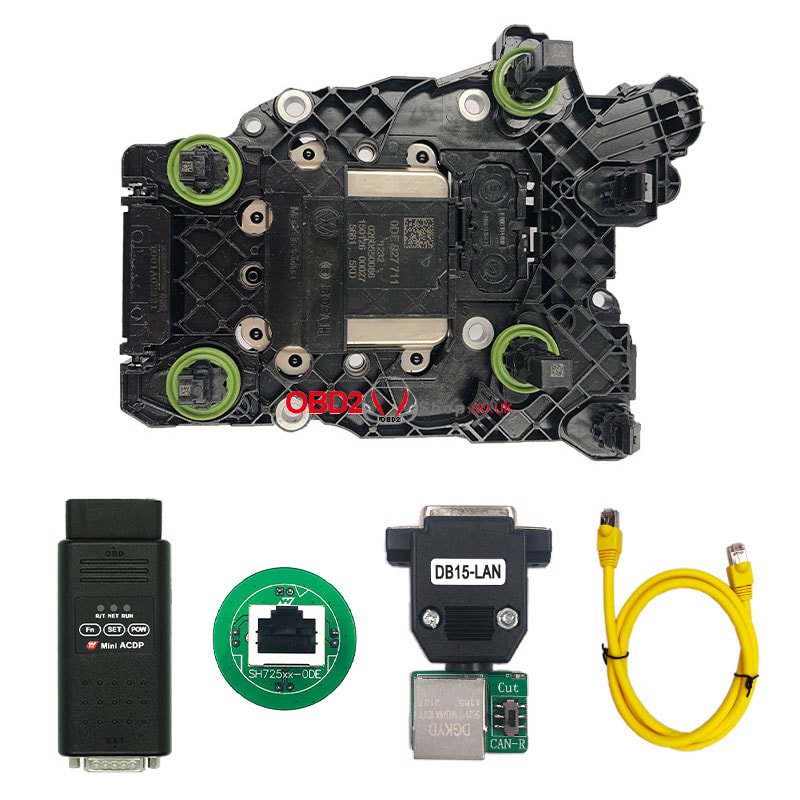 Step1. Connect SH725XX-0DE to gearbox correctly as image. 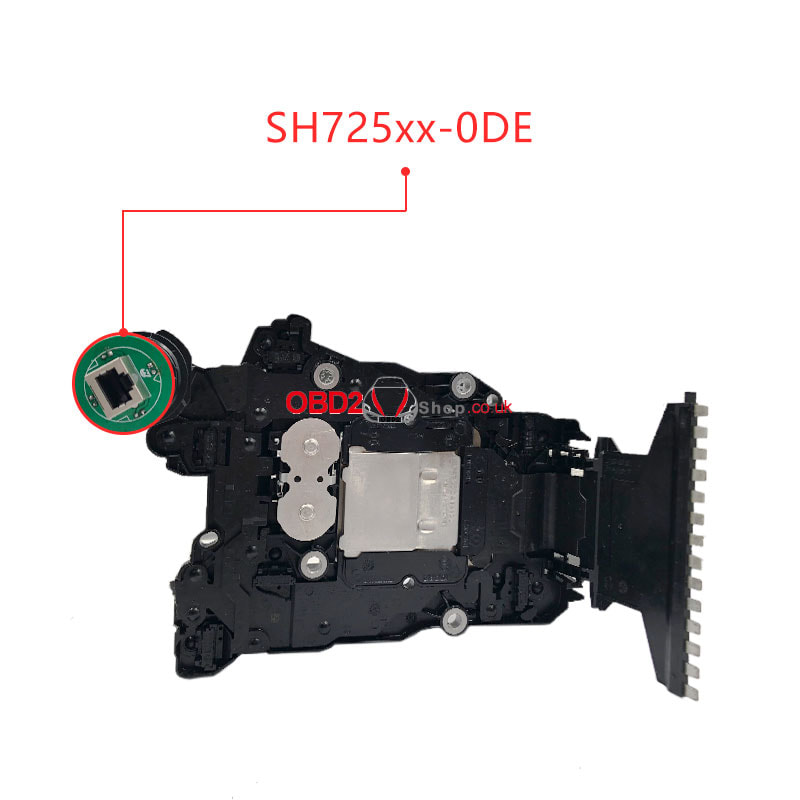 Step2. Short the CAN resistor on the DB15-LAN adapter to CAN-R. 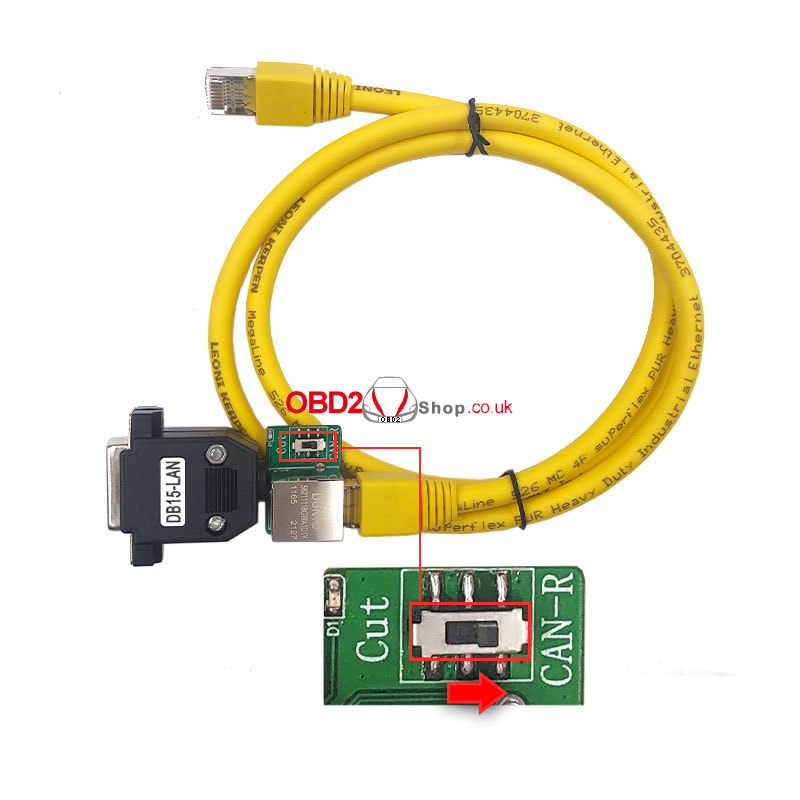 Step3. Connect ACDP, DB15-LAN adapter, interface board & gearbox. 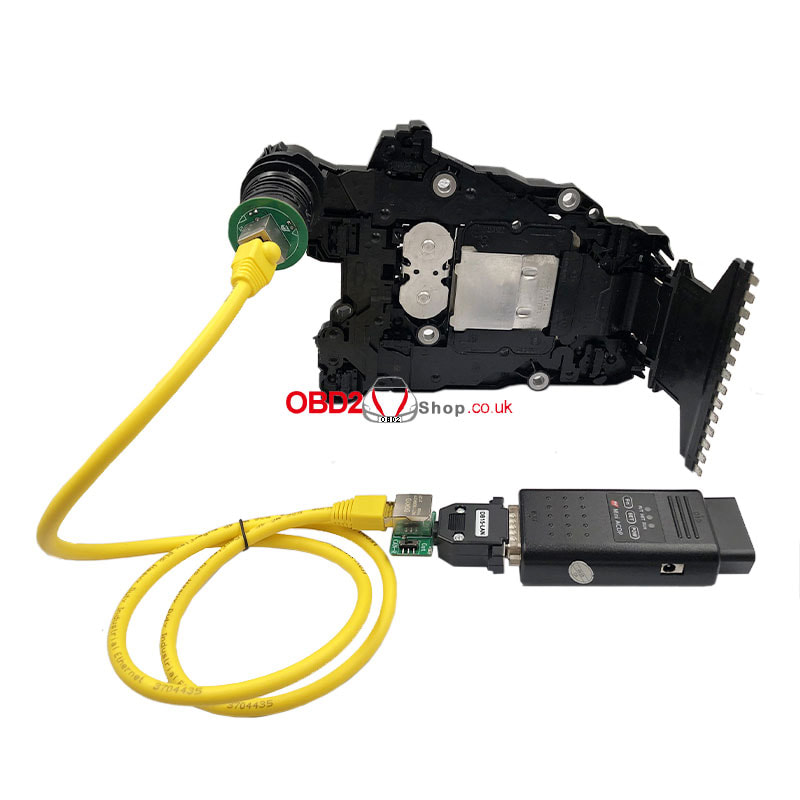 Here Obd2shop.co.uk have collected the latest hot injector cleaners & tester machines in 2022. Covering 4-cylinder & 6-cylinder machines from Summary, Autool, Launch, Tektino. By making a list of the differences to help consumers make a better choice. Hot 4 4-Cylinder Injector Cleaners Summary vs. Autool vs. Launch Comparison 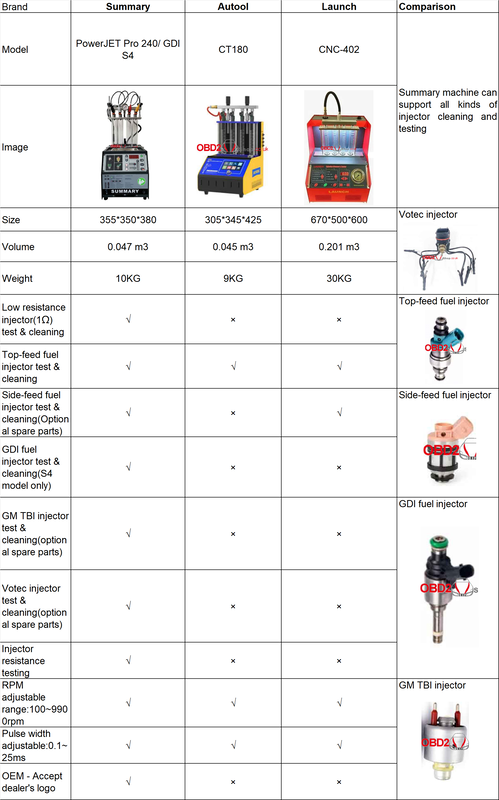 Hot 4 6-Cylinder Injector Cleaners Summary vs. Autool vs. Launch vs. Tektino Comparison 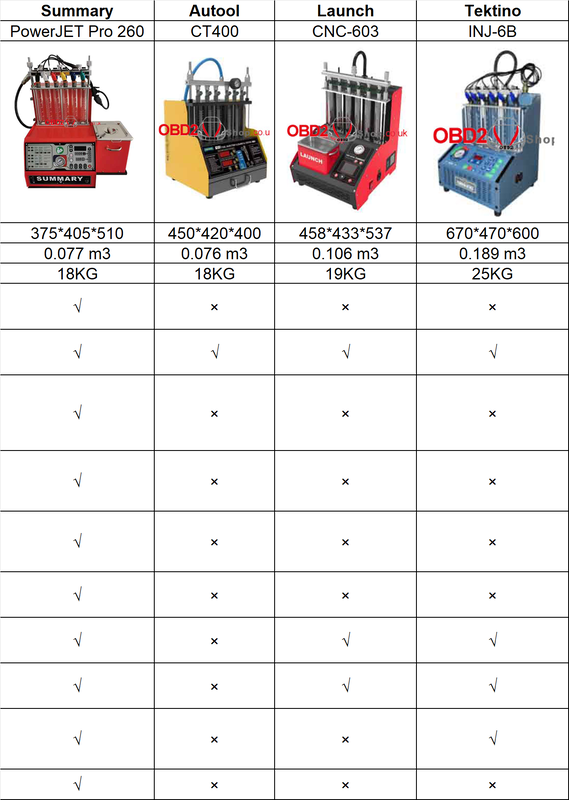 Conclusion
From the comparison table, Summary supports the most features while other brands are not or less. However, remember to make sure the injector cleaner you're purchasing is work for your car. As choosing an appropriate machine can greatly save money than going to maintenance. Article source: http://blog.obd2shop.co.uk/hot-4-injector-cleaner-tester-machine-2022-how-to-choose/ It takes only 3 minutes to add a key for Toyota Camry 2014 with Xhorse VVDI Key Tool MAX + Autel MaxiIM IM508. Following is the procedure step by step. Program Remote via VVDI Key Tool MAX Path: Vehicle remote >> TOYOTA >> B42TH B41TA VIGO, CAMRY, ALTIS, INNOVA 1830 >> Generate remote Burn success. 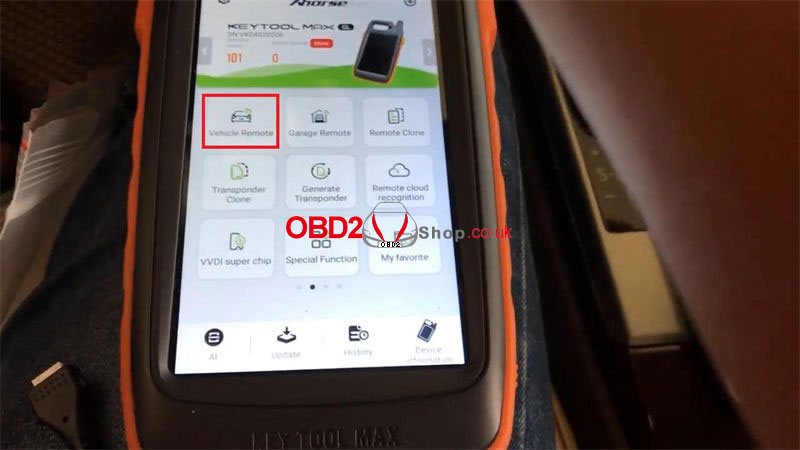 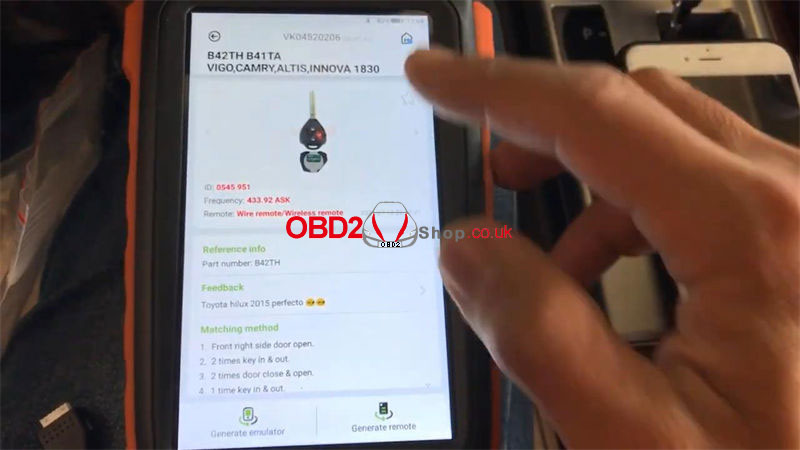 Add Key via Autel IM508 IMMO >> Toyota >> System selection >> Remote system >> Remote system(CAN) >> Remote control learning Turn the ignition on and open the driver door. Within 30s, press LOCK and UNLOCK on the remote control to be learned at the same time for 2s and then press LOCK once again. Press "OK" to continue. Learning is completed. 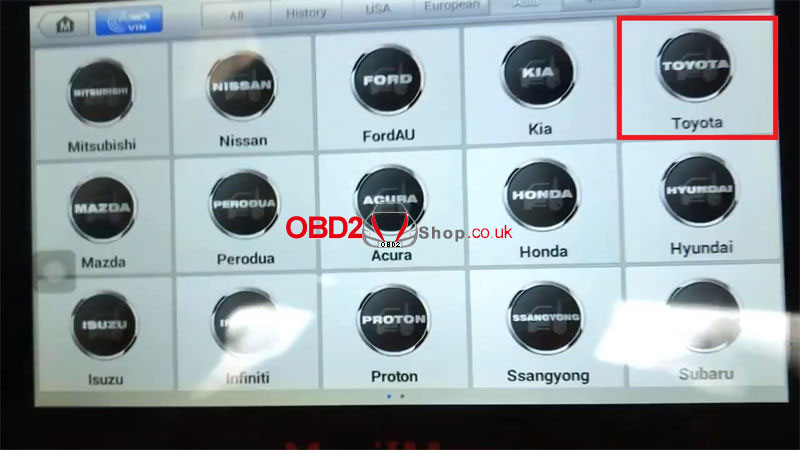  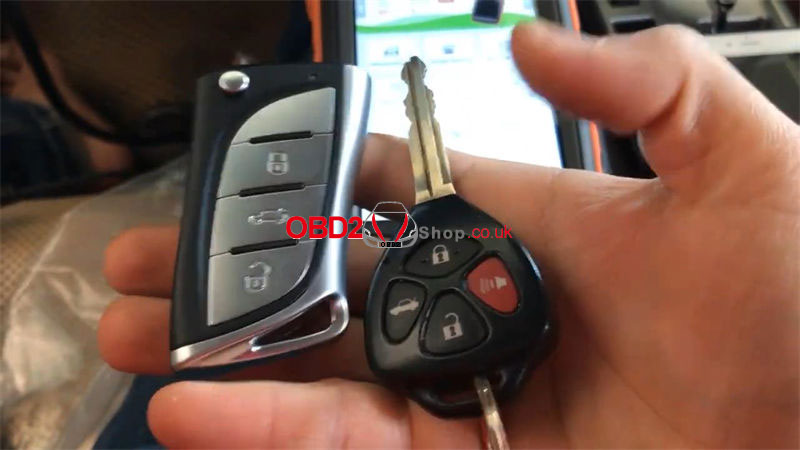 Test the new key.
It can work normally. Done. Using Xhorse Key Tool MAX to work with Autel IM508 is fast and easy. www.obd2shop.co.uk Please notice not upgrade PCMflash 1.20 to above version in V1.25 PCMtuner software. Or else, this may cause "PCM Tuner Device not found!" error, failed to identify PCMtuner Dongle or to do any read and write jobs. 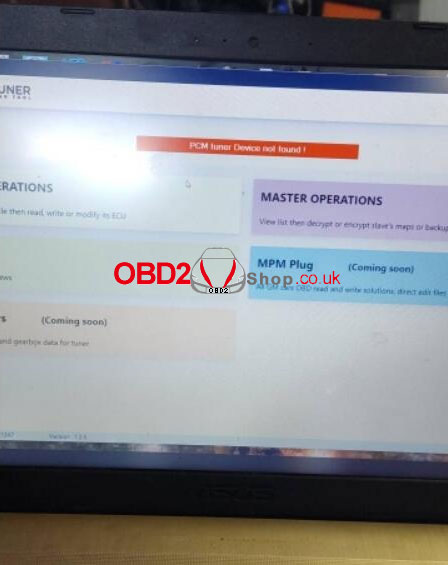 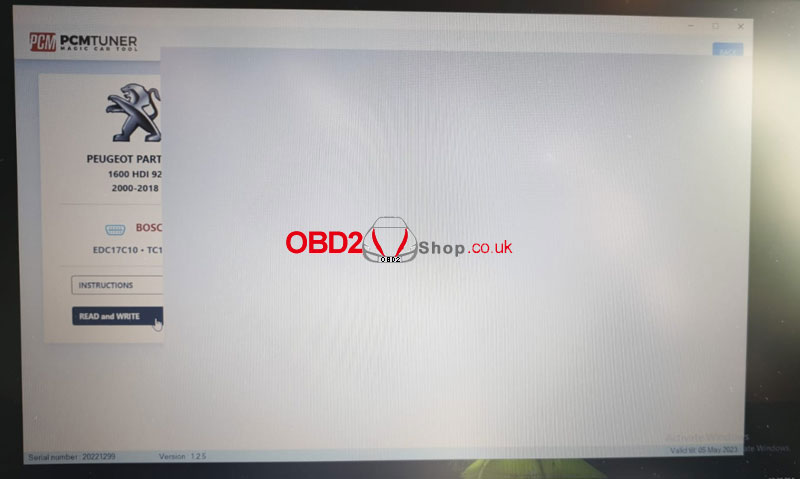 Solution
1. For upgrade misoperation, uninstall then re-install PCMflash 1.20; Free download PCMflash 1.20 software: https://mega.nz/file/xwMWiSYb#CVsKxEyCTjRTEnpe9memWCzywKihxEf0mO5OmgX4X0g 2. If the error still exits for other cases, unplug & re-plug PCMtuner Dongle, then restart PCMtuner ECU programmer. Problem will be solved. Hope this is helpful. http://blog.obd2shop.co.uk/solution-pcmtuner-device-not-found-error/ |
