|
Problem: My new Yanhua Mini ACDP is unable to bind in app, it prompted: "WiFi connection fails. Please check if the phone is a WIFI connection and whether the WiFi name and password are correct. Then retry the initial use settings." I'm sure the WiFi name and password are all correct. What's the reason? Any advice? 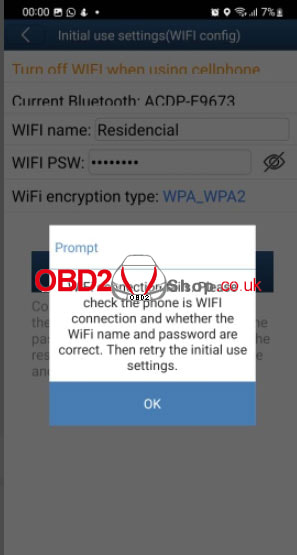 Solution Change the WiFi name to be shorter. Then try again. Cause Mini ACDP may not be identified if the WiFi name is longer. 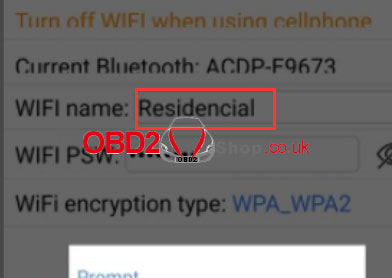
0 Comments
Hello, guys! Today I'm going to show how to add a new key for the 2006-2012 Chevrolet Captiva. The tools that will be used are Xhorse VVDI Key Tool MAX & OBDSTAR X300 DP PLUS. As for the new key, I would consider the Xhorse XELEX0EN Super Remote for a try. It's very easy to finish in 2 steps. So, let's get started. 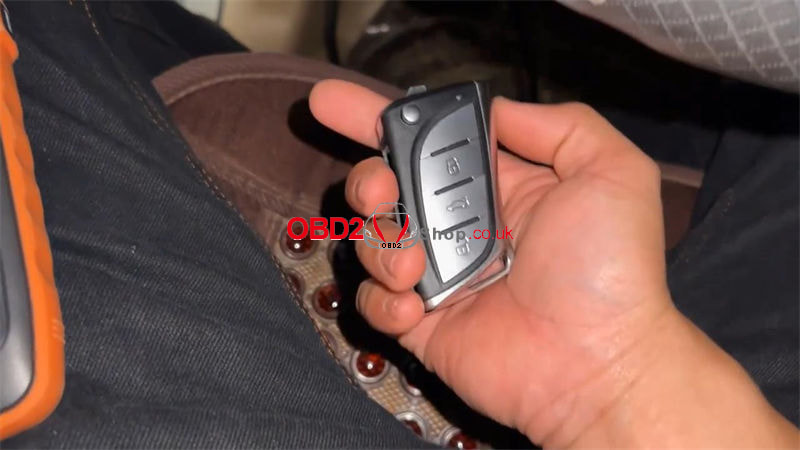 Step 1. Generate Remote Put the new key into VVDI Key Tool MAX slot, Vehicle remote >> Chevrolet >> Captive >> Captiva 08-15 ASK 433 >> Generate remote Burn success. 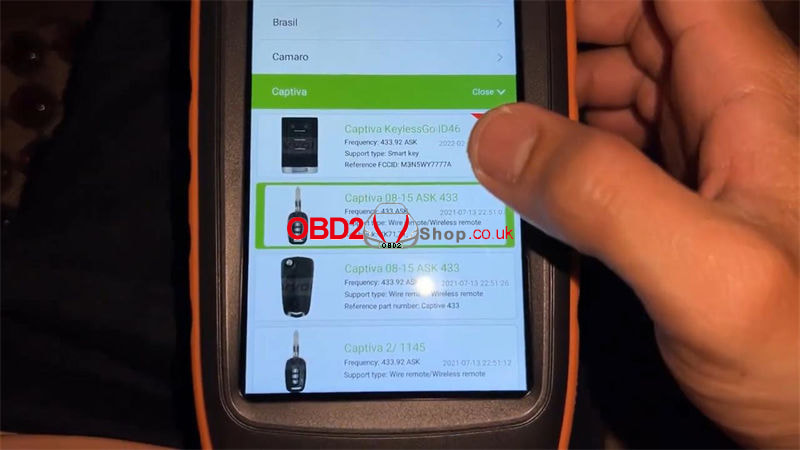 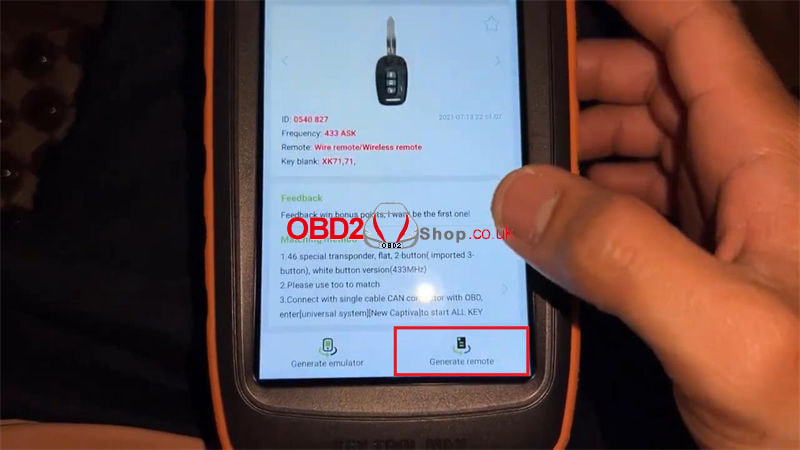 Step 2. Add Key IMMO >> Americas >> GM >> Latest version >> Remote >> Select from vehicle >> Chevrolet >> Captiva >> 2006-2012 >> Add remote Within 1 minute, at the same time hold each Lock & Unlock button of the remote until the vehicle sound. 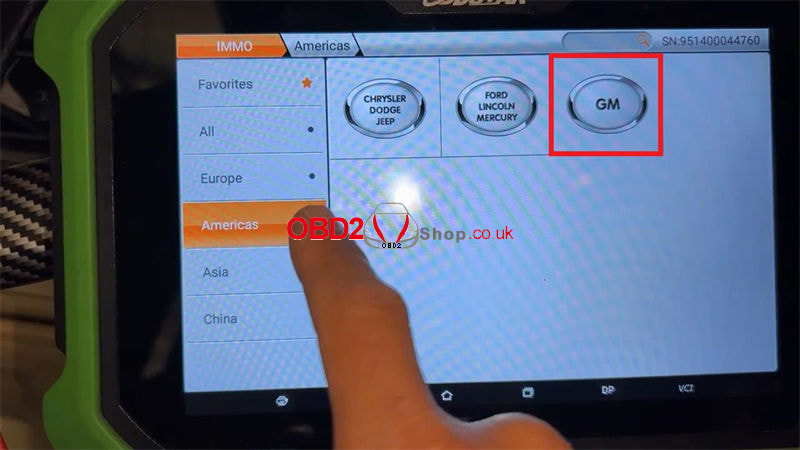 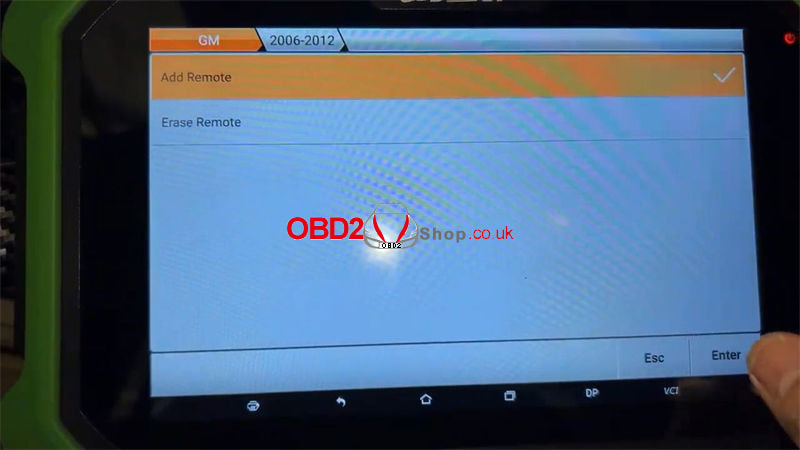 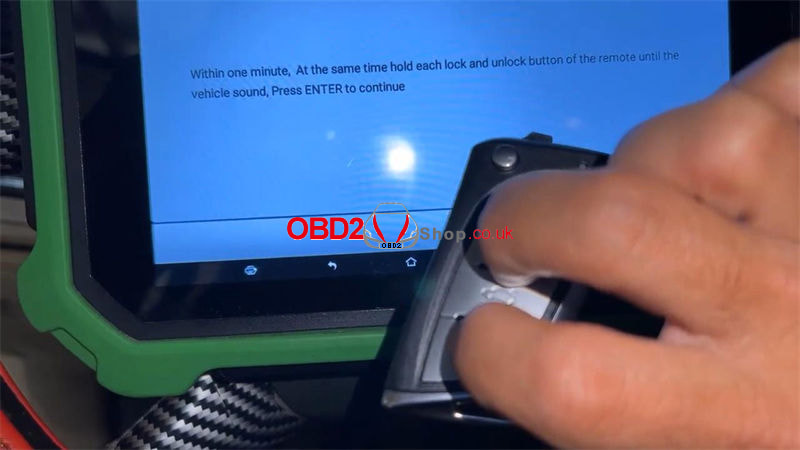 Completed! Very fast and amazing. Test the new key, remote works OK. Perfectly done.  Problem: My Condor XC Mini Plus, everything else works on it, the X Y Z axis also works fine and I have upgraded it to the latest version, but the motor won't spin. 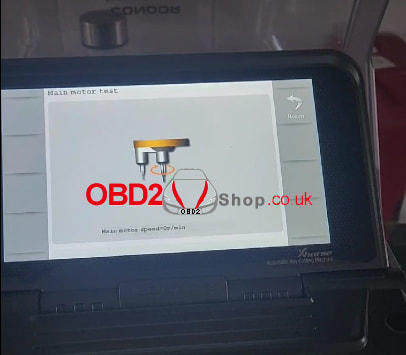 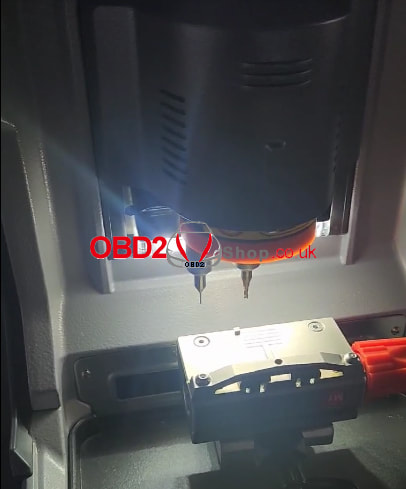 Problem: I've tried to connect my Lonsdor K518ISE to Land Rover, Ford & Audi, but they all have the same error: "Vehicle connection failed, please check the connection between the device and vehicle OBD." 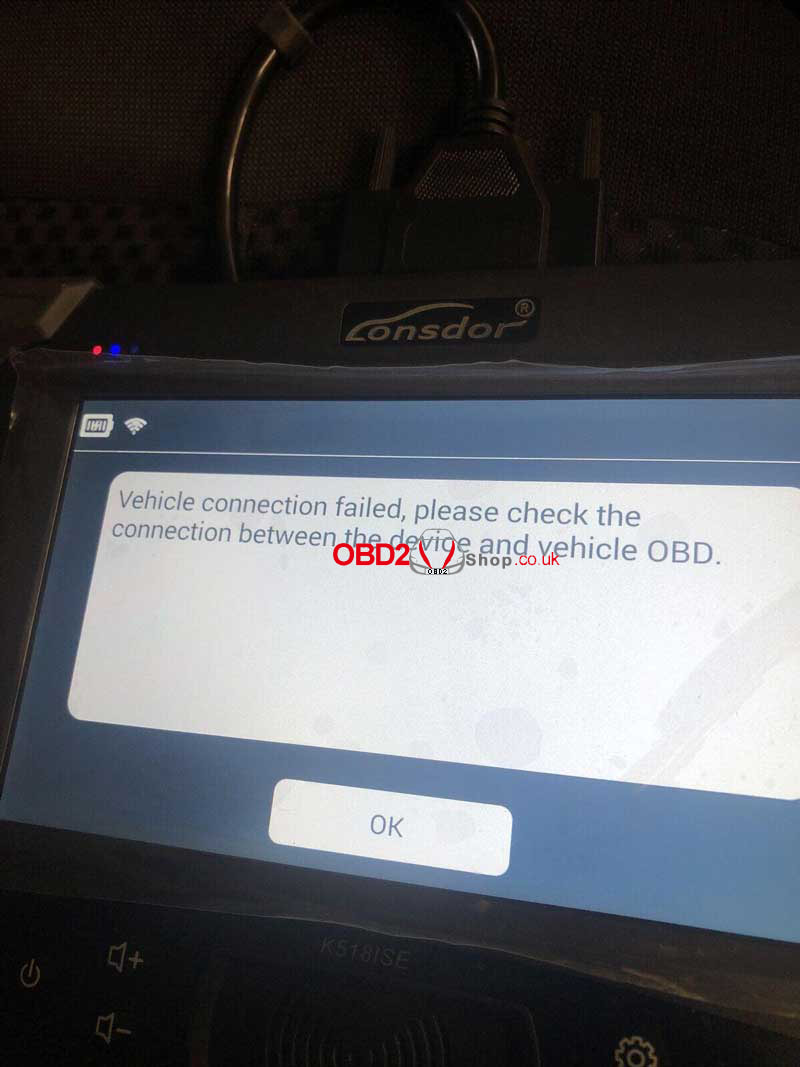 Possible reasons that may cause the issue: 1. OBD cable is broken; 2. K518 communication chip is damaged. Test with a new OBD cable to judge if the communication chip can still work normally. To find out if the OBD cable has a problem, we need to test it. How to test K518 OBD cable? 1. Unplug K518 Key Programmer and turn it off. 2. Connect the OBD cable(DB25 cable) to K518ISE, and switch to the diode stalls with a multimeter. Pay attention that there are 3 connectors on the OBD cable: Connector 1: connect K518ISE OBD port; Connector 2: connect KPROG adaptor; Connector 3: connect the vehicle OBD port. 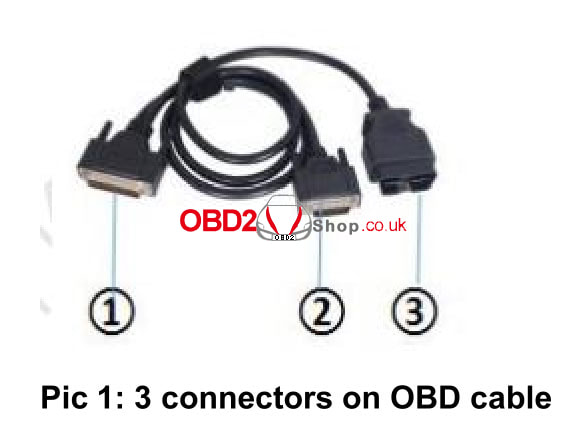 3. Touch the metal part(shown in pic) with a red pen. 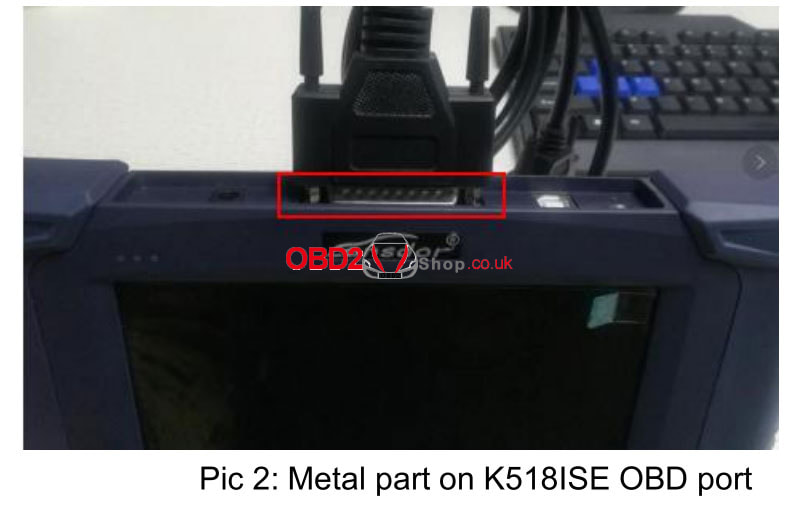 4. Test the resistance of each pin on the K518 connector with a black pen, making sure the vehicle connector is held in the way as shown. 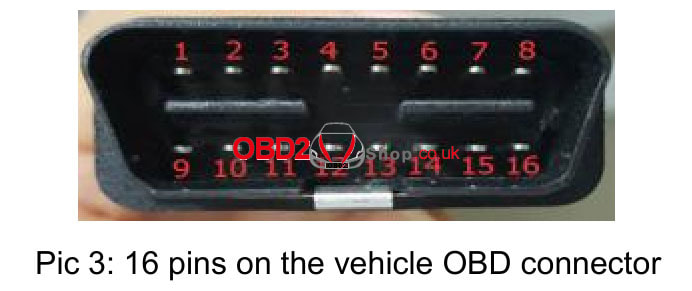 PIN1,8 should have no resistance;
PIN2,3,4,5,6,7,9,10,11,12,13,14,15,16 should have resistance. Test Results If all have no resistance, the OBD cable(DB25 cable) has a problem. If the measurement is all as it is supposed to be, and the car(K518 supported models) still can't be connected, you'll need to send back the OBD cable(DB25 cable) & K518 device for Lonsdor to check. www.obd2shop.co.uk Why do we need to update COROLLA 4A to TOYOTA-27? COROLLA 4A supports the programming of 4A proximity keys. TOYOTA-27 supports programming of proximity key 4A, 8A-A9, 8A-AA ... TOYOTA-27 is the upgraded version of COROLLA 4A. Compared to COROLLA 4A, TOYOTA-27 has one more power cable.  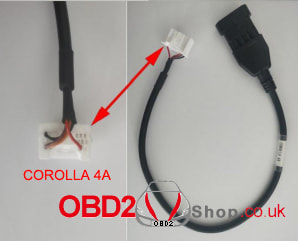 Below I will guide you on how to upgrade COROLLA 4A cable to the TOYOTA-27 cable. Of course you can also directly buy OBDSTAR CAN DIRECT KIT which includes CAN DIRECT cable and TOYOTA-27. Step 1. Remove the heat shrink tube part as in the picture below from COROLLA 4A. 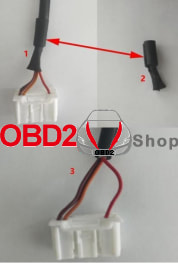 Step 2. Break the insulation of the red wiring (power cable) and find the matching DuPont line (female). 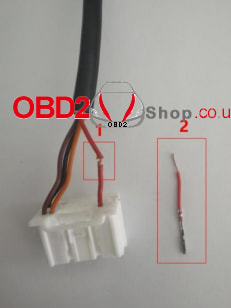 Step 3. Connect the DuPont line (female) to the red wiring point (power cable) as shown below.  Step 4. Insert the DuPont cable into the NO. 4 hole as in the picture below and protect it with electrical tape to avoid short circuits. 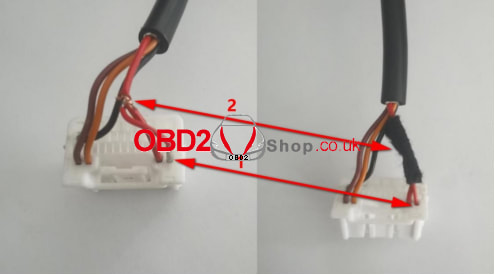 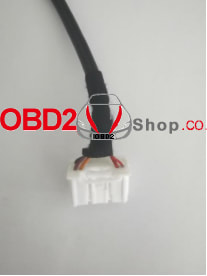
OBDSTAR X300 DP PLUS/ X300 PRO4 can now program 2018+ Toyota/ Lexus 8A-AA proximity add keys & all keys lost with free pincode. Need to work with CAN Direct Kit & Key Sim.
Covering Toyota Highlander HV, Avalon, RAV4/RAV4 HV, Crown Kluger HV; Lexus ES, RX, UX. Also supported 8A-A9: 2018- Camry, IZOA, CHR, LS... 4A: 2019- Corolla... 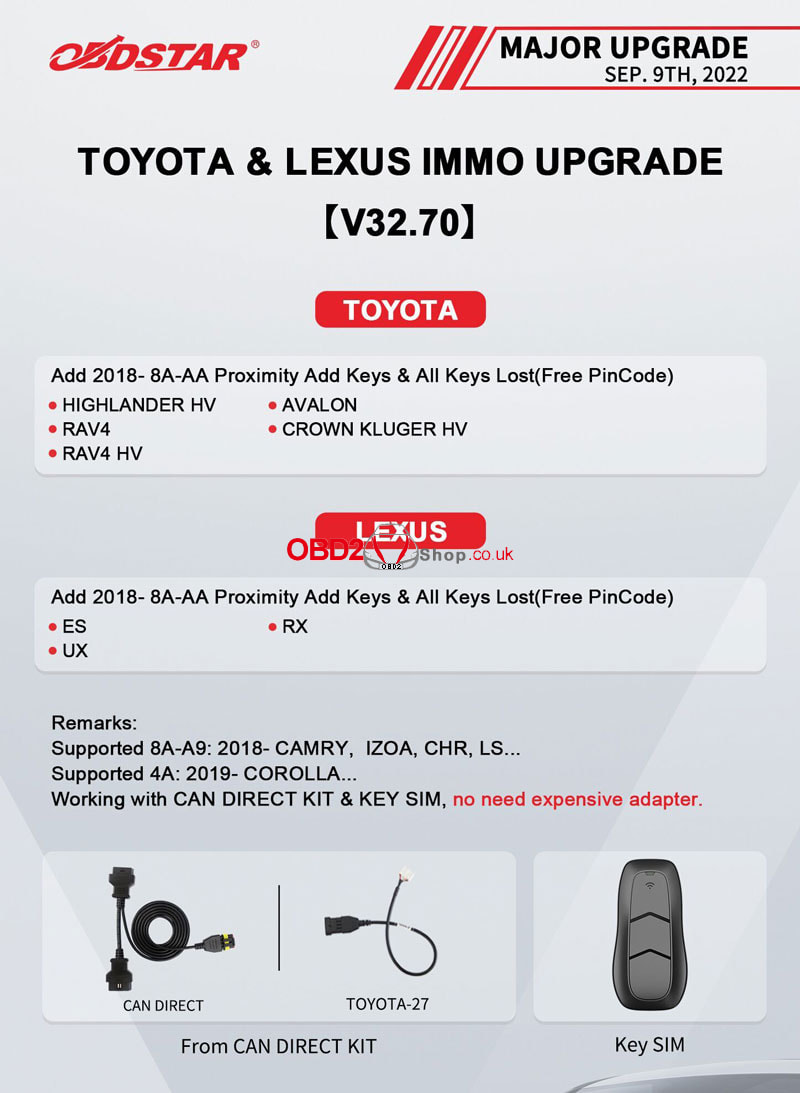
Key Master DP Plus Program 2020 Toyota Avalon SIM Key
Tools Required: Key Master DP Plus Main cable CAN Direct Kit (CAN Direct, Toyota-27) Key SIM 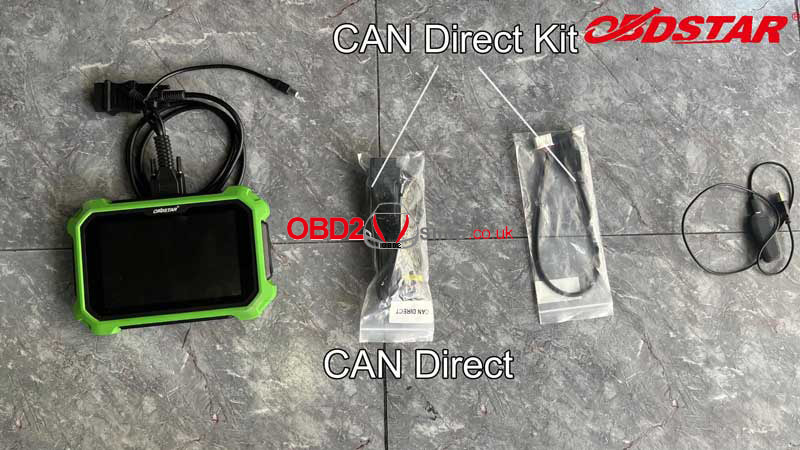
Connection
Connect Toyota-27 with IMMO smart box. Connect CAN direct with OBD. Please connect cables referring to the video:
Operation
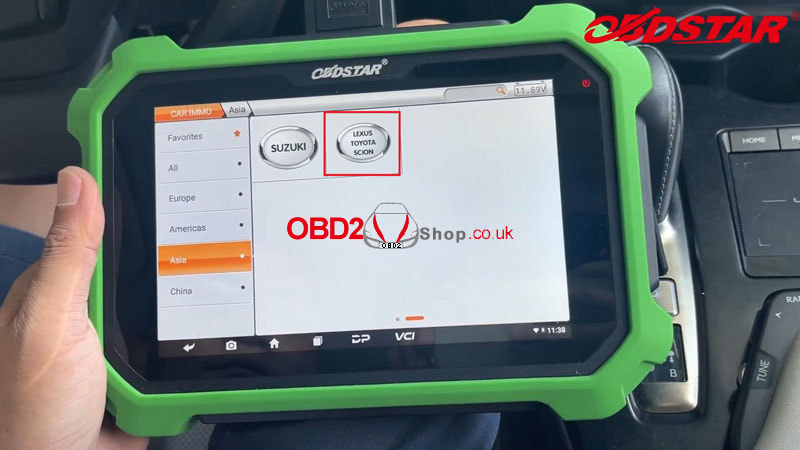
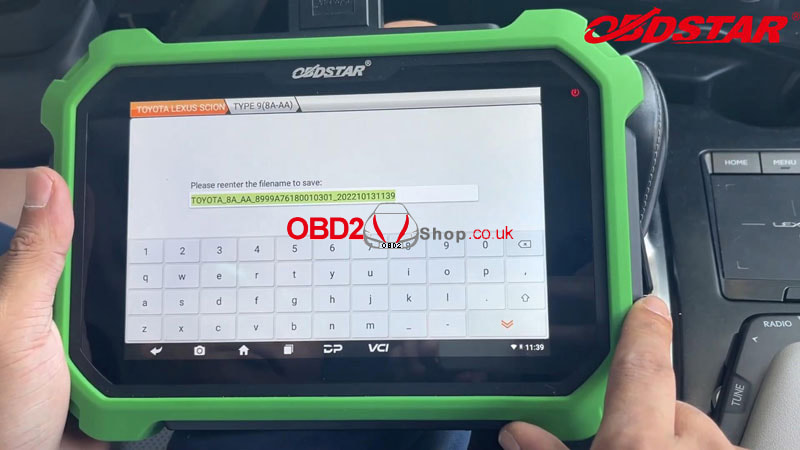
1. Read IMMO Data Car IMMO >> Asia >> LEXUS TOYOTA SCION >> Latest version >> Manual select system >> Proximity >> Type 9(8A-AA) >> Read IMMO data >> Operation in the car(CAN DIRECT KIT) Please connect the diagnostic device, SMART KEY ECU, and vehicle OBD through the CAN DIRECT KIT. This function is available by connecting the server, please ensure the Internet connection is normal. Save IMMO data file. 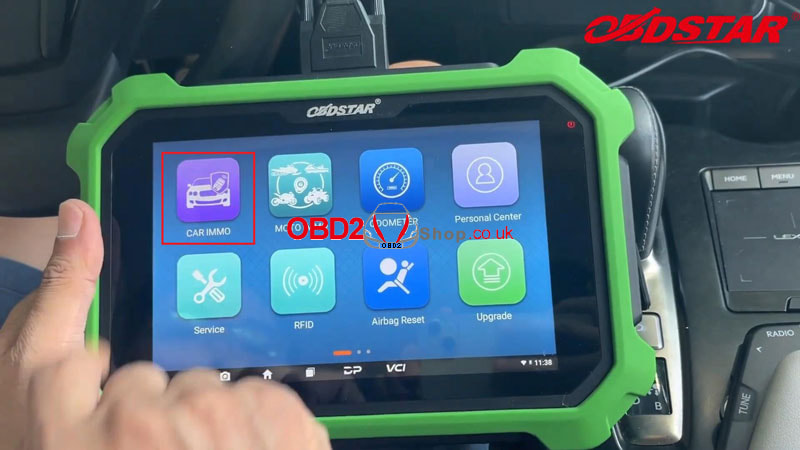
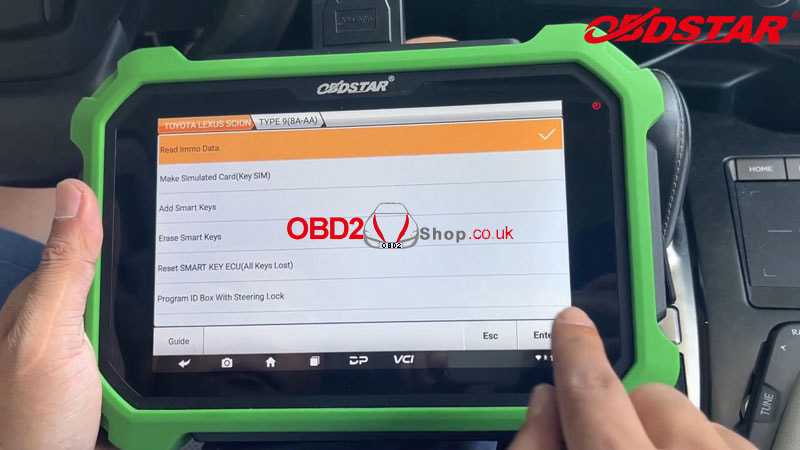
2. Make Simulated Key
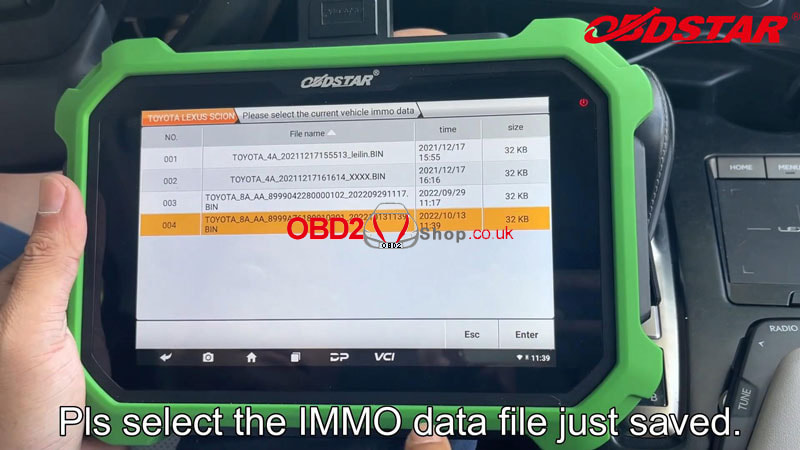
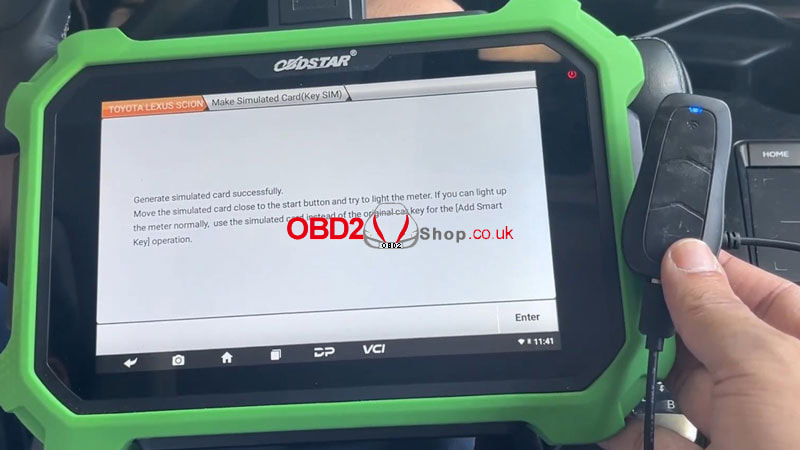
Make simulated card(Key SIM) >> Enter 1)This function can make simulated key when all the keys are lost; (note: simulated key needs to be kept charged, and it needs to be made again after the power is off) 2)The simulated key can replace the original car key to add keys, erase keys and other operations; 3)Has the current vehicle immo data been read? If the immo data is not read, please execute the immo data reading function first. Select the IMMO data file just saved. Connect Key Sim simulator. Loading...please wait Generate simulated card successfully. 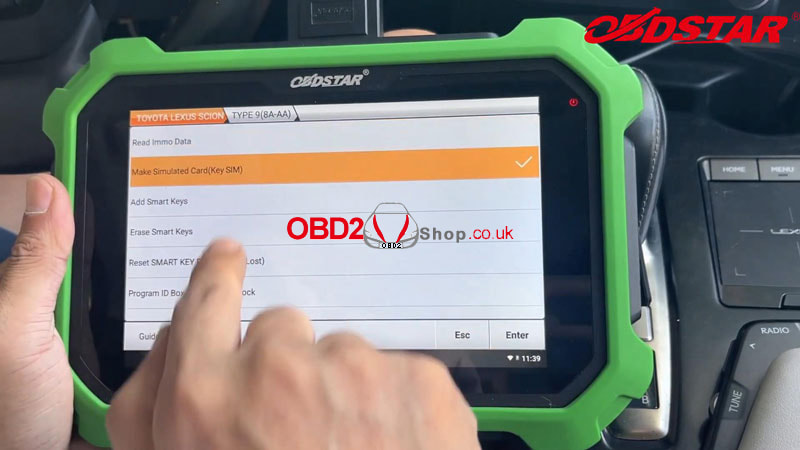
3. Add Smart Key
Move the simulated card close to the start button and try to light the meter. If you can light up the meter normally, use the simulated card instead of the original card key for the "Add smart key" operation. Restore IMMO smart box cable The simulated key makes engine started successfully. New keys can be added via IMMO data files as well(free pincode). 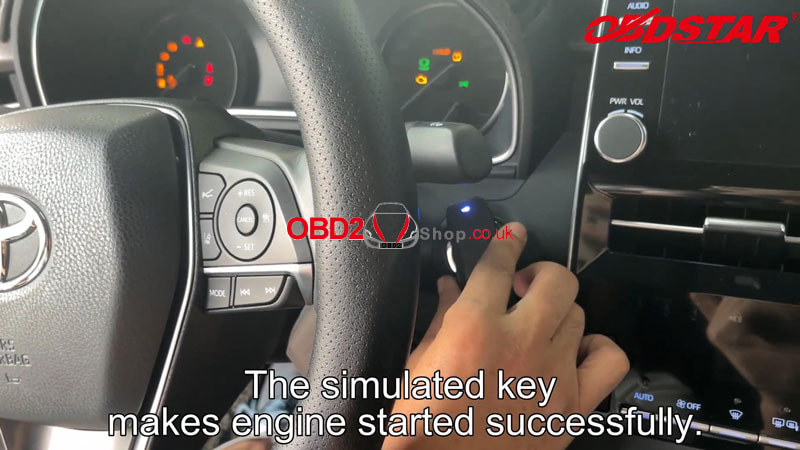
VNCI J2534 Nano is a device to work between diagnostic software & vehicle, compatible with J2534 Passthru & ELM327. There are a total of 6 software tested by VNCI NANO equipment, including: 1. ODIS V9.0 2. TIS V17.00 3. HDS V3.102 4. FORSCAN V2.3.48 5. PCMFLASH V1.2.0 6. SCANMASTER V2.1 Free Download VNCI NANO Software VAG ODIS: https://mega.nz/file/aihm0AIT#_YgcOUa9QUxrg92PFo1rK0zU-Gx-Wy_7B2iCC49QiO4 Toyota 17.00.00/17.20.013: https://mega.nz/file/6ZABzbxS#PNHECjMr1S7mDMGWuOOK-6icrSV5cFsL2FbZONEg01c HDS HONDA 3.104.024: https://mega.nz/file/JgtEkb4K#jDs8le68Bz6soLyJ9H7LB061C3_BvbKgnIwA1dp7JzE JLR SDD 163: https://mega.nz/file/DJ4FySzY#n8sa8xFRArey0k8XeK8KAERioOmO7u7knf5DrQHAhmk Forscan 2.3.48: https://mega.nz/file/XQ4kAQBI#4CujUR7XKRnQ0_MsXcQvryumnHruPmy9qNdpahqIeYQ SCANMASTER v2.1: https://mega.nz/file/PQpynZDD#mNdKmUxh6FHqGUdvb8LQEJgb5Y3_W4X_-I7uXVK1hdo FCMFLASH 1.20: https://mega.nz/file/TIw1EBwY#hIclEWBhhU9ByjLgoQrCRG8VRTOb82I0m51oEGyxiPQ VNCI NANO driver: https://mega.nz/file/iERnEL7R#KEEKbXzuHx7spOV-3fRz1EkEbJHemANwGjHv1fXq7Bk NOTE: Each software needs to select the VNCI NANO interface when using it, among which the anti-theft function of HDS software needs to change the registry before it can be used. The Volkswagen ODIS software is difficult to install and needs to be solved by the customer. Do not change the installation path of all software during installation. By default, they are installed on the C drive. All software needs to install the VNCI NANO driver when using it. Operation Methods of All Software in VNCI NANO Honda 1. Unzip "hds3v102.zip" package; 2. Open the "hds" folder, find the "setup.exe" program to run it; 3. When the option to select a region pops up, the USA must be selected; 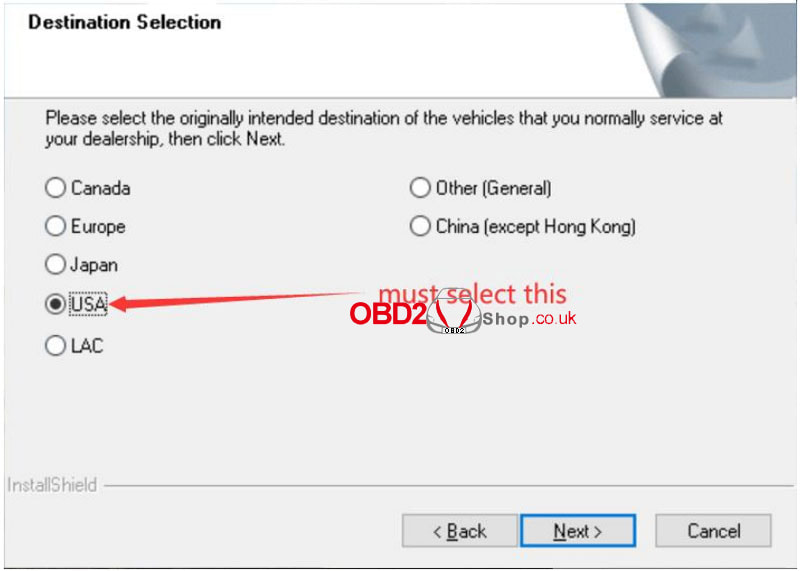 4. After installation is completed, you should change the interface settings for the first time to run HDS software: Default DTC information: must select "RKW-VNCI Nano"; 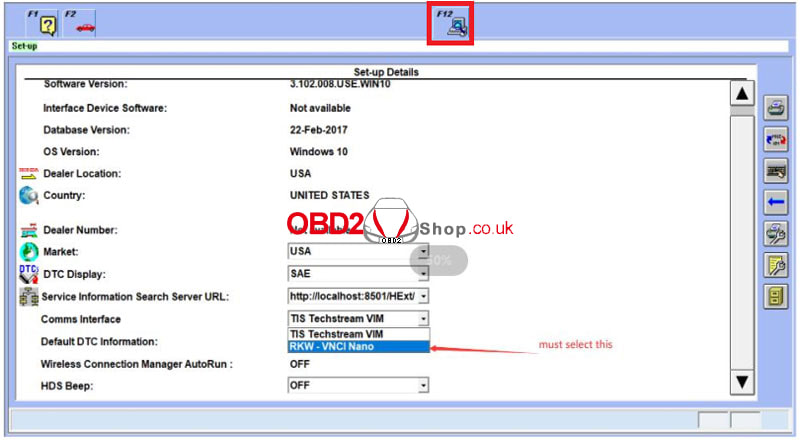 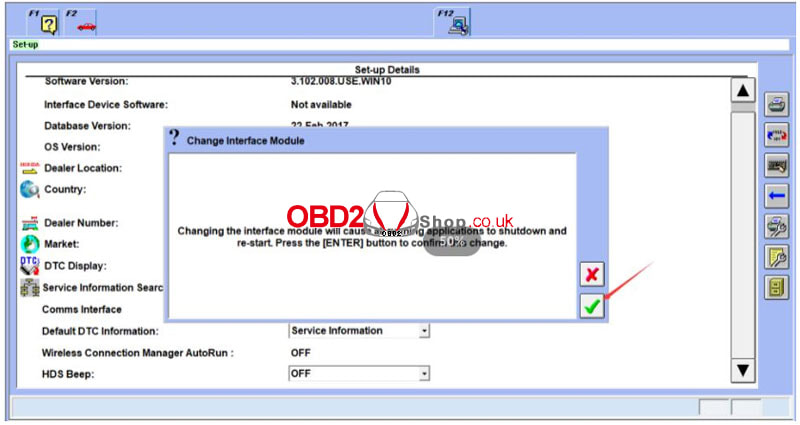 5. The device can be normally used when the content below is displayed.  Customers who need to use the HDS anti-theft function, they also need to change the registration information before they can be used. Operation steps: 1. Search Regedit on the shortcut bar of the computer, and enter the Registry Editor. 2. Find: the corresponding directory, and change the value data to 200000. There are 2 changes in total. After the change, connect the vehicle and enter the software, there will be an anti-theft option, and if it is not changed, there will be no anti-theft option. 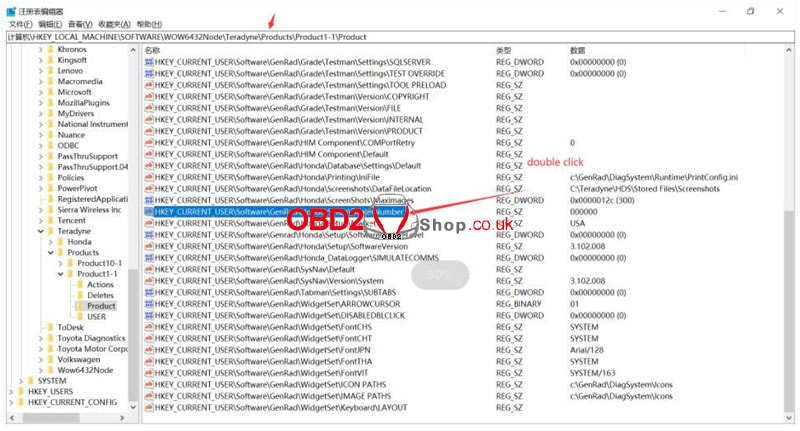 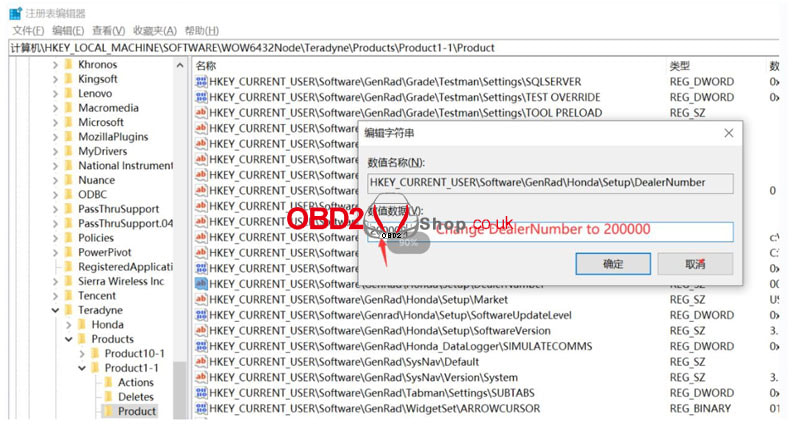 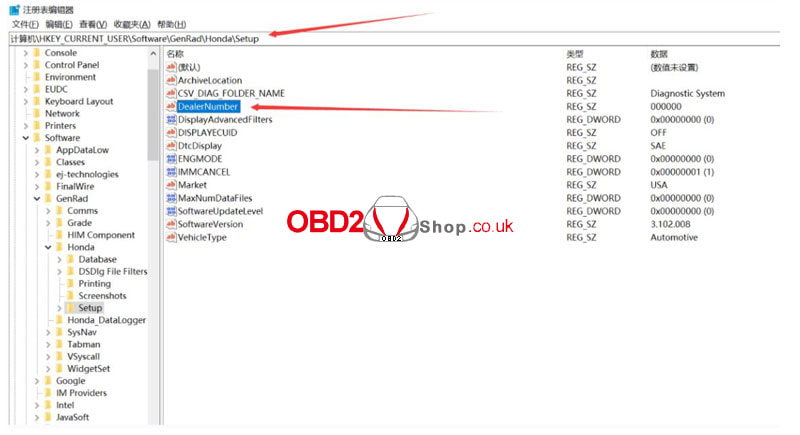 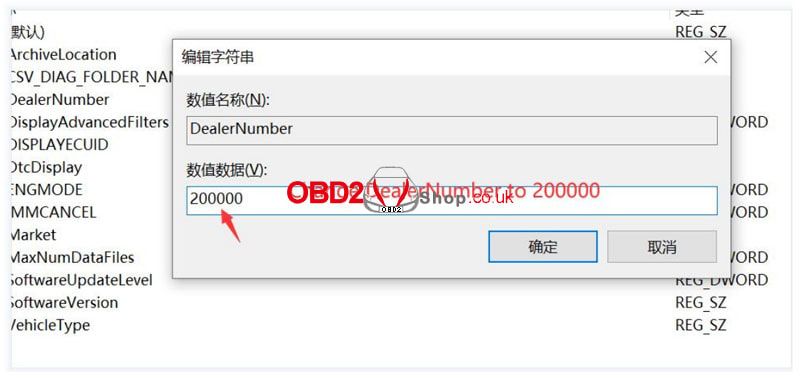 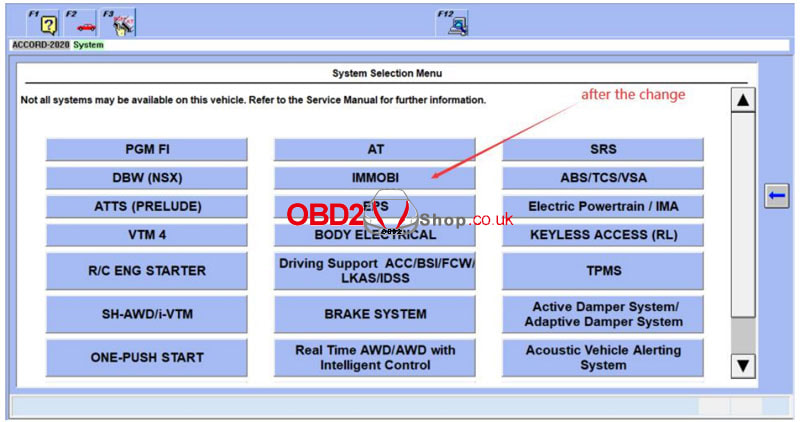 TIS 1. Complete installation: Run "Techstream_Setup_V17.00.020.exe" >> Next; 2. You will be prompted to select an area for the first time using, just select the area corresponding to the vehicle, and you can also change it in the software later: Setup >> Techstream Configuration >> Area Selection; 3. When registering, confirm the area -- software version number - each area needs to be registered for the first time using, and the registration time can be selected at will; 4. After the registration is completed, you need to select the VNCI NANO interface before using: Setup >> VIM Select >> RKW-VNCI Nano 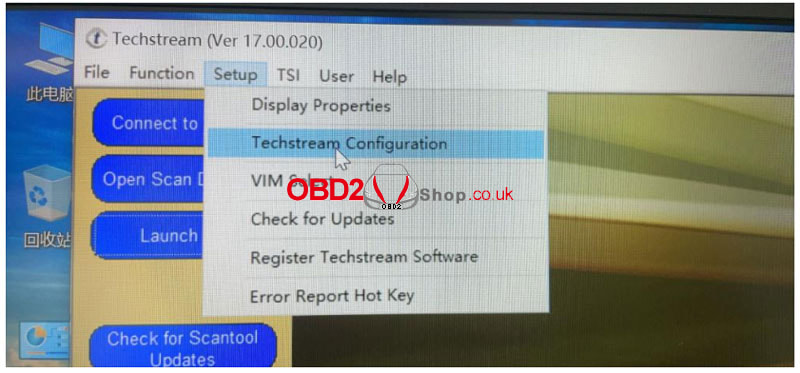 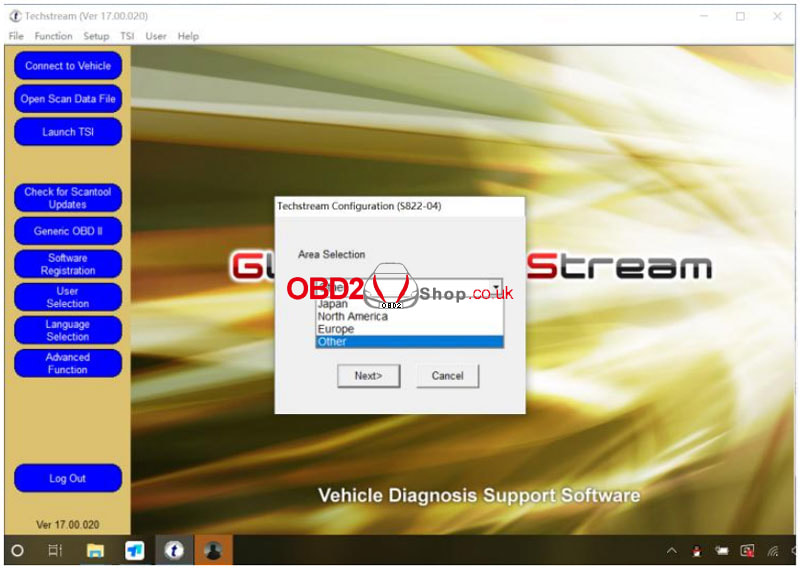 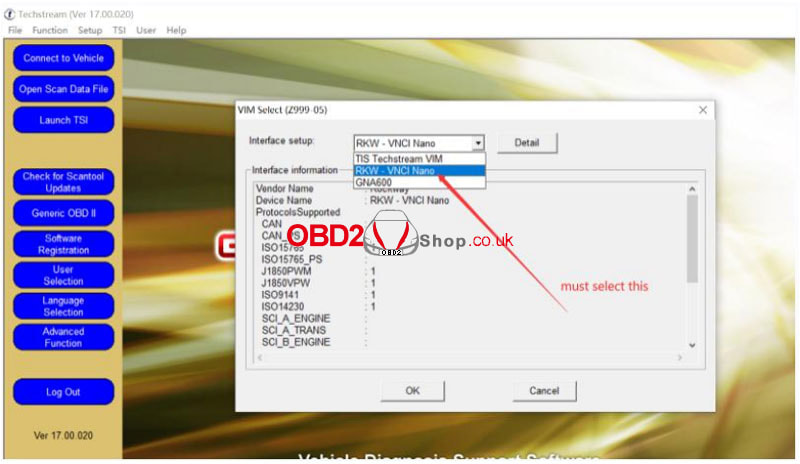 PCMFLASH 1. PCMFLASH software is special and needs to be solved by the customers themselves. 2. After the installation is complete, select the VNCI NANO interface to use. 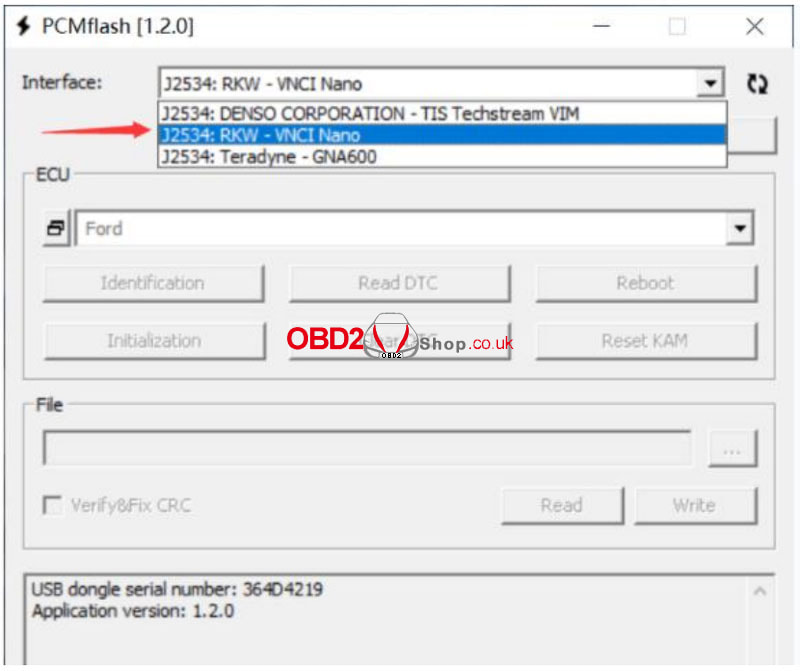 FORSCAN 1. Install "FORScanSetup2.3.48.release.exe"; 2. Select the VNCI NANO interface to use. 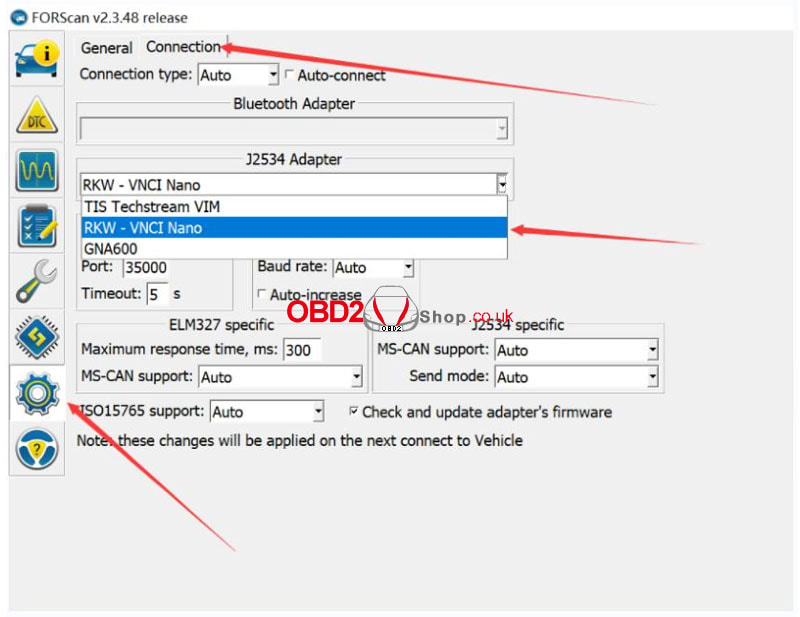 SCANMASTER Note: Please turn off anti-virus software during installation. The specific registration steps and installation steps are described in detail in the SCANMASTER software installation package. 1. Open "ScanMaster-ELM v2.1" folder; 2.Click to install "ScanMaster-ELM v2.1"; 3. Open "ScanMaster-ELM" to copy install code, then paste it in "KeyGen-scanmaster" to get the registration code; 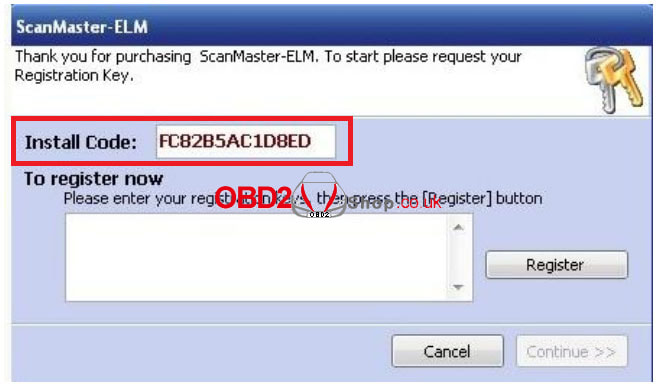 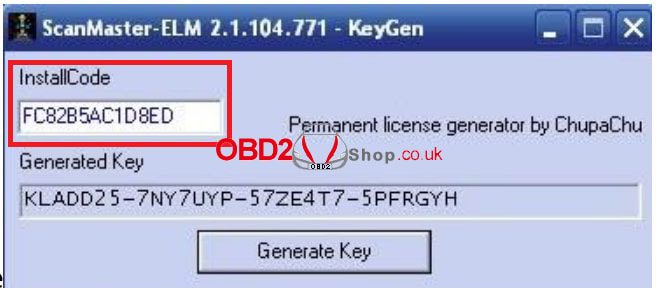 4. Click on the desktop "ScanMaster-ELM", enter the obtained registration code; 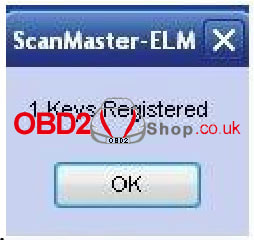 5. Click on the desktop "ScanMaster-ELM", when the interface appears, the registration is successful. 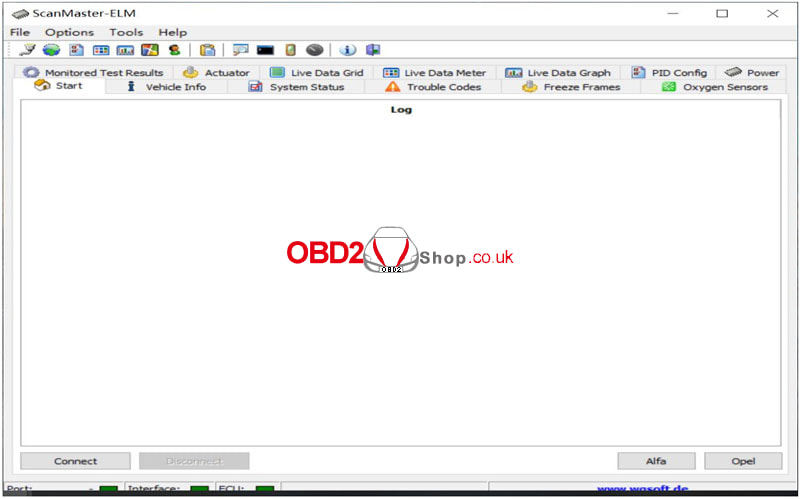 ODIS 1. Due to the troublesome installation method of ODIS software, we will not install it. We cannot provide the installation method for the time being. If you can install this software, please share the installation steps with us. 2. After the ODIS software is installed, choose to switch to the VNCI NANO interface to use it. 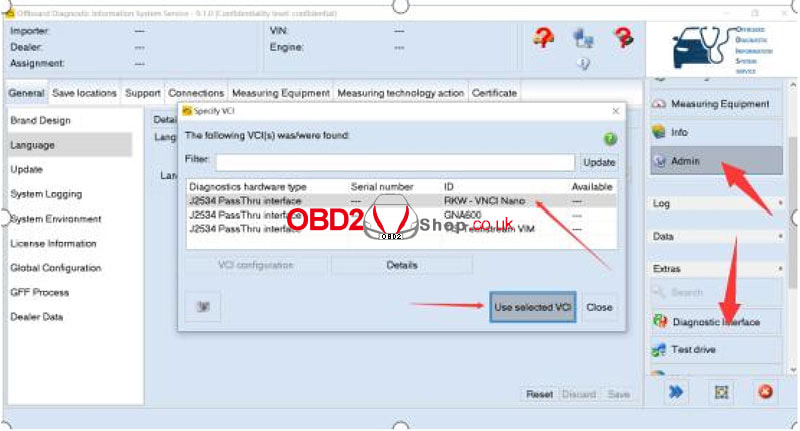
ACDP module 28 supports Jaguar, Land Rover, Chrysler, Dodge, Fiat, Honda, Jeep, and other models of the ZF-9HP gearbox computer BOOT mode clone.
This post will take JLR as an example to make the ZF-9HP gearbox cone with ACDP Master and module 28. Check all the accessories we need. 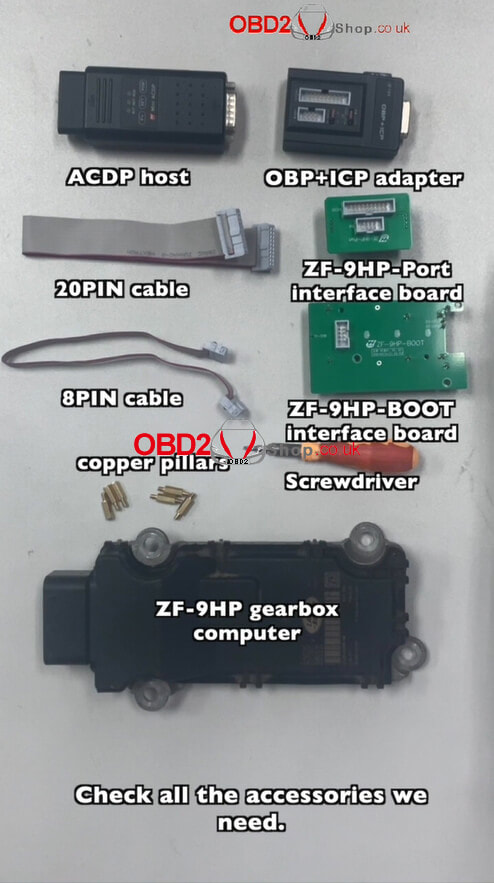
Step 1. Connect and install
Disassembling the ZF-9HP gearbox computer case. Remove the 3 screws of the interface board. Install the copper pillars. 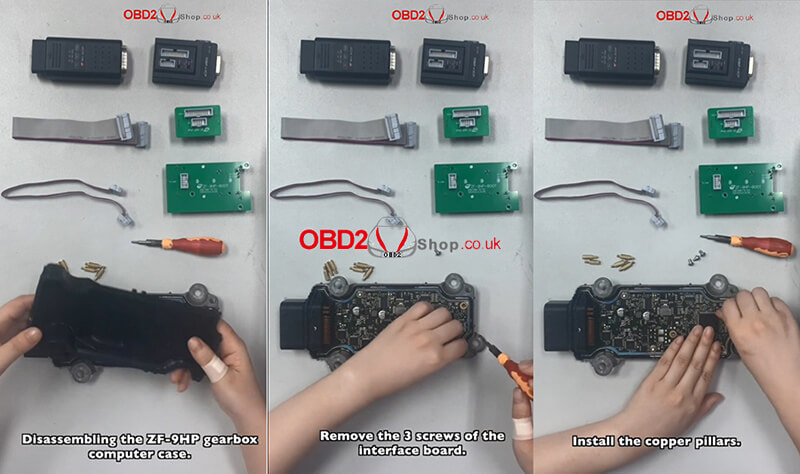
Put the CPU positioning frame on the CPU.
Install the ZF-9HP BOOT interface board. Then lock the board with copper pillars. Install the ZF-9HP Port interface board, and connect two interface boards with an 8PIN cable. 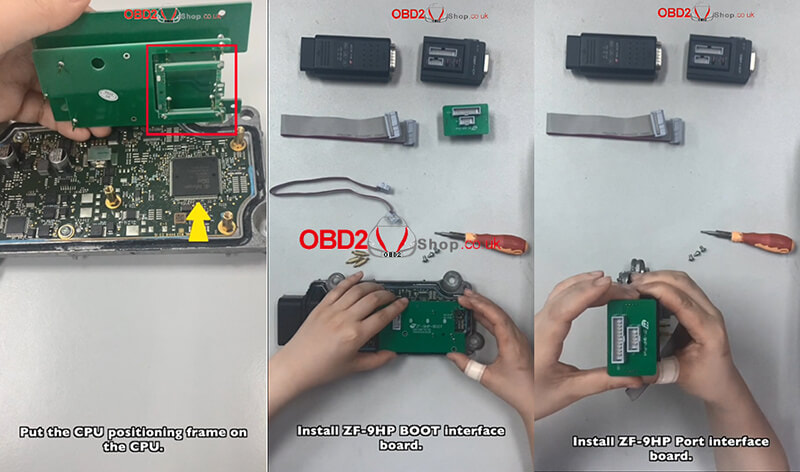
Connect the OBP+ICP adapter with the 20PIN cable.
Short the CAN resistor on the OBP+ICP adapter to the "CAN-R-JOIN" side. Connect the ACDP host. 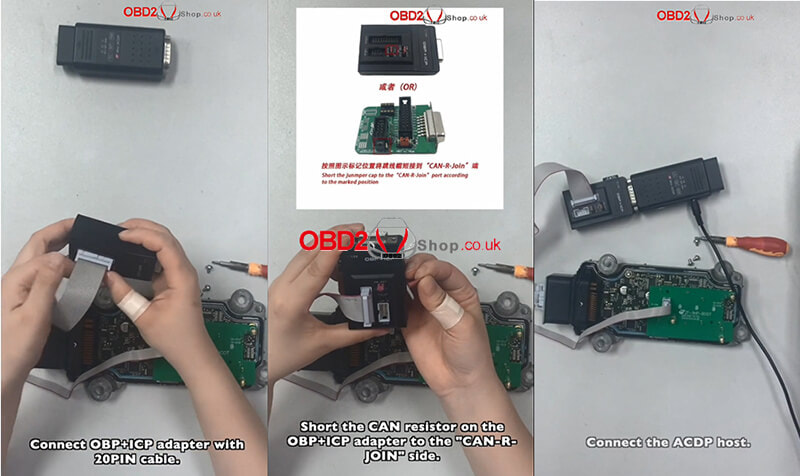
For more detailed installation steps, please refer to the video:
Step 2. Identify
Open ACDP APP, select "Jaguar/LangRover" >> "Gearbox Clone" >> ZF-9HP(BOOT) 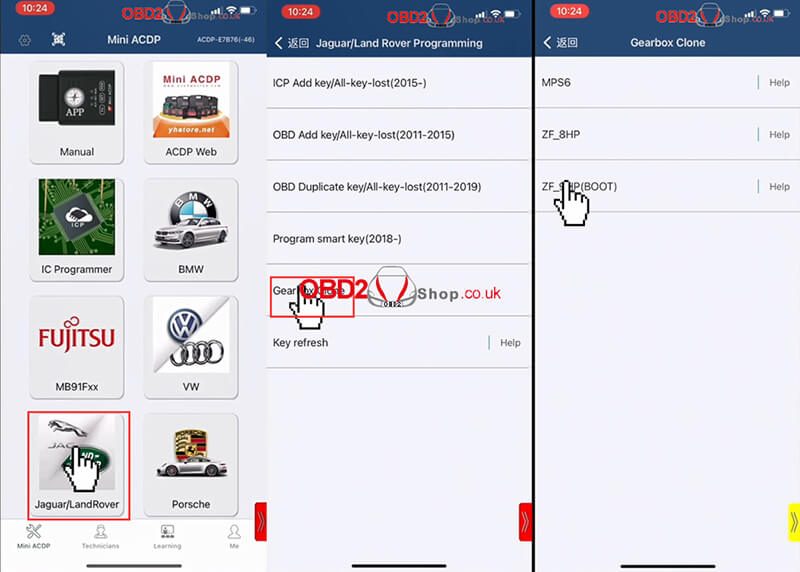
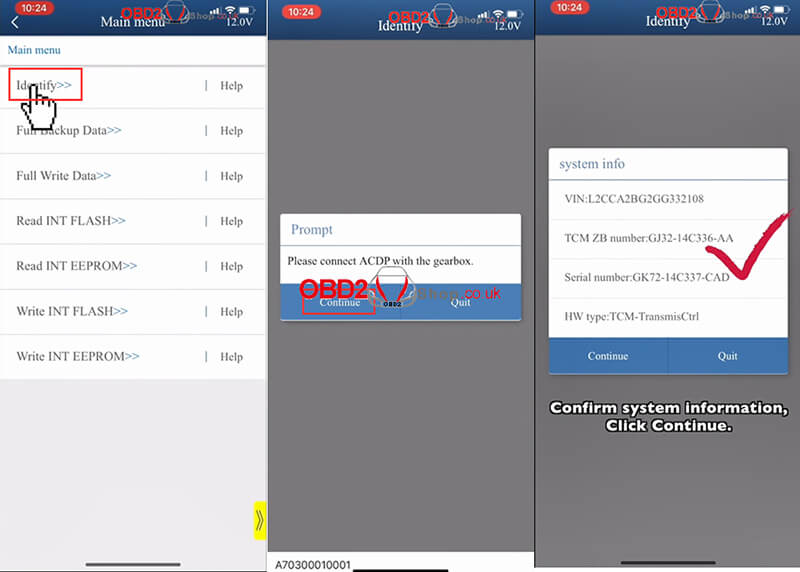
Choose "Identify", confirm system information, and click "Continue".
BOOT point pin detection passed, click"Continue".
Confirm the system information and click "OK". Identify system info finished. 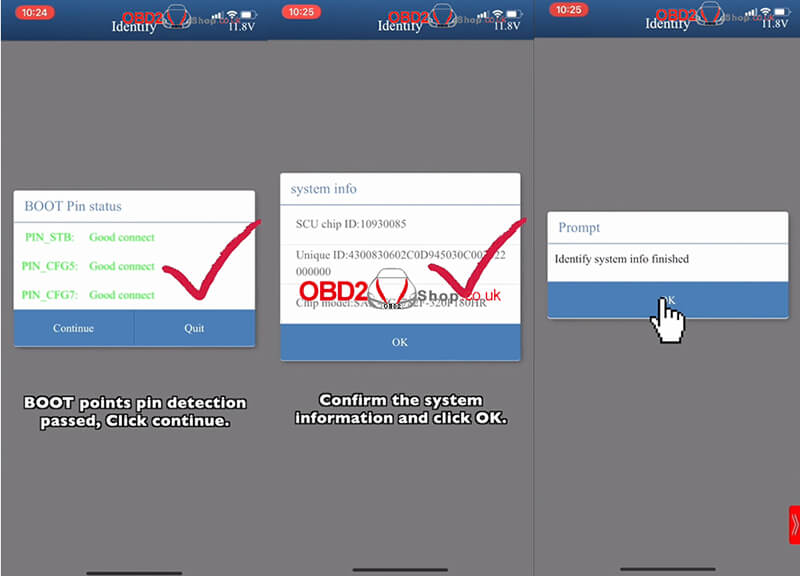
Step 3. Full Backup Data
Choose "Full Backup Data", BOOT point pin detection passed, and click"Continue". 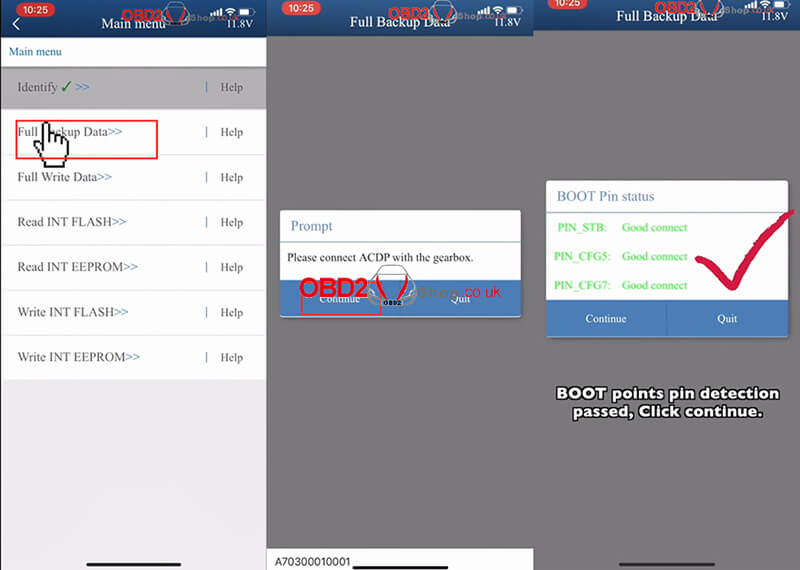
Confirm system information, and click "Continue".
Reading chip data... Save chip data, and click "OK". Reading chip data finished. 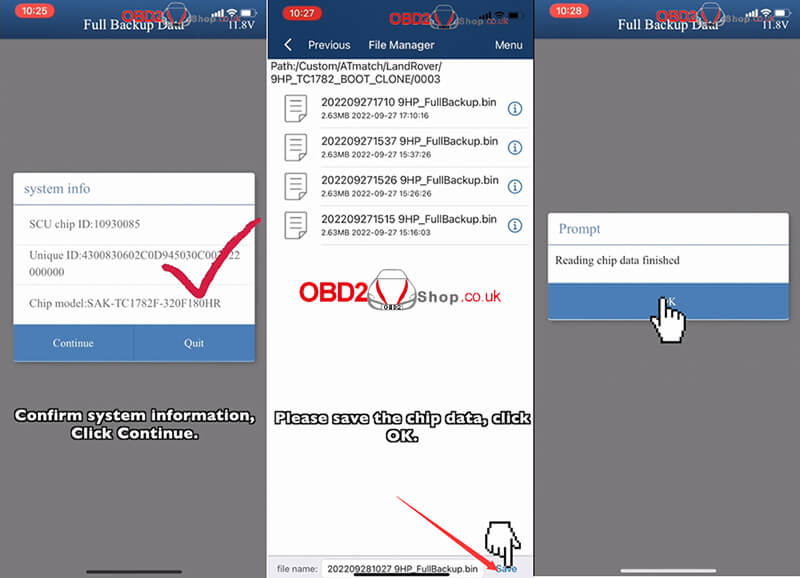
Step 4. Full Write Data
Connect another ZF-9HP gearbox computer. 
Then choose "Full Write Data"
BOOT point pin detection passed, click"Continue". 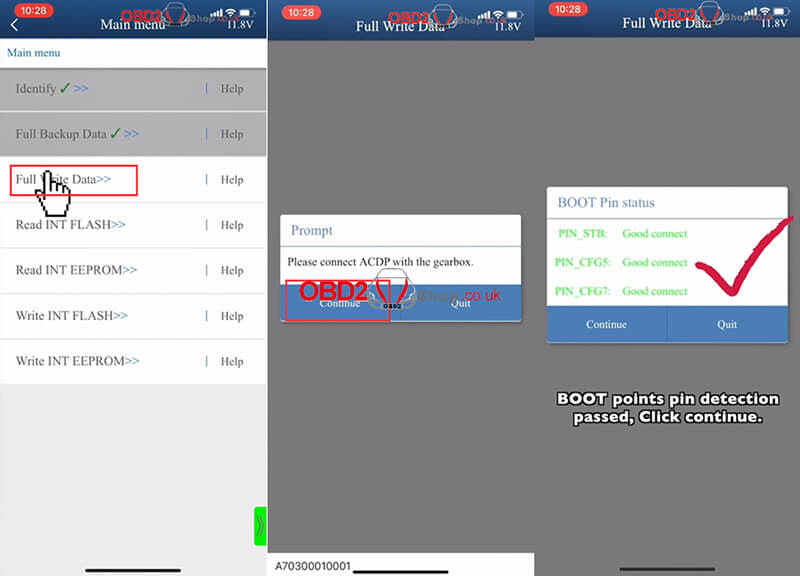
Confirm system information, and click "Continue".
Select chip data: click the chip data file saved in Step 3. Ready to write chip data, please don't cut the power nor pull out the device during the programming! 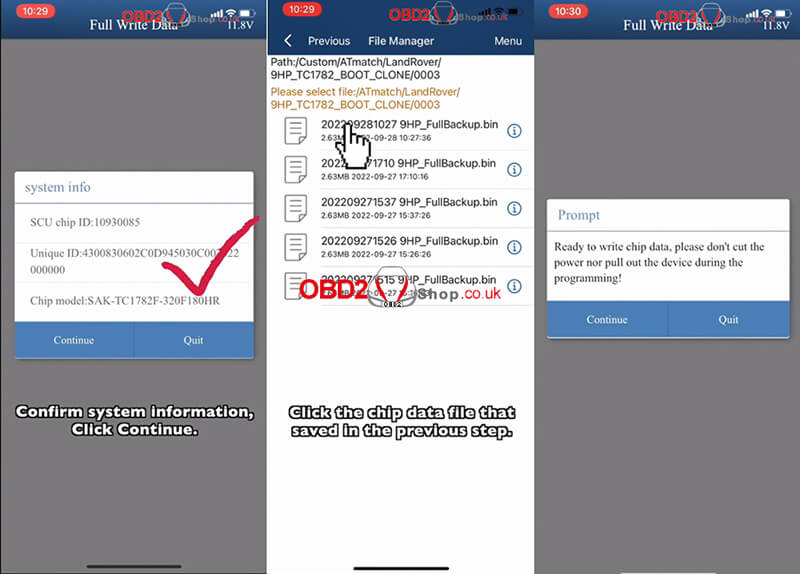
Writing chip data...
Writing chip data finished. 
Problem: After installing the KT200 software, it cannot be opened or reinstalled and the message "Cannot find 'DFB2XX.dll'" is displayed. What should I do?  Solution: Copy the DFB2XX.dll file to the C:\Windows\SysWOW 64 directory, if it is a 32-bit system, the path is C:\Windows\System32
DFB2XX.dll file Download free: https://mega.nz/file/t4xmhIoC#BBzV4tnoacSGA3vB-AwQDVP7gzWwT7ouSd2-yqm_Qqk Note: The files in this link are compressed packages, which must be unzipped before replacement. For more technical support, please follow http://blog.obd2shop.co.uk/ Here www.obd2shop.co.uk provide the latest version of KTM200 10.01 software with free download link and ECU supported update content. Where to free download KT200 10.01 https://mega.nz/file/MKd03YQA#wpv1vARRRYNx9dERkYbIIoPdoaEMrVErVVLRUJYJP4k Size: 885.6MB Operating system: Win7, Win8/8.1, Win10, Win11 KTM200 ECU Programmer New Features Tricore Clone Automatic Function Added automatism to clone the following control units with OTP zone adaptation and password: - MED17.5 AUDI - MED17.5.25 AUDI - MEVD17.4.2 CITROEN - EDC17 C08 HYUNDAI - EDC17 C53 HYUNDAI - EDC17 C08 KIA - EDC17 C53 KIA - EDC17 C66 MERCEDES BENZ - MEVD17.4.2 PEUGEOT - MED17.5 SEAT - MED17.5.25 SEAT - MED17.5 SKODA - MED17.5.25 SKODA - ME17.9.20 SMART - EDC17 C73 TOYOTA - MED17.5 VOLKSWAGEN - MED17.5.25 VOLKSWAGEN New full system for Mercedes truck & CLAAS continental ACM/MCM Until now, the K-line MCM2 D1/D2 and ACM versions were supported. Full reading of MCM2.1 D3/D4 and ACM2.1 in CAN line is now also available. - Reading and writing Micro - Reading and writing EEPROM - Recovery - Checksum To enable full system communication in D4 hardware versions, it will be necessary to perform simple unlocking operations with the control unit open by performing bridges on the PCB. At the end it will be possible to close the control unit and read and write all the contents from the pinout. Follow the instructions in the operating manuals. 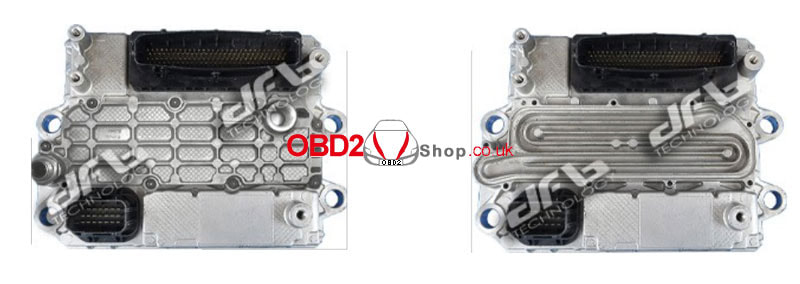 PSA HYBRID4 HV17.4 Bench Mode Per Centraline PSA HYBRID4 HV17.4 Full reading of Citroen/Peugeot HYBRID4 ECUs via pinout added. The ECU has 2 internal HCUs. - Reading and writing Micro HCU1 / HCU2 - Reading and writing EEPROM HCU1 / HCU2 - Recovery - Checksum 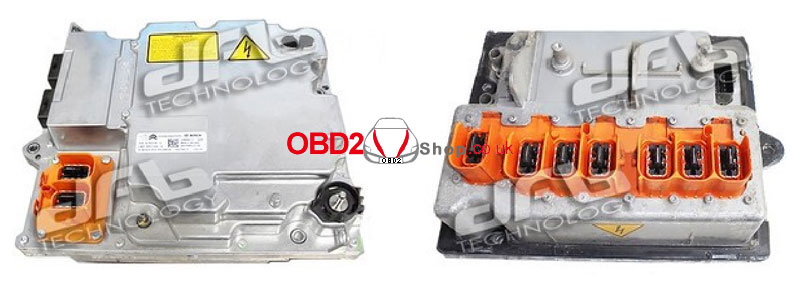 Boot Mode (BAM) for EMS S8 e CRD2 We have added new BOOT MODE (BAM) for complete control unit management on SCANIA: - CONTINENTAL EMS S8 and new BOOT MODE (BAM) for MERCEDES BENZ / FCA with control units: - DELPHI CRD2.xx (Versioni SOLENOID e PIEZOTEC) This makes reading and writing ECU in open mode easier compared to the previous JTAG mode (JTAG function still available). Furthermore, with this method, it's no longer necessary for Delphi CRD2.xx SOLENOIDs to open the ECU from the underside. - Reading Micro + Eeprom - Writing Micro + Eeprom - Recovery - Checksum 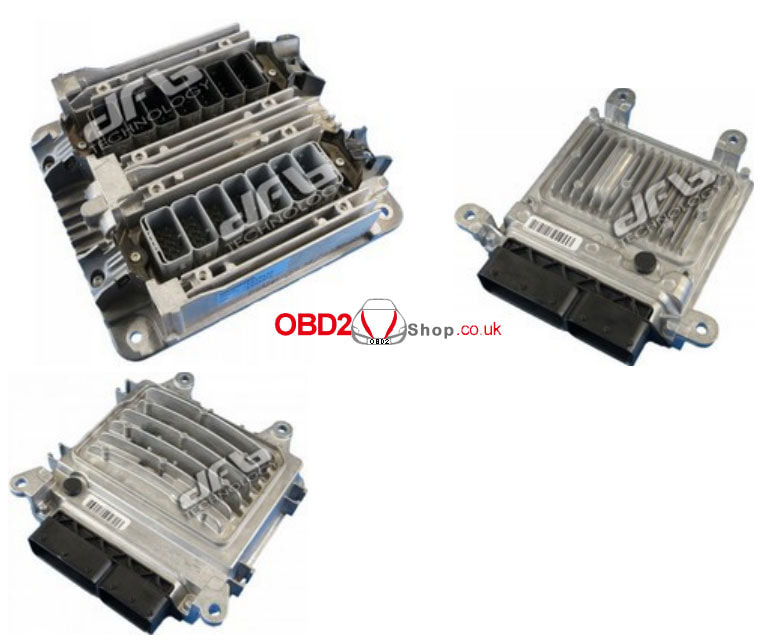 New Automatic Function: Tricore Clone Added automatism to clone the following control units with OTP zone adaptation and password: - BMW MEVD17.2.8 - BMW MEVD17.2.H - FIAT DCU17 PC42 - MERCEDES BENZ EDC17 CP10 - MERCEDES DCU17 PC42 - MINI MEVD17.2.8 - MINI MEVD17.2.H - RENAULT DCU17 PC42 - VOLVO EDC17 CP48 Continental GPEC2, GPEC3, GPEC4, GPEC4LM ! New BOOT MODE (BAM) for ECUs Continental GPEC fitted on vehicles FCA Fiat, Jeep, Chrysler, Dodge: - Continental GPEC2A - Continental GPEC3 - Continental GPEC4 - Continental GPEC4LM - Reading Micro + Eeprom - Writing Micro + Eeprom - Recovery - Checksum 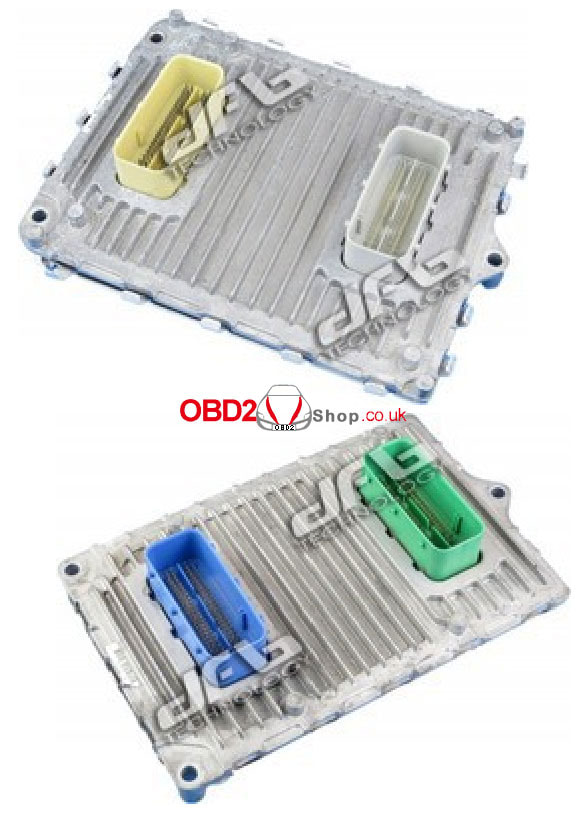 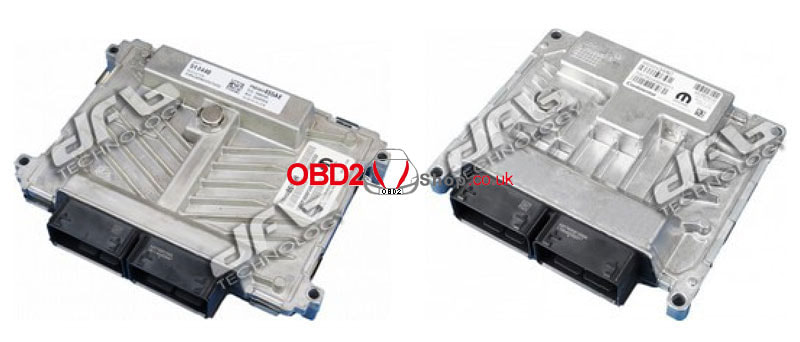 Cummins CM2200 Dodge Chrysler Added JTAG MODE for control unit Continental Cummins CM2200 for vehicles Dodge And Chrysler. - Reading - Writing - Recovery - Checksum  New Boot Modes For Delphi DCM7.1 A/B PSA Boot Mode Solution For Delphi ECU DCM7.1A / DCM7.1B Added New Boot Mode for micro AURIX TC297 for ECUs DCM7.1A and DCM7.1B mounted on PSA group cars. - Reading - Writing - Recovery - Checksum  Updates for JTAG - Bench - OBD - New boot via pinout for Mitsubishi Outlander 2.0 Petrol - Read and write - Recovery - Checksum Added JTAG mode for Adblue ACM Volvo Trucks Euro 6 control unit - Read - Writing - Recovery - Checksum  Added to the OBD driver for Marelli 9DF FCA also the VIRTUAL reading, in addition to the real reading already present.
Exclusive! - Full System for Marelli 9GF and 8GSW sw version from 2020 - Full System Marelli 9GF for software version from 2020 - Full System Marelli 8GSW for software version from 2020 Added new full system drivers for Marelli 9GF and Marelli 8GSW control units for versions with software update blocked since 2020. On these control units with updated software was no longer allowed the complete reading of micro and eeprom from pinout. Is now possible: read and write the complete content without opening the control unit. - Reading and writing Micro - Reading and writing EEPROM - Recovery - Checksum www.obd2shop.co.uk |
